

Surcharge: A Comprehensive Guide
Overview
The Surcharge module provides access to fee and surcharge configuration capabilities within the Gateway Management system of the Juspay payment platform. It offers centralized management of surcharge-related settings and configurations for payment processing through an integrated tab interface within the PG Control Center.
This module is designed for a wide range of users, including:
- Operations Teams: For configuring and managing surcharge settings across different payment methods and gateways to optimize transaction processing costs.
- Finance Teams: For setting up fee structures, surcharge calculations, and cost management policies that align with business objectives and revenue optimization.
- Business Teams: For implementing surcharge policies that support commercial agreements, pricing strategies, and customer experience optimization.
Accessing the Module
1. Log in to the Juspay dashboard.
2. From the main navigation menu on the left, click on PG Control Center.
3. Select Surcharge from the available tabs (4th tab in the sequence).
4. The navigation URL for this module is https://portal.juspay.in/gateways/surcharge![]()
Dashboard Overview
Main Interface Components
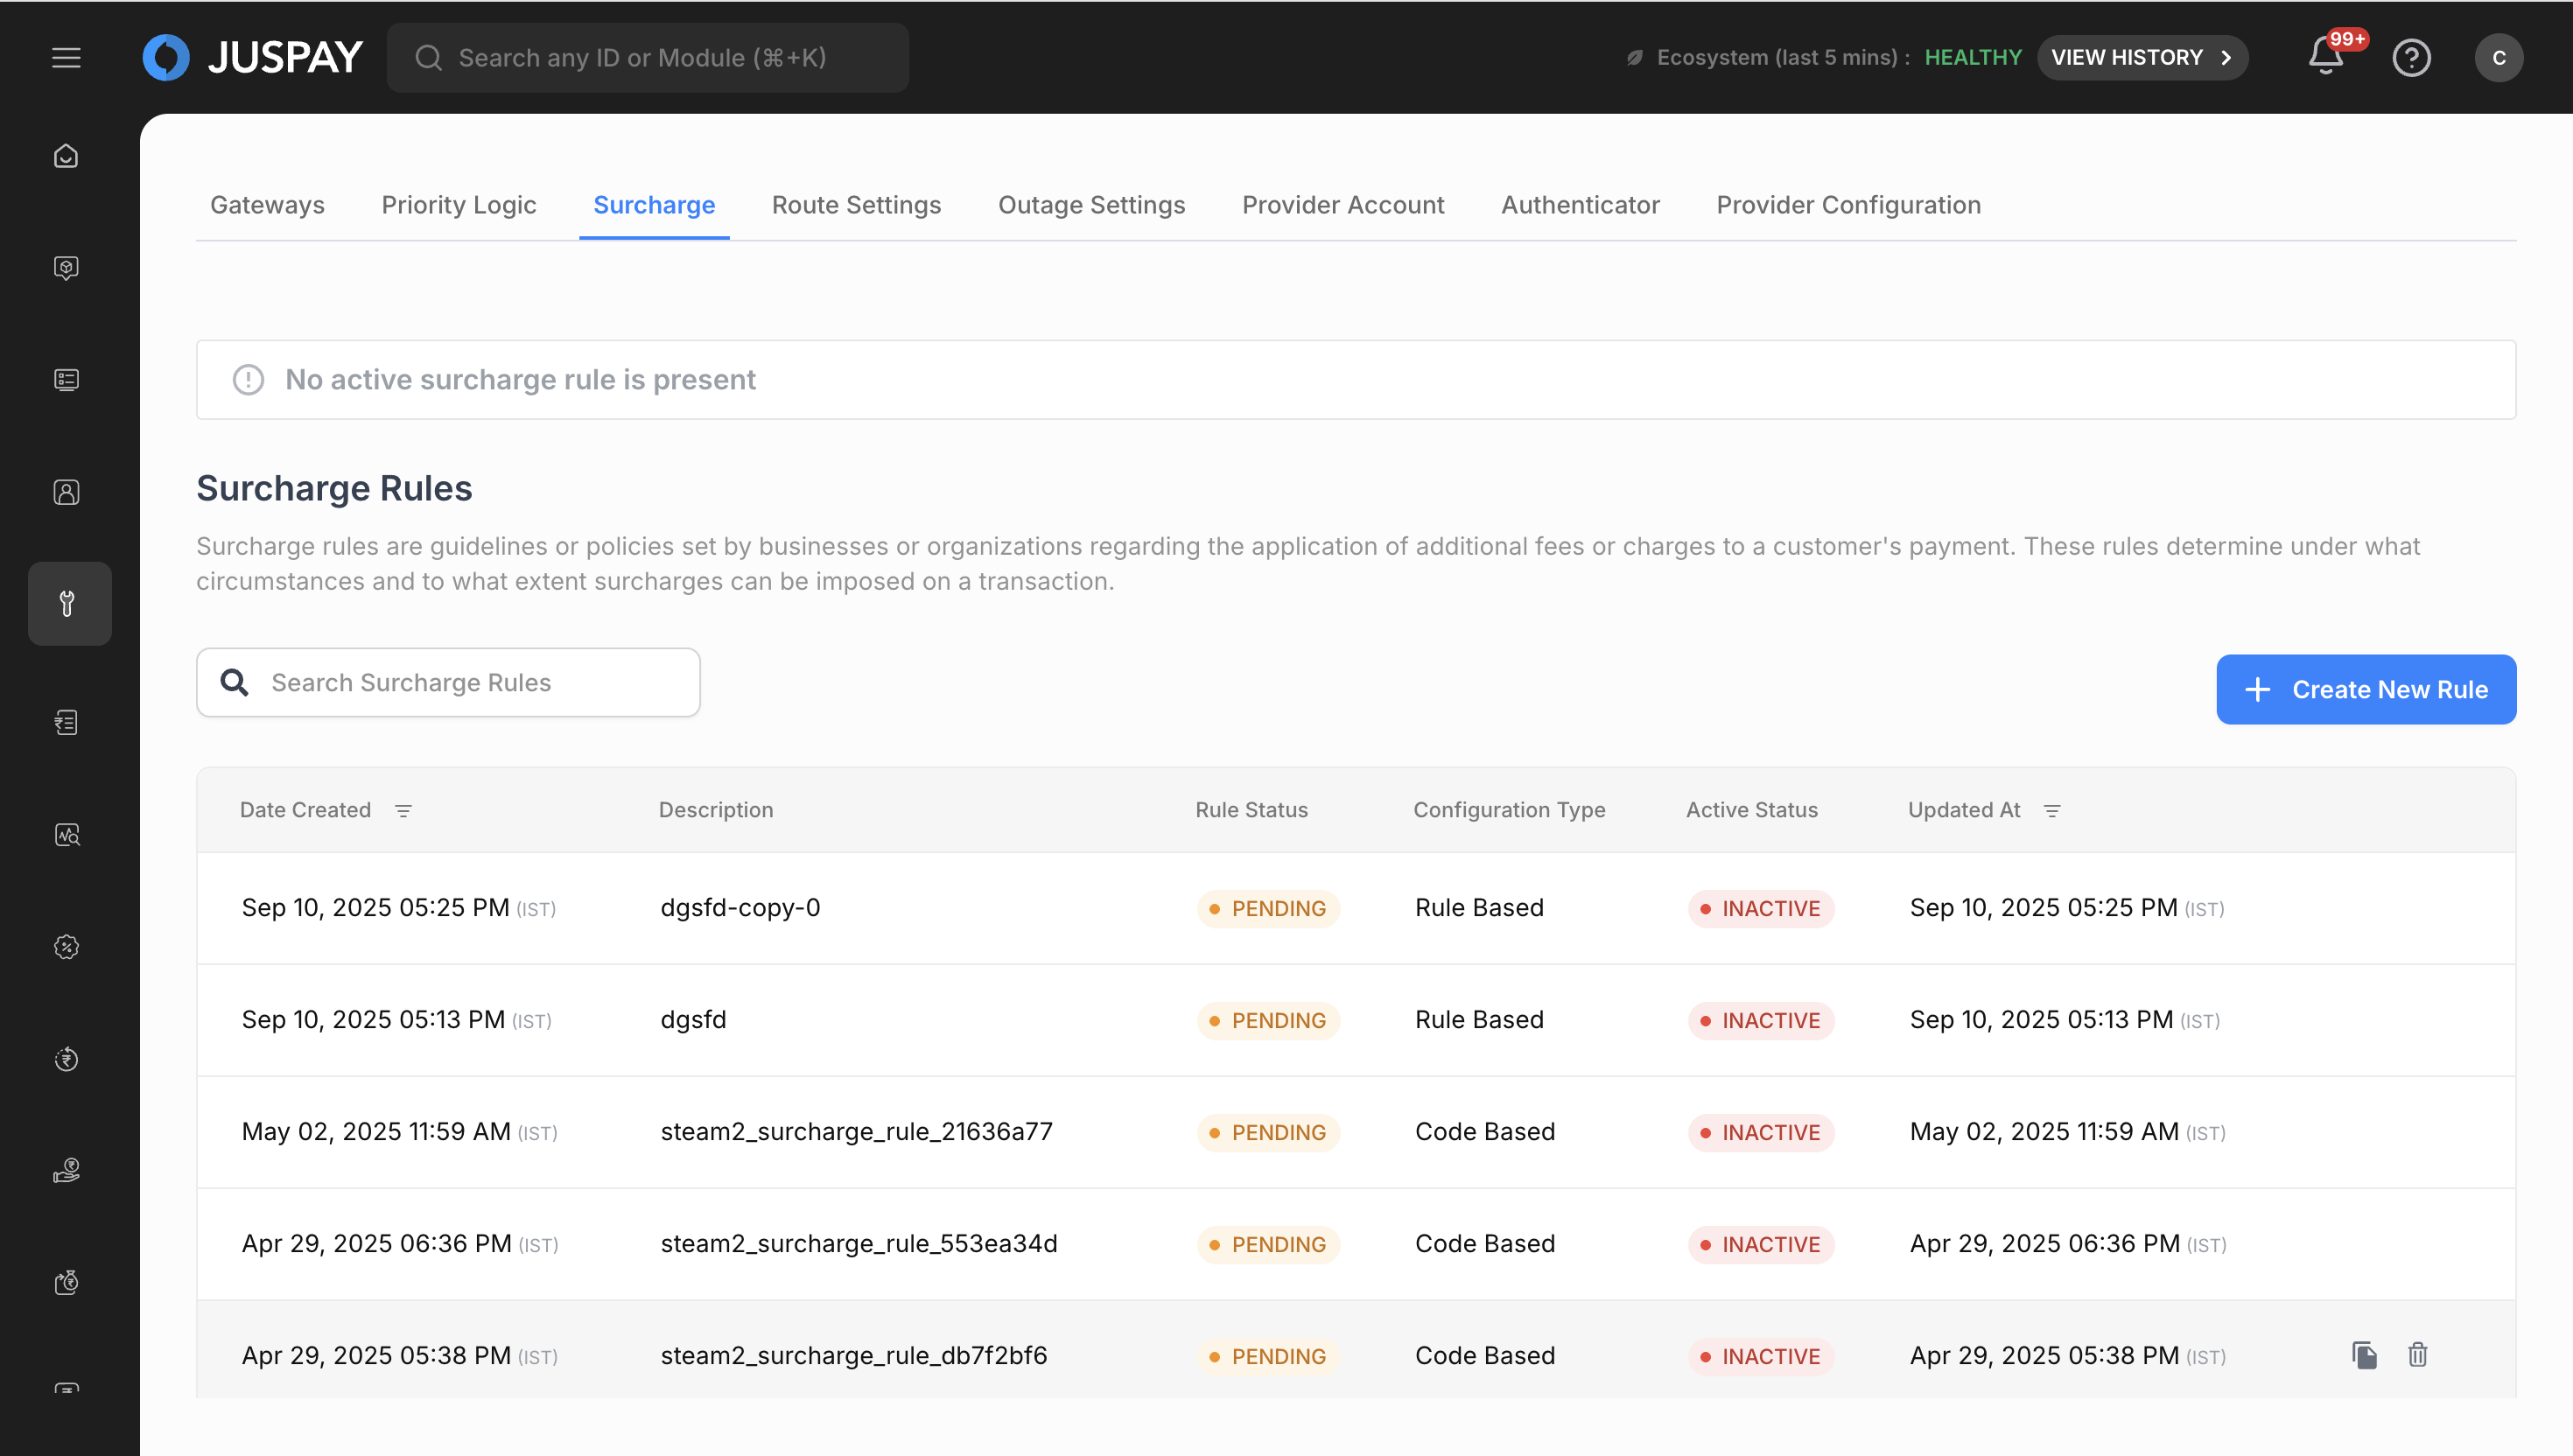
The Surcharge module displays two primary sections:
Active Surcharge Section
This section shows currently active surcharge configurations with real-time information:
- Active Surcharge Preview: Display of the currently active surcharge rule with its configuration details
- Rule Status: Shows whether a surcharge rule is currently active or if no active rule is present
- Configuration Summary: Brief overview of active surcharge settings including rates and conditions
Surcharge Rules Management
A comprehensive interface for managing all surcharge configurations with the following features:
- Rules List: Table listing all surcharge rules with their status, type, and creation details
- Add New Rule: Primary action button to create new surcharge configurations
- Rule Actions: Edit, copy, delete, and activate/deactivate existing rules
- Search and Filter: Tools to find specific surcharge rules quickly
Key Features
The Surcharge module provides:
- Intelligent Surcharge Rules: Configure smart surcharge logic based on multiple criteria
- Fee Management: Set up different surcharge rates for various payment methods and conditions
- Tax Compliance: Configure tax rates (CGST/SGST) for regulatory compliance
- Cost Recovery: Implement surcharges to recover payment processing costs
- Conditional Pricing: Apply surcharges based on transaction characteristics
- Real-time Configuration: Dynamic surcharge application based on current transaction context
Create New Surcharge Rule
The "Create new rule" feature is a comprehensive surcharge configuration tool that allows merchants to create intelligent surcharge rules for payment processing. This feature enables you to set up custom surcharge logic that determines how additional fees and charges are applied to payment transactions based on various business criteria and transaction characteristics.
Prerequisites and Permissions
Before creating Surcharge rules, ensure you have the appropriate access:
Required Permissions:
- Basic Access: gateways_surcharge ACL permission is required to access the Surcharge module
- Creation Rights: gateways_surcharge permission with ReadWrite access allows creation of new configurations
Core Purpose
Surcharge rules enable you to create custom fee structures that determine how additional charges are applied to payment transactions based on various business criteria, payment methods, and transaction characteristics.
Step-by-Step Rule Creation Instructions
Step 1: Initiate Rule Creation Process
1. Access Creation Interface
- From the Surcharge main page, click on "Add New Rule" button
- The system will open the rule creation interface
- Verify you have gateways_surcharge permission with ReadWrite access
Step 2: Basic Rule Configuration
1. Enter Rule Description
- Rule Description: Provide a unique, descriptive name for your surcharge rule (maximum 200 characters)
- Use clear, meaningful names that describe the rule's purpose
- Avoid duplicate names with existing rules
- Example: "Credit Card Processing Fee - Premium Customers"
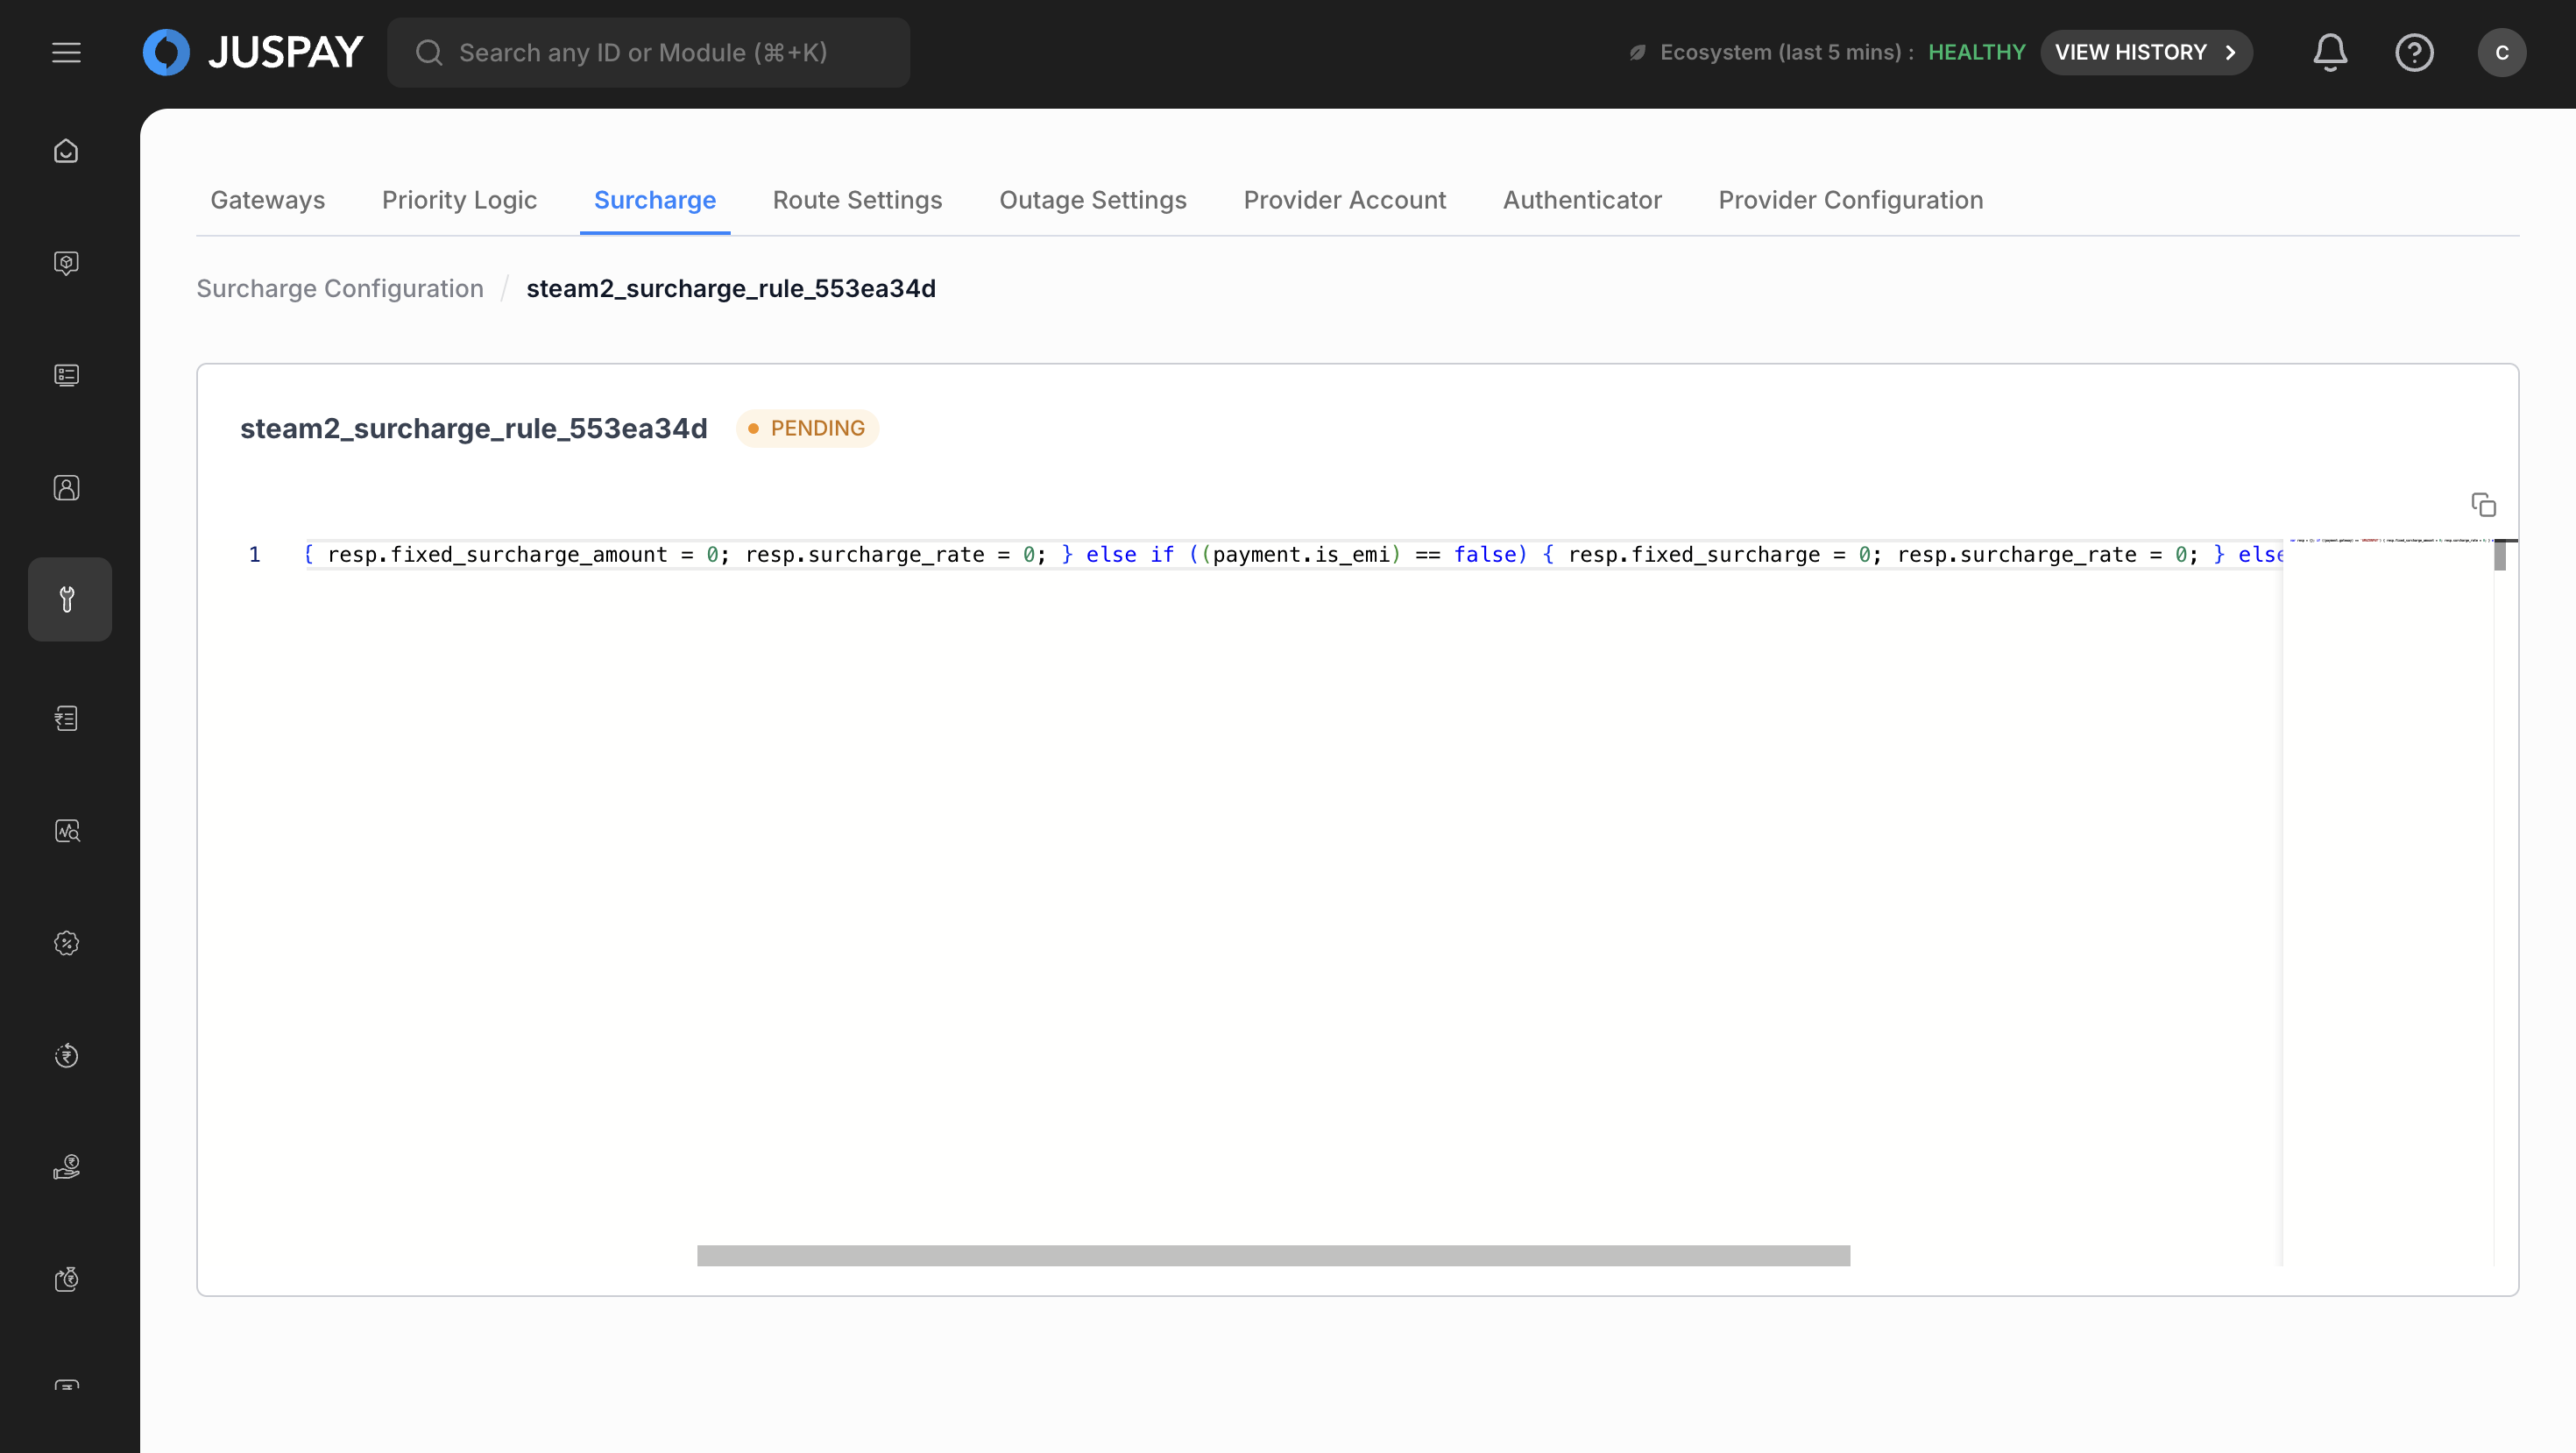
2. Select Configuration Type
- Rule-Based UI: Choose this for visual rule creation with drag-and-drop interface
- Code-Based UI: Select this for advanced JavaScript-based surcharge logic
- Consider your technical expertise and complexity requirements
- Rule-Based UI is recommended for most standard use cases
3. Proceed to Next Step
- Click "Next" button to proceed to rule configuration
- The system will validate your basic inputs before proceeding
- Address any validation errors before continuing
Step 3: Configure Surcharge Rules (Rule-Based UI)
1. Set Up Rule Conditions
- Click "Add Rule" to create your first surcharge rule
- Define conditions using the visual condition builder:
- Select field type (Payment Method, Transaction Amount, Card Issuer, etc.)
- Choose operator (equals, greater than, less than, contains, etc.)
- Enter or select values from dropdown lists
- Add multiple conditions using AND/OR logic operators
- Example: "Payment Method equals Credit Card AND Transaction Amount greater than 1000"
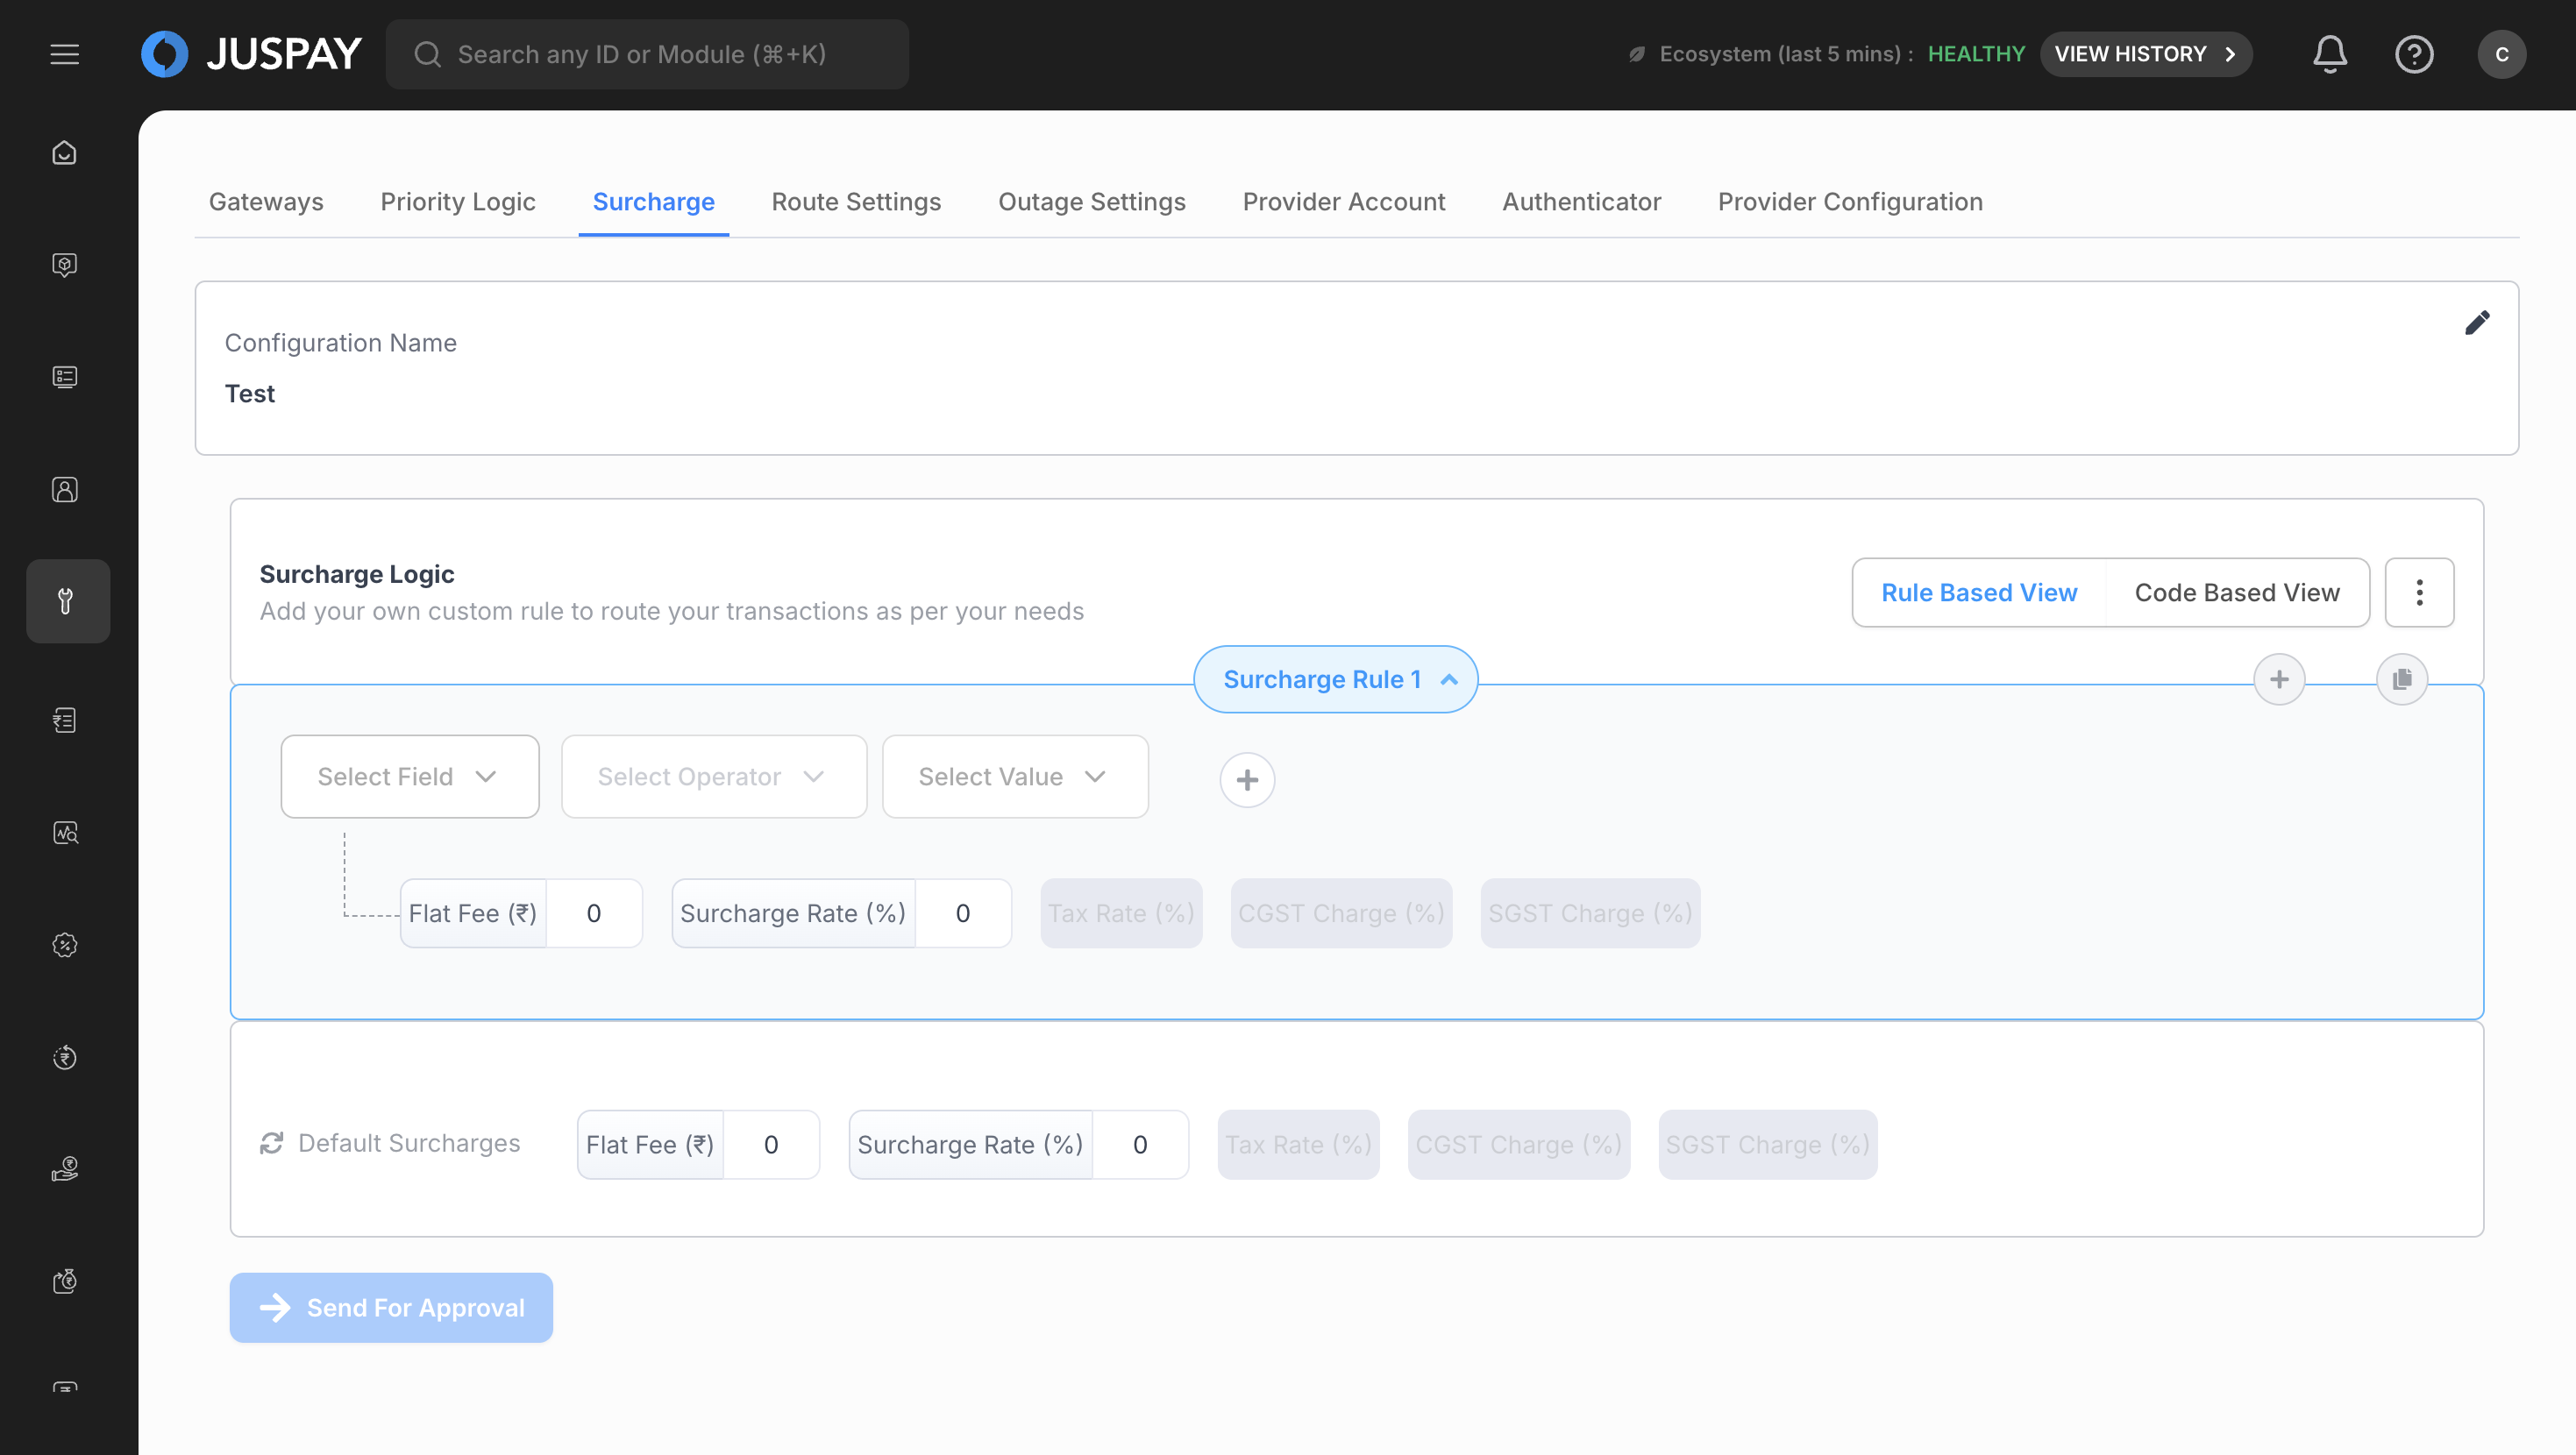
2. Configure Surcharge Fields
- Fixed Surcharge Amount (Flat Fee): Set specific amount in rupees (₹)
- Enter amount like "25" for ₹25 flat fee
- Use for covering fixed processing costs
- Surcharge Rate: Set percentage of transaction amount
- Enter percentage like "2.5" for 2.5% of transaction amount
- Use for proportional fee structures
- Tax Rate: Configure tax percentage for compliance
- Enter tax percentage for regulatory requirements
- Applied in addition to base surcharge amounts
- CGST: Set Central Goods and Services Tax percentage
- Configure for Indian tax compliance requirements
- SGST: Set State Goods and Services Tax percentage
- Configure for state-level tax compliance
3. Add Multiple Rules (Optional)
- Click "Add New Rule" to create additional rules
- Use "Copy Rule" to duplicate existing rules as templates
- Drag and drop rules to change priority order
- Each rule can have different conditions and surcharge configurations
4. Configure Default Surcharges
- Set up fallback surcharge values for when no rules match
- Configure default values for each surcharge type
- These values apply to transactions that don't match any specific rule
- Ensure default values align with your business policies
Step 4: Advanced Configuration (Code-Based UI)
1. Write Custom Surcharge Logic
- Use the JavaScript code editor with syntax highlighting
- Implement custom surcharge calculation algorithms
- Add complex conditional logic and mathematical operations
- Access transaction properties and customer data for calculations
2. Test and Validate Code
- Use the built-in validation tools to check syntax
- Test with sample transaction scenarios
- Verify mathematical accuracy of calculations
- Optimize code for performance and efficiency
Step 5: Validation and Review
1. Automatic Validation
- The system automatically validates rule logic and calculations
- Review validation results and address any errors or warnings
- Check for conflicts between multiple rules
- Ensure mathematical accuracy of surcharge calculations
2. Rule Testing
- Test rules with various transaction scenarios
- Verify surcharge application matches expectations
- Check edge cases and boundary conditions
- Validate tax calculations and compliance requirements
Step 6: Approval and Activation
1. Submit for Approval (if Maker-Checker is enabled)
- Review all rule configurations in the summary view
- Add approval comments and business justification
- Submit configuration for approval workflow
- Track approval status through system notifications
2. Choose Activation Method
- Immediate Activation: Activate immediately after approval
- Select this for urgent rule changes
- Ensure business readiness for immediate implementation
- Manual Activation: Activate manually at a later time
- Keep rule in approved but inactive state
- Activate when business conditions are optimal