

Batch Merchant
Overview
The Batch Merchant module provides comprehensive bulk merchant creation capabilities for onboarding multiple merchant accounts simultaneously through CSV file uploads and multi-stage configuration workflows. It offers real-time progress tracking, status monitoring, and detailed reporting for all merchant creation operations processed through the Juspay payment platform.
This module is designed for a wide range of users, including:
Operations Teams: For creating multiple merchant accounts in bulk and monitoring merchant onboarding performance across different reseller types and configurations with comprehensive operational logs and audit trails.
Reseller Management Teams: For bulk merchant account creation during partner onboarding, merchant provisioning, and tracking merchant creation operations across multiple business segments with detailed status reporting.
System Administrators: To process bulk merchant creation requests, manage access control configurations, and provide accurate updates on merchant account creation status and system access activation.
Accessing the Module
Log in to the Juspay dashboard.
From the main navigation menu on the left, navigate to the batch operations section.
Select Batch Merchant from the available batch operation tabs.
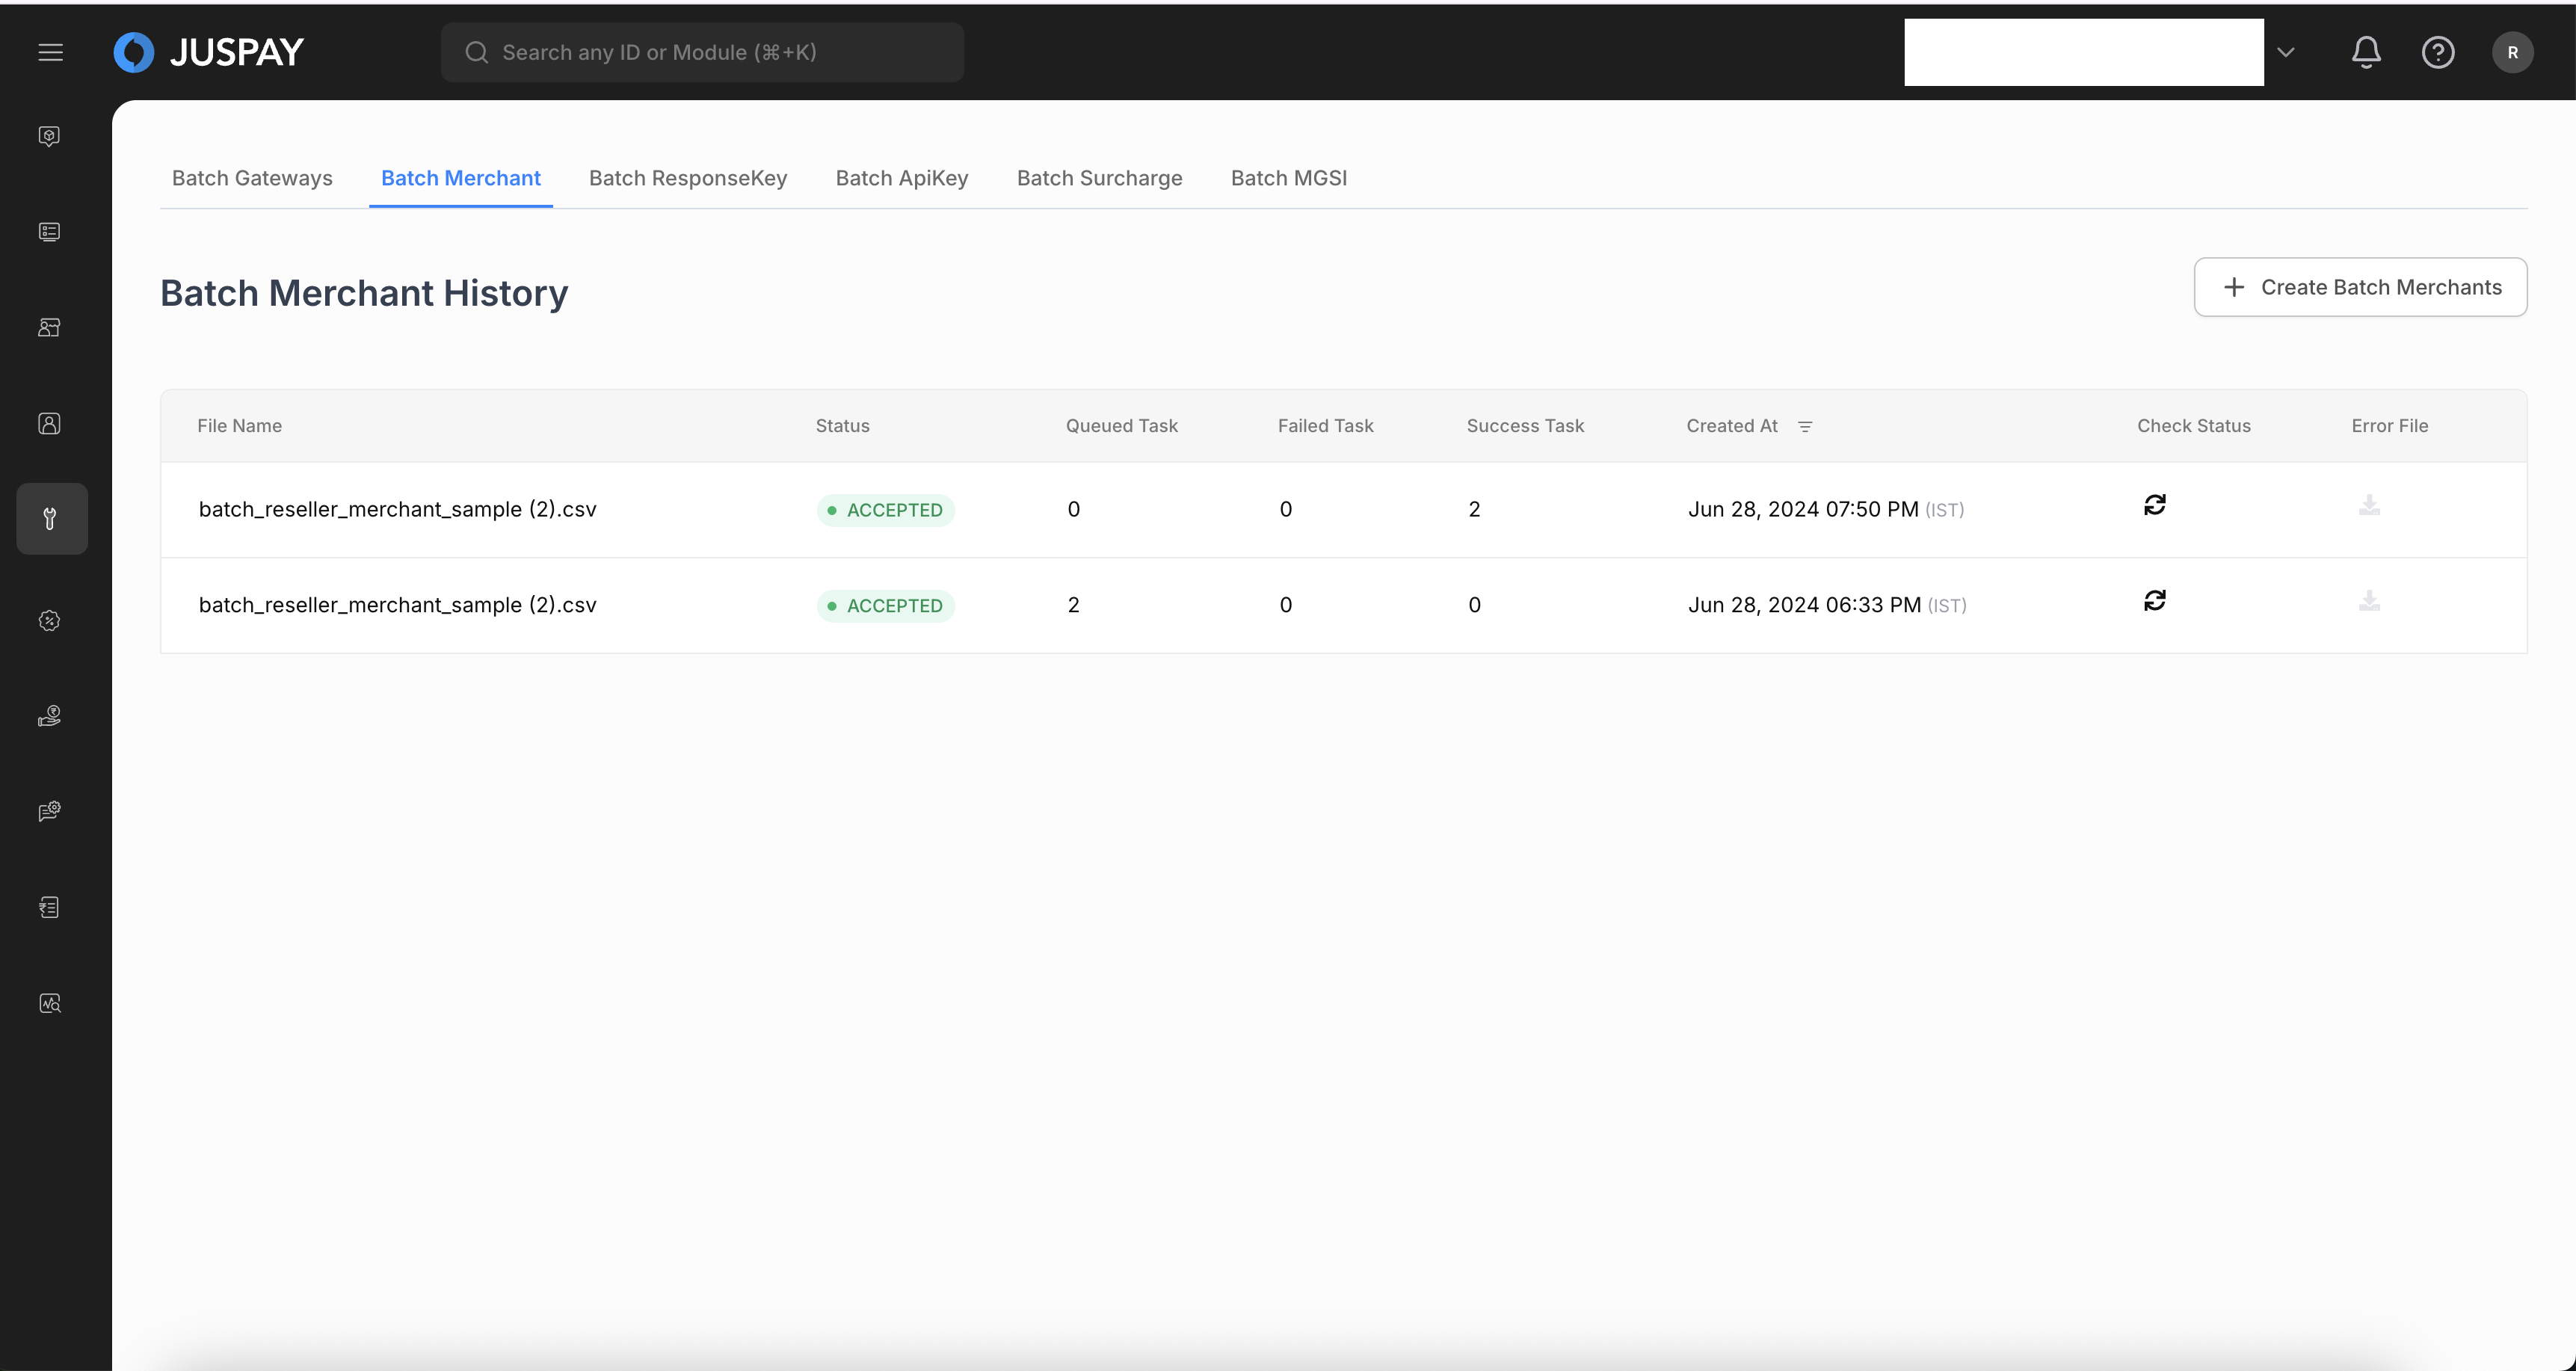
You will see the "Batch Merchant History" interface displaying previously uploaded batch files.
Click "Create Batch Merchants" to initiate a new batch merchant creation process.
The navigation URL for this module is https://portal.juspay.in/batch/merchant
 .
.
Step-by-Step Usage Instructions
Creating Batch Merchant Operations
Step 1: Access the Batch Merchant Interface
Navigate to the Batch Merchant module using the steps above.
You will see the main "Batch Merchant History" dashboard displaying any previously uploaded batch merchant files in a table format.
The interface shows columns for File Name, Status, Queued Task, Failed Task, Success Task, Created At, Check Status, and Error File.
Files are displayed with status indicators: ACCEPTED (green) for successful processing.
Step 2: Initiate New Batch Merchant Creation
Click the "Create Batch Merchants" button (visible only to users with appropriate permissions).
The system will navigate to the "Batch Flow" configuration interface.
You will see a breadcrumb navigation: "Batch History → New Configuration".
Step 3: Multi-Stage Configuration Process
Stage Navigation Overview:
The batch merchant creation process involves multiple configuration stages depending on your reseller type:
For Axis Reseller Users:
Juspay Details - Basic merchant type configuration
Platform Details - Platform type selection
Access Control - Role and permission management
Client Configuration - SDK and platform-specific settings
For Standard Reseller Users:
Access Control - Role and permission management only
Step 4: Configure Access Control Stage
User Management Section:
Configure access permissions for the "Users" module
Options available: "Read Only" or "Read & Write"
Use "Select All" to apply permissions to all modules
Use "Mark as Read Only" or "Mark as Read & Write" for bulk permission setting
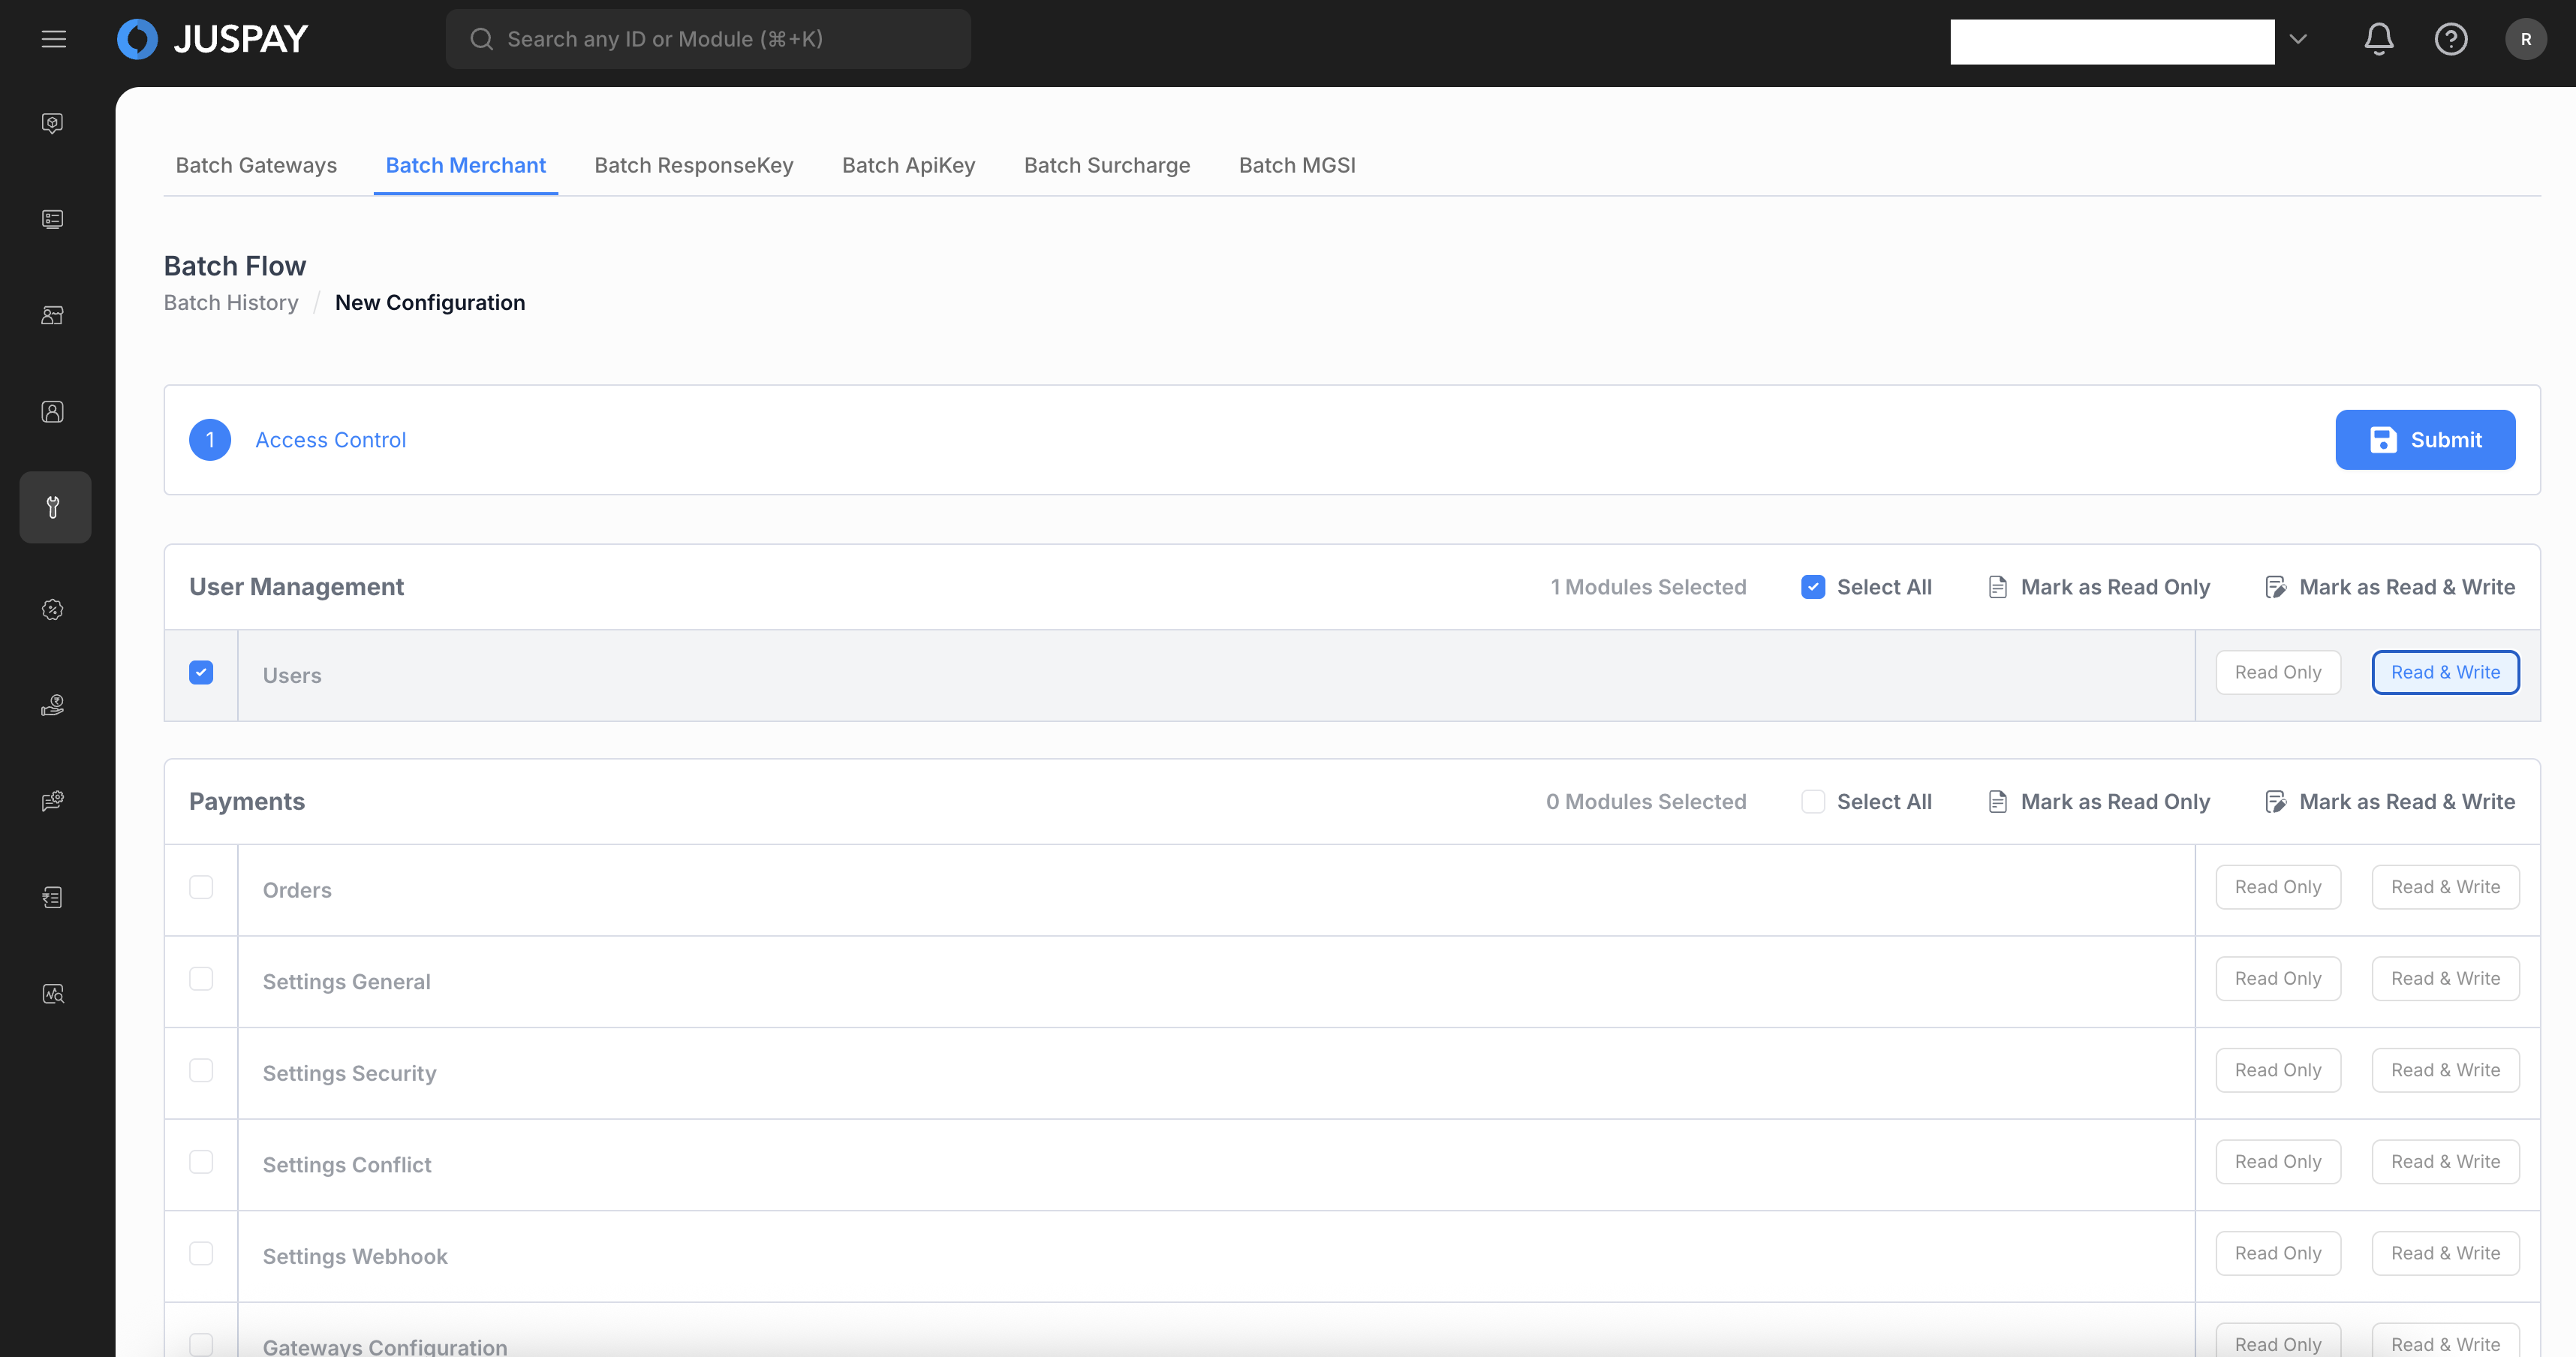
Batch Merchant Payments Section:
Configure access permissions for payment-related modules:
Orders: Transaction and order management access
Settings General: General payment settings access
Settings Security: Security configuration access
Settings Conflict: Conflict resolution settings access
Settings Webhook: Webhook configuration access
Gateways Configuration: Payment gateway setup access
Each module can be set to "Read Only" or "Read & Write" permissions
Permission Selection:
Individual module selection with checkboxes
Bulk permission management with "Select All" functionality
Permission level indicators showing "0 Modules Selected" or "1 Modules Selected"
Clear visual distinction between Read Only and Read & Write access levels
Step 5: Submit Configuration and Upload CSV File
Click the "Submit" button to proceed to the CSV upload interface.
The system will open the "Upload CSV File" modal with detailed instructions and upload interface.

Step 6: Prepare and Upload CSV File
Download Sample File: Click on the "Download Sample CSV" button to download the CSV template.
Prepare Your Data: Fill in your merchant data following the CSV field specifications (see table below).
File Limitations:
Maximum 1000 entries per file
CSV format only (.csv file extension required)
File size limitations apply
Upload Process:
Click "Click to upload or drag and drop" or drag and drop your CSV file into the upload area
The system validates the file format and structure
Mandatory fields are checked (Merchant Name, Merchant ID, Email, Country)
Column types are validated for proper data format
File format must be .csv only
Step 7: File Processing and Validation
File Validation: The system performs the following checks:
CSV format validation (.csv file extension required)
Mandatory field presence (merchantId, merchantName, email, country)
Data type validation for each column
Email format validation for email field
Merchant ID format validation (4-16 alphanumeric characters)
Row count validation (maximum 1000 entries)
Error Handling: If validation fails, specific error messages are displayed:
Missing mandatory fields
Invalid data types
Invalid email format
Invalid merchant ID format
File format errors
Row limit exceeded
Successful Upload: Upon successful validation:
File is queued for processing
Batch ID is generated
Initial status is set to processing
Merchant creation processing begins
Step 8: Monitor Processing Status
Real-time Updates: The dashboard automatically updates with processing status.
Status Indicators:
ACCEPTED: Successfully processed merchant creation operations (Green indicator)
FAILED: Failed merchant creation attempts (Red indicator)
QUEUED: Merchant creation operations waiting in processing queue (Blue indicator)
Monitoring and Managing Batch Merchant Operations
Viewing Batch Merchant Details
Table View: The main interface displays all uploaded batch files with:
File Name: Name of the uploaded CSV file containing merchant data
Status: Current processing status with color-coded labels
Queued Task: Number of merchant creation requests waiting for processing
Failed Task: Number of failed merchant creation attempts
Success Task: Number of successfully processed merchant records
Created At: File upload timestamp
Check Status: Refresh button for manual status synchronization
Error File: Download option for error reports
Batch Merchant - Table View Detailed View: Click on any filename to access detailed information:
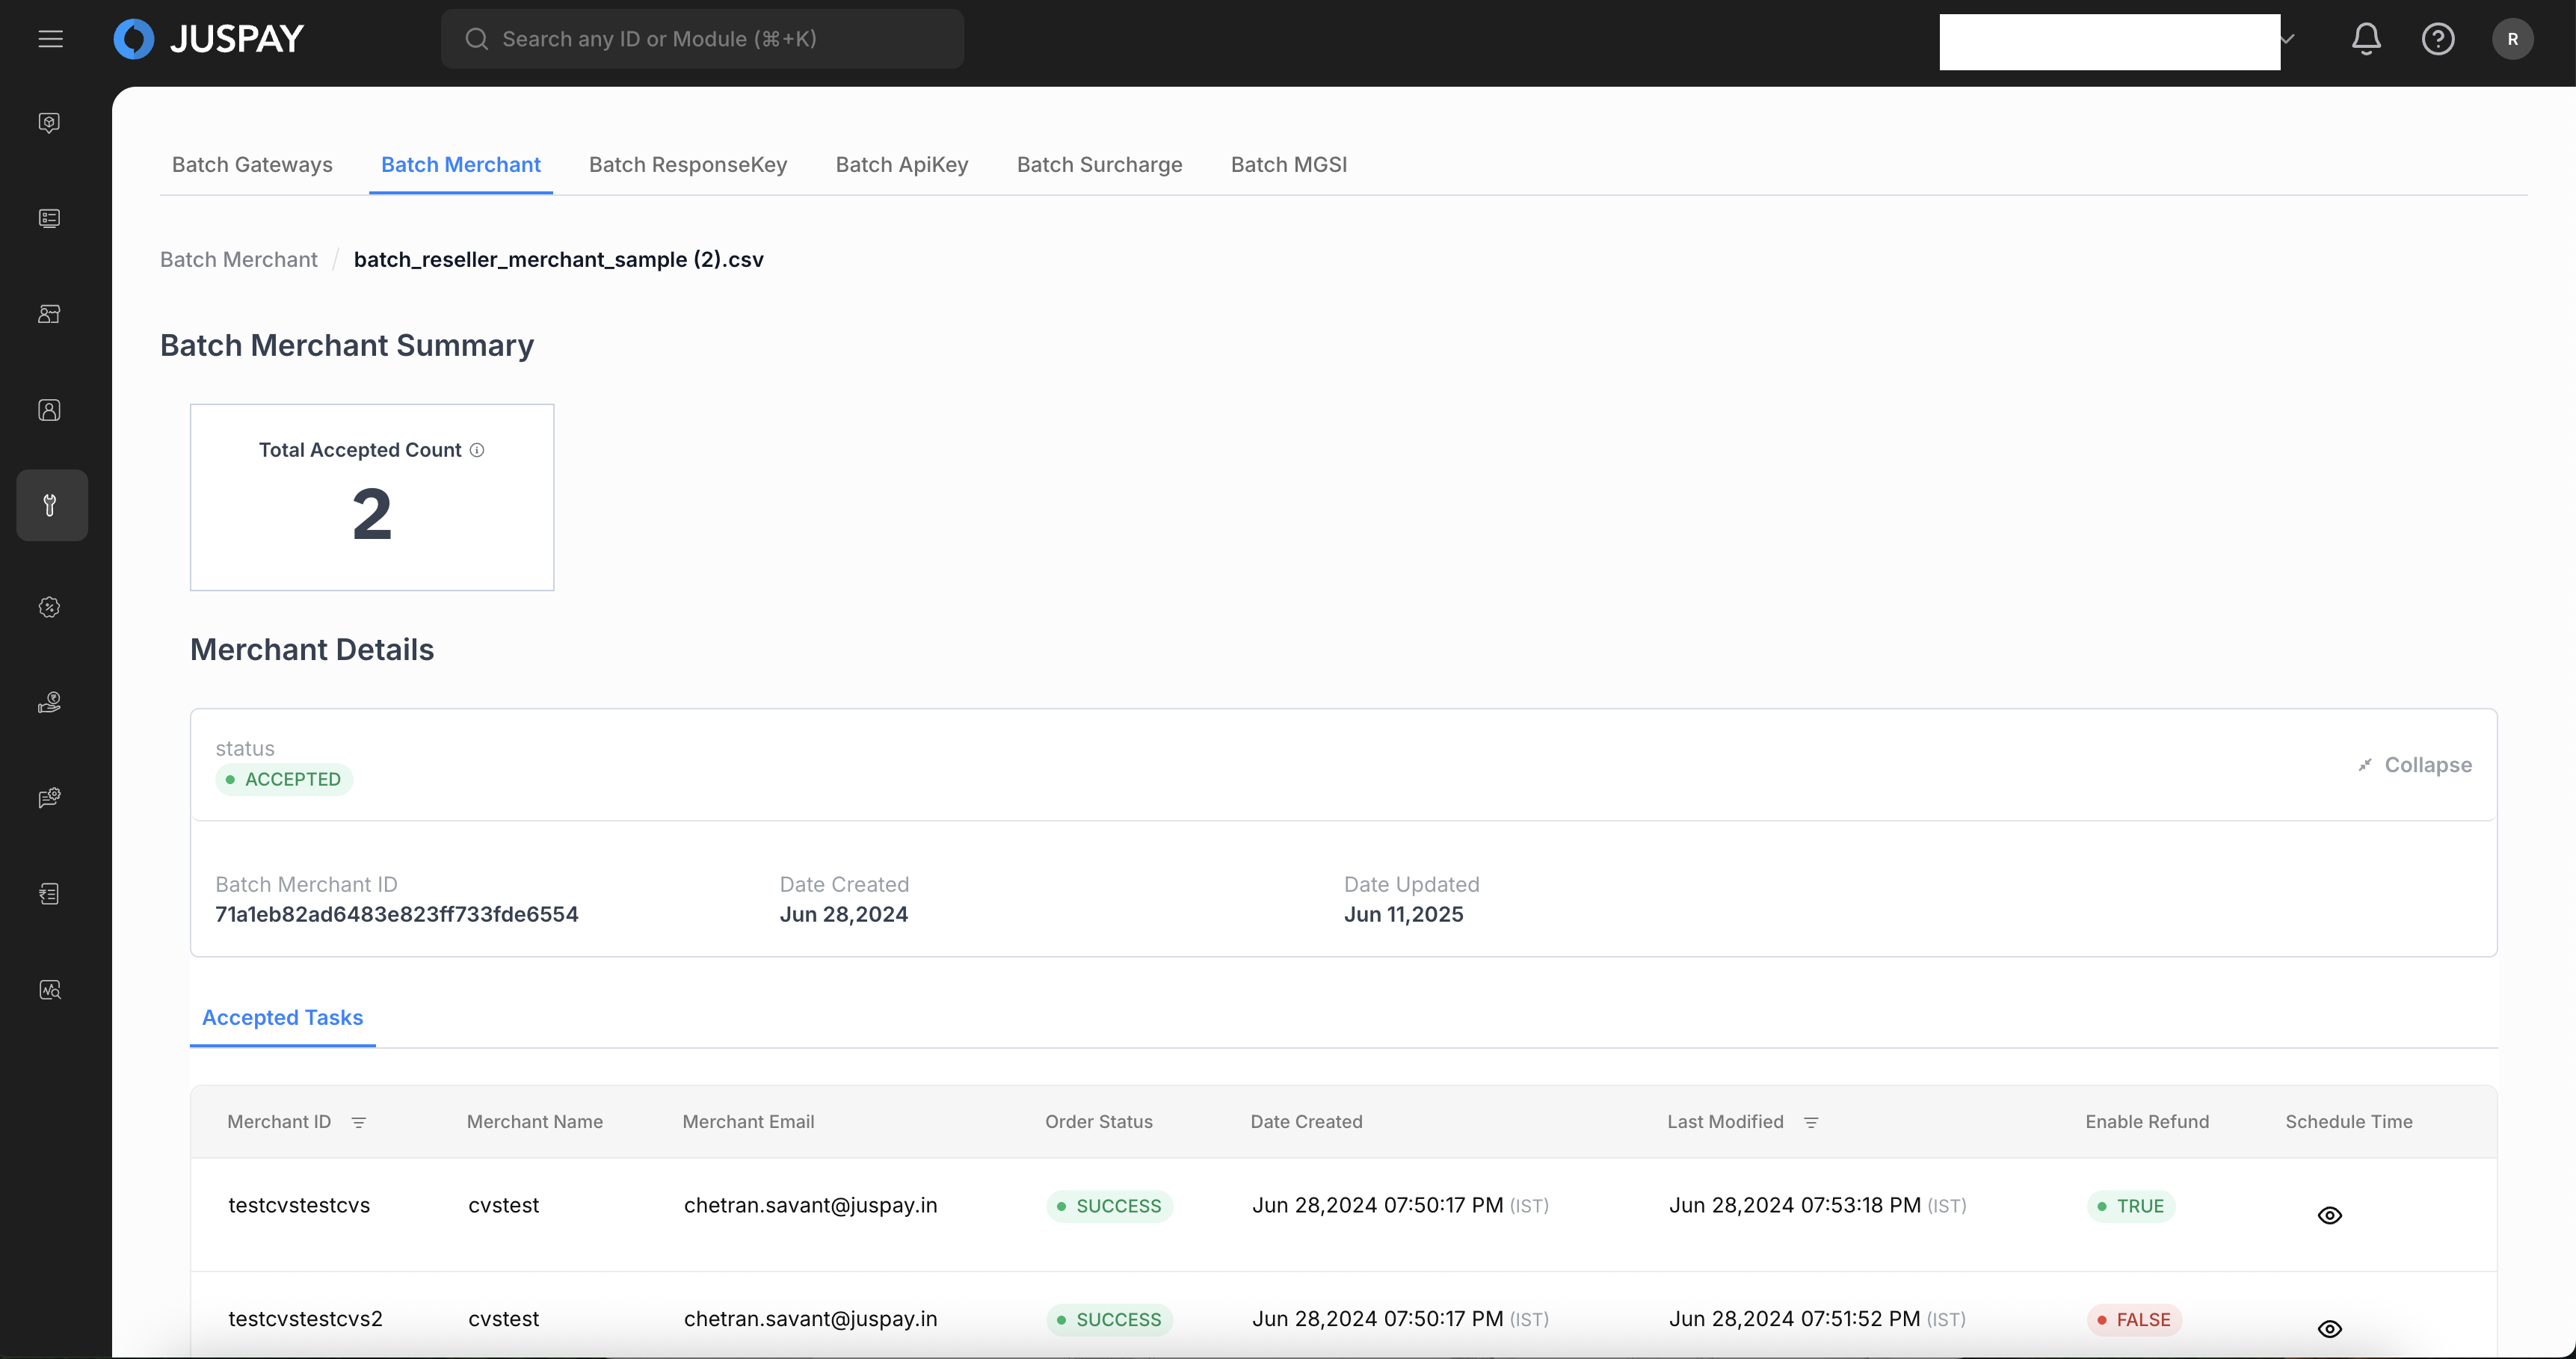
Batch Merchant Summary: Shows comprehensive batch information including:
Total Accepted Count: Number of successfully processed merchant records
Batch ID: Unique identifier for the uploaded file (format: alphanumeric string)
Date Created and Date Updated timestamps
Merchant Details: Expandable/collapsible interface showing:
Batch Merchant ID: Unique identifier for the batch
Date Created and Date Updated timestamps
Current status with color-coded indicators
Batch Merchant - Detailed View
Individual Merchant Records View
Accepted Tasks Tab: The detailed view shows successfully created merchant accounts with columns:
Merchant ID: Unique merchant identifier from the CSV file
Merchant Name: Merchant business name from the CSV file
Merchant Email: Email address from the CSV file
Order Status: Processing status (SUCCESS, FAILED, PENDING)
Date Created: Merchant account creation timestamp
Last Modified: Last update timestamp for the merchant record
Enable Refund: Refund capability status (TRUE/FALSE)
Schedule Time: Processing schedule information with eye icon for details
Search and Filter Capabilities
Table Sorting:
Click column headers to sort data
Available sorting for: File Name, Status, Created At, Success Task, Failed Task
Toggle between ascending and descending order
Sort indicators show current sort direction
Data Export and Download
Downloading Processed Data
Error File Download: Click the download icon in the "Error File" column for failed entries.
CSV Export: Downloads include:
All processed merchant data with complete status information
Individual merchant creation results
Processing timestamps and status details
Error information for failed merchant creation attempts
File Format:
CSV format with comma-separated values
Includes header row with column names
Comprehensive data export for audit and reporting purposes
CSV File Upload Specifications
CSV Field Requirements
|
Field Name
|
Mandatory/Optional
|
Data Type
|
Description
|
Sample Value
|
Validation Rules
|
|---|---|---|---|---|---|
merchantId
| Mandatory
| String
| Unique merchant identifier for the account
| "abc"
| Must be 4-16 alphanumeric characters, no special characters
|
merchantName
| Mandatory
| String
| Business name of the merchant
| "abcd"
| Must be a valid string, cannot be empty
|
email
| Mandatory
| String
| Email address for the merchant account
| "abc@*.in"
| Must be valid email format, cannot be empty
|
country
| Mandatory
| String
| Country code for the merchant
| "IND"
| Must be a valid country code
|
enableRefund(true/false)[OPTIONAL]
| Optional
| Boolean
| Refund capability for the merchant
| "false"
| Must be true or false when provided
|
merchantCategoryCode[OPTIONAL]
| Optional
| String
| Merchant category classification code
| "7889"
| Must be a valid MCC when provided
|
mobile[OPTIONAL]
| Optional
| String
| Mobile number with country code
| "+91 9999999999"
| Must be valid phone number format when provided
|
mustUseGivenOrderIdForTxn(true/false)[OPTIONAL]
| Optional
| Boolean
| Order ID usage requirement
| "true"
| Must be true or false when provided
|
industry[OPTIONAL]
| Optional
| String
| Industry classification
| "Education"
| Must be a valid industry type when provided
|
returnUrl[OPTIONAL]
| Optional
| String
| Return URL for transactions
| "https://google.com"
| Must be valid URL format when provided
|
Merchant Creation Validation Rules
Merchant ID Requirements:
Format: Must be 4-16 alphanumeric characters only
Uniqueness: Merchant ID must be unique across the system
Characters: No special characters allowed
Length: Minimum 4 characters, maximum 16 characters
Existence: System checks for existing merchant IDs to prevent duplicates
Email Requirements:
Format: Must follow valid email format (user@domain.com)
Uniqueness: Email address must be unique across the system
Domain Validation: Email domain must be valid and accessible
Length: Standard email length limitations apply
Existence: System checks for existing email addresses
Country Requirements:
Format: Must be a valid country code (e.g., IND, USA, GBR)
Validation: Country code must exist in the system's country configuration
Case Sensitivity: Country codes are case-sensitive
Standard: Follows ISO country code standards
Optional Field Requirements:
Boolean Fields: enableRefund and mustUseGivenOrderIdForTxn must be "true" or "false" when provided
Mobile Format: Must include country code and follow international phone number format
URL Format: returnUrl must be a valid HTTP/HTTPS URL when provided
Industry: Must match predefined industry classifications (defaults to "Others" if empty)
MCC: merchantCategoryCode must be a valid merchant category code when provided
Merchant Creation Processing Logic
Eligibility Criteria:
Unique Identifiers: Merchant ID and email must be unique in the system
Configuration Validation: Access control configuration must be properly set
System Capacity: Merchant creation depends on system capacity and limitations
Permission Validation: User must have appropriate permissions for merchant creation
Processing Sequence:
Configuration Validation: Verify access control settings and permissions
CSV Validation: Validate all mandatory fields and data format compliance
Uniqueness Check: Validate merchant ID and email uniqueness
Queue Management: Add merchant creation requests to processing queue
Account Creation: Create merchant account with specified details and configuration
Permission Assignment: Apply access control settings to the merchant account
Status Update: Update merchant creation status based on processing result
Activation: Activate merchant account for system access
Merchant Creation Behavior:
Account Setup: Complete merchant account creation with all specified details
Access Control: Apply configured permissions for different modules
Configuration Application: Set up merchant with specified optional parameters
Notification: System may send account creation notifications to merchants
CSV Format Examples
Complete CSV Format with Sample Data:
CSV Format with Minimal Required Fields:
File Upload Constraints
Maximum Rows: 1000 entries per CSV file
File Format: CSV (Comma Separated Values) only with .csv extension
Encoding: UTF-8 encoding recommended
File Size: Standard file size limitations apply
Column Order: Must match the specified header format exactly
Required Fields: First four fields (merchantId, merchantName, email, country) are mandatory and cannot be empty
Optional Fields: Optional fields can be left empty but column structure must be maintained
Data Consistency: All entries must follow the same data format standards
Duplicate Prevention: Avoid duplicate merchantId or email entries within the same file
Use Cases
New Partner Onboarding
Export new partner merchant data from partner management systems with required merchant information
Configure access control settings for the partner's merchant accounts
Prepare CSV file with merchant IDs, business names, email addresses, and appropriate configurations
Upload file through Batch Merchant interface for immediate processing
Monitor merchant creation status and download results for partner confirmation and system access setup
Reseller Merchant Provisioning
Identify merchants that need system access for new reseller partnerships or business expansion
Configure appropriate access control settings for different merchant types and business requirements
Compile list of affected merchants with specific permission assignments and access levels
Upload merchant creation file with defined access control configurations and business parameters
Track individual merchant creation status and automatic account activation
Seasonal Business Expansion
Set up seasonal merchant accounts for temporary business partnerships or project-based access requirements
Configure appropriate access control settings for temporary merchant accounts
Create CSV files with merchant details and appropriate temporary business configurations
Upload merchant creation files for automated processing during specified business periods
Monitor merchant creation success rates and manage system access provisioning
Troubleshooting
File Upload Validation Errors:
"Invalid file format": Ensure file is in CSV format with .csv extension and proper comma separation
"Missing mandatory fields": Verify that merchantId, merchantName, email, and country columns are present and not empty
"Row limit exceeded": Reduce file size to maximum 1000 entries per upload
"Invalid data type": Check that all fields contain appropriate string values in correct format
"Invalid email format": Ensure email field follows valid email format (user@domain.com)
"Invalid merchant ID format": Verify merchant ID is 4-16 alphanumeric characters with no special characters
"Merchant ID already exists": Verify that merchant IDs are unique and not already present in the system
"Email already exists": Ensure email addresses are unique and not already registered in the system
"Invalid country code": Check that country values match valid country codes (IND, USA, GBR, etc.)
Permissions and Roles
Access to the Batch Merchant module is controlled by the following permissions:
Merchant Module Access: Required for accessing the batch merchant interface (ACL:
merchants)Batch Create Merchants Permission: Required for creating and uploading batch merchant files (ACL:
batch_create_merchants)Merchant Creation Access: Required for performing bulk merchant creation operations (ACL:
merchants)Access Control Configuration: Required for configuring merchant access permissions and module settings
Reseller Management Permission: Required for reseller-specific merchant creation and configuration (ACL:
reseller)