

Batch Revoke
Overview
The Batch Revoke module provides comprehensive bulk mandate revocation capabilities for permanently terminating multiple mandate operations simultaneously through CSV file uploads. It offers real-time progress tracking, status monitoring, and detailed reporting for all mandate revocation operations processed through the Juspay payment platform.
This module is designed for a wide range of users, including:
Operations Teams: For revoking mandate operations in bulk and monitoring revocation processing performance across different payment methods and gateways with comprehensive operational logs and audit trails.
Finance Teams: For bulk mandate revocation processing, payment termination control, and tracking revocation operations across multiple active transactions with detailed compliance records.
Compliance Teams: To process regulatory mandate revocation requirements in bulk, track revocation status, and maintain comprehensive audit trails for compliance and regulatory reporting.
Accessing the Module
Log in to the Juspay dashboard.
From the main navigation menu on the left, click on Payments.
Select Bulk Operations from the Payments submenu.
Click on the Mandates tab from the bulk operations navigation.
Select Batch Revoke from the mandate operations dropdown.
The navigation URL for this module is https://portal.juspay.in/batch/batch-revoke
 .
.
Batch Revoke
Step-by-Step Usage Instructions
Creating Batch Revoke Operations
Step 1: Access the Batch Revoke Interface
Navigate to the Batch Revoke module using the steps above.
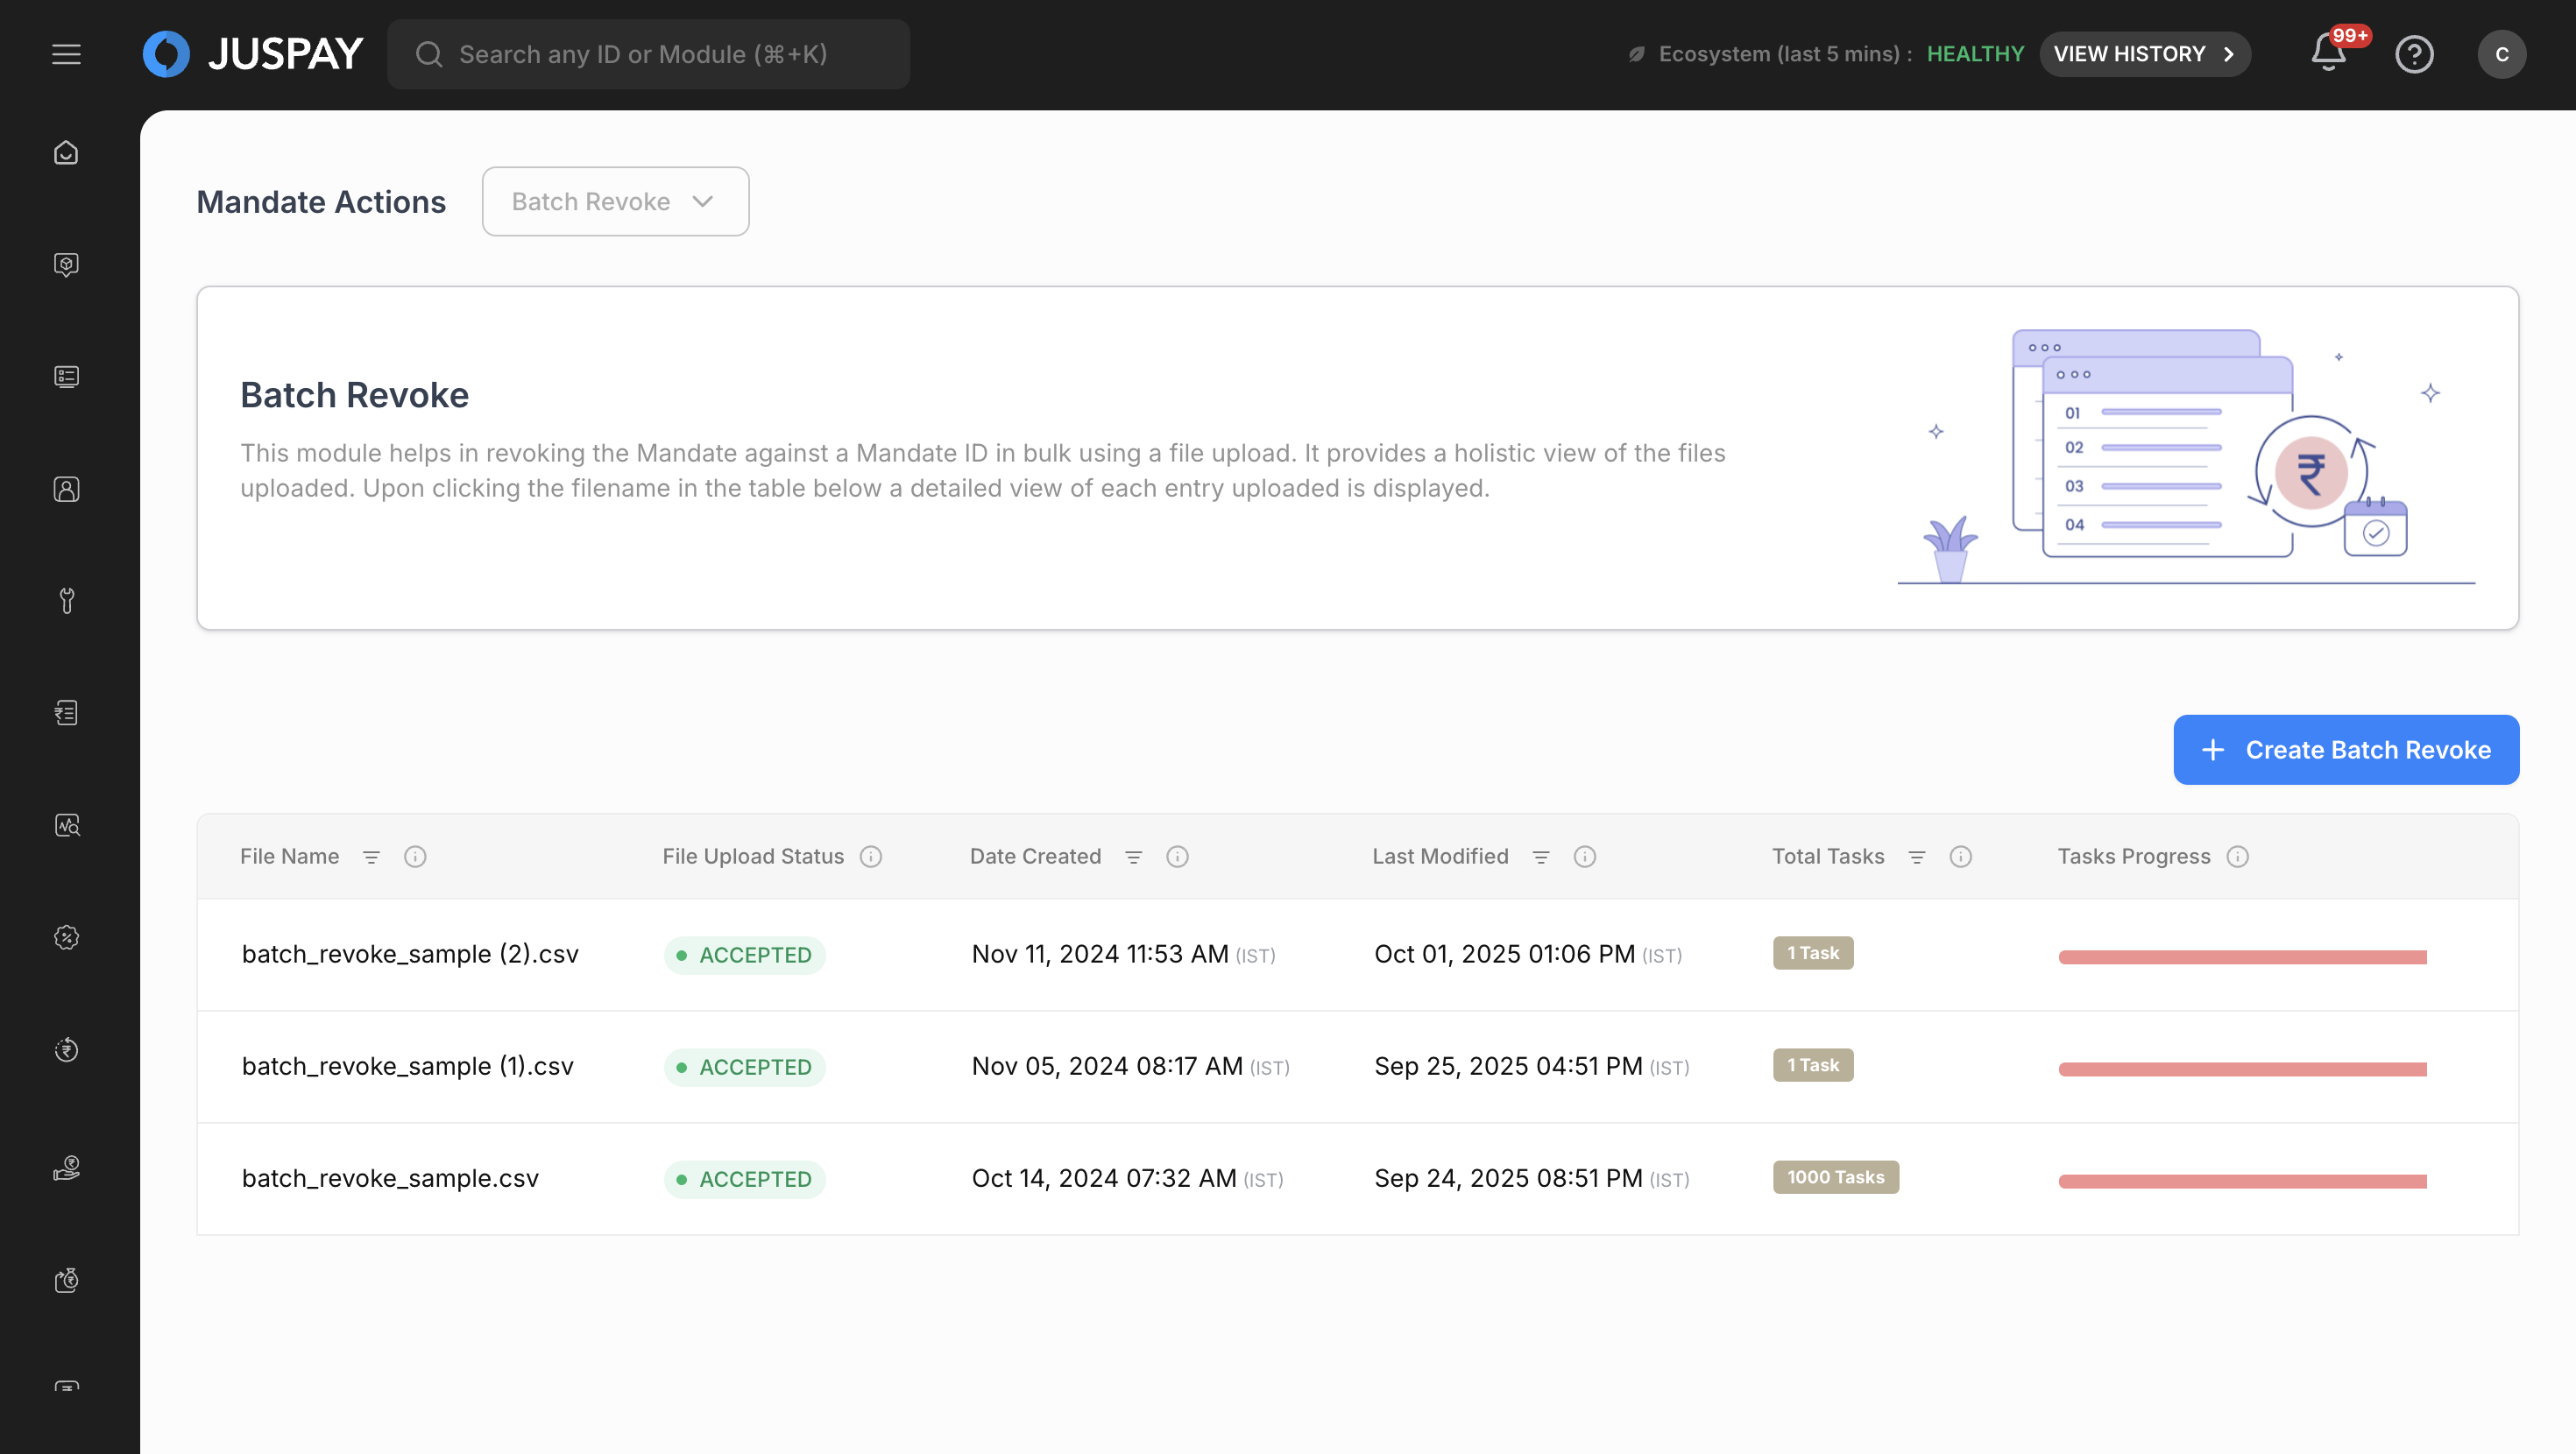
You will see the main dashboard with a description: "This module helps in revoking mandates in bulk using a file upload. It provides a holistic view of the files uploaded. Upon clicking the filename in the table below a detailed view of each mandate revocation uploaded is displayed."
The interface displays any previously uploaded batch revoke files in a table format.
Step 2: Initiate New Batch Revoke Upload
Click the "Create Batch Revoke" button (visible only to users with appropriate permissions).
If maker-checker workflow is enabled for your account, you will first see a description modal:
Enter a description for the batch revoke request in the text field.
Click "Submit" to proceed to the file upload interface.
If maker-checker is not enabled, you will directly access the file upload interface.
Batch Revoke
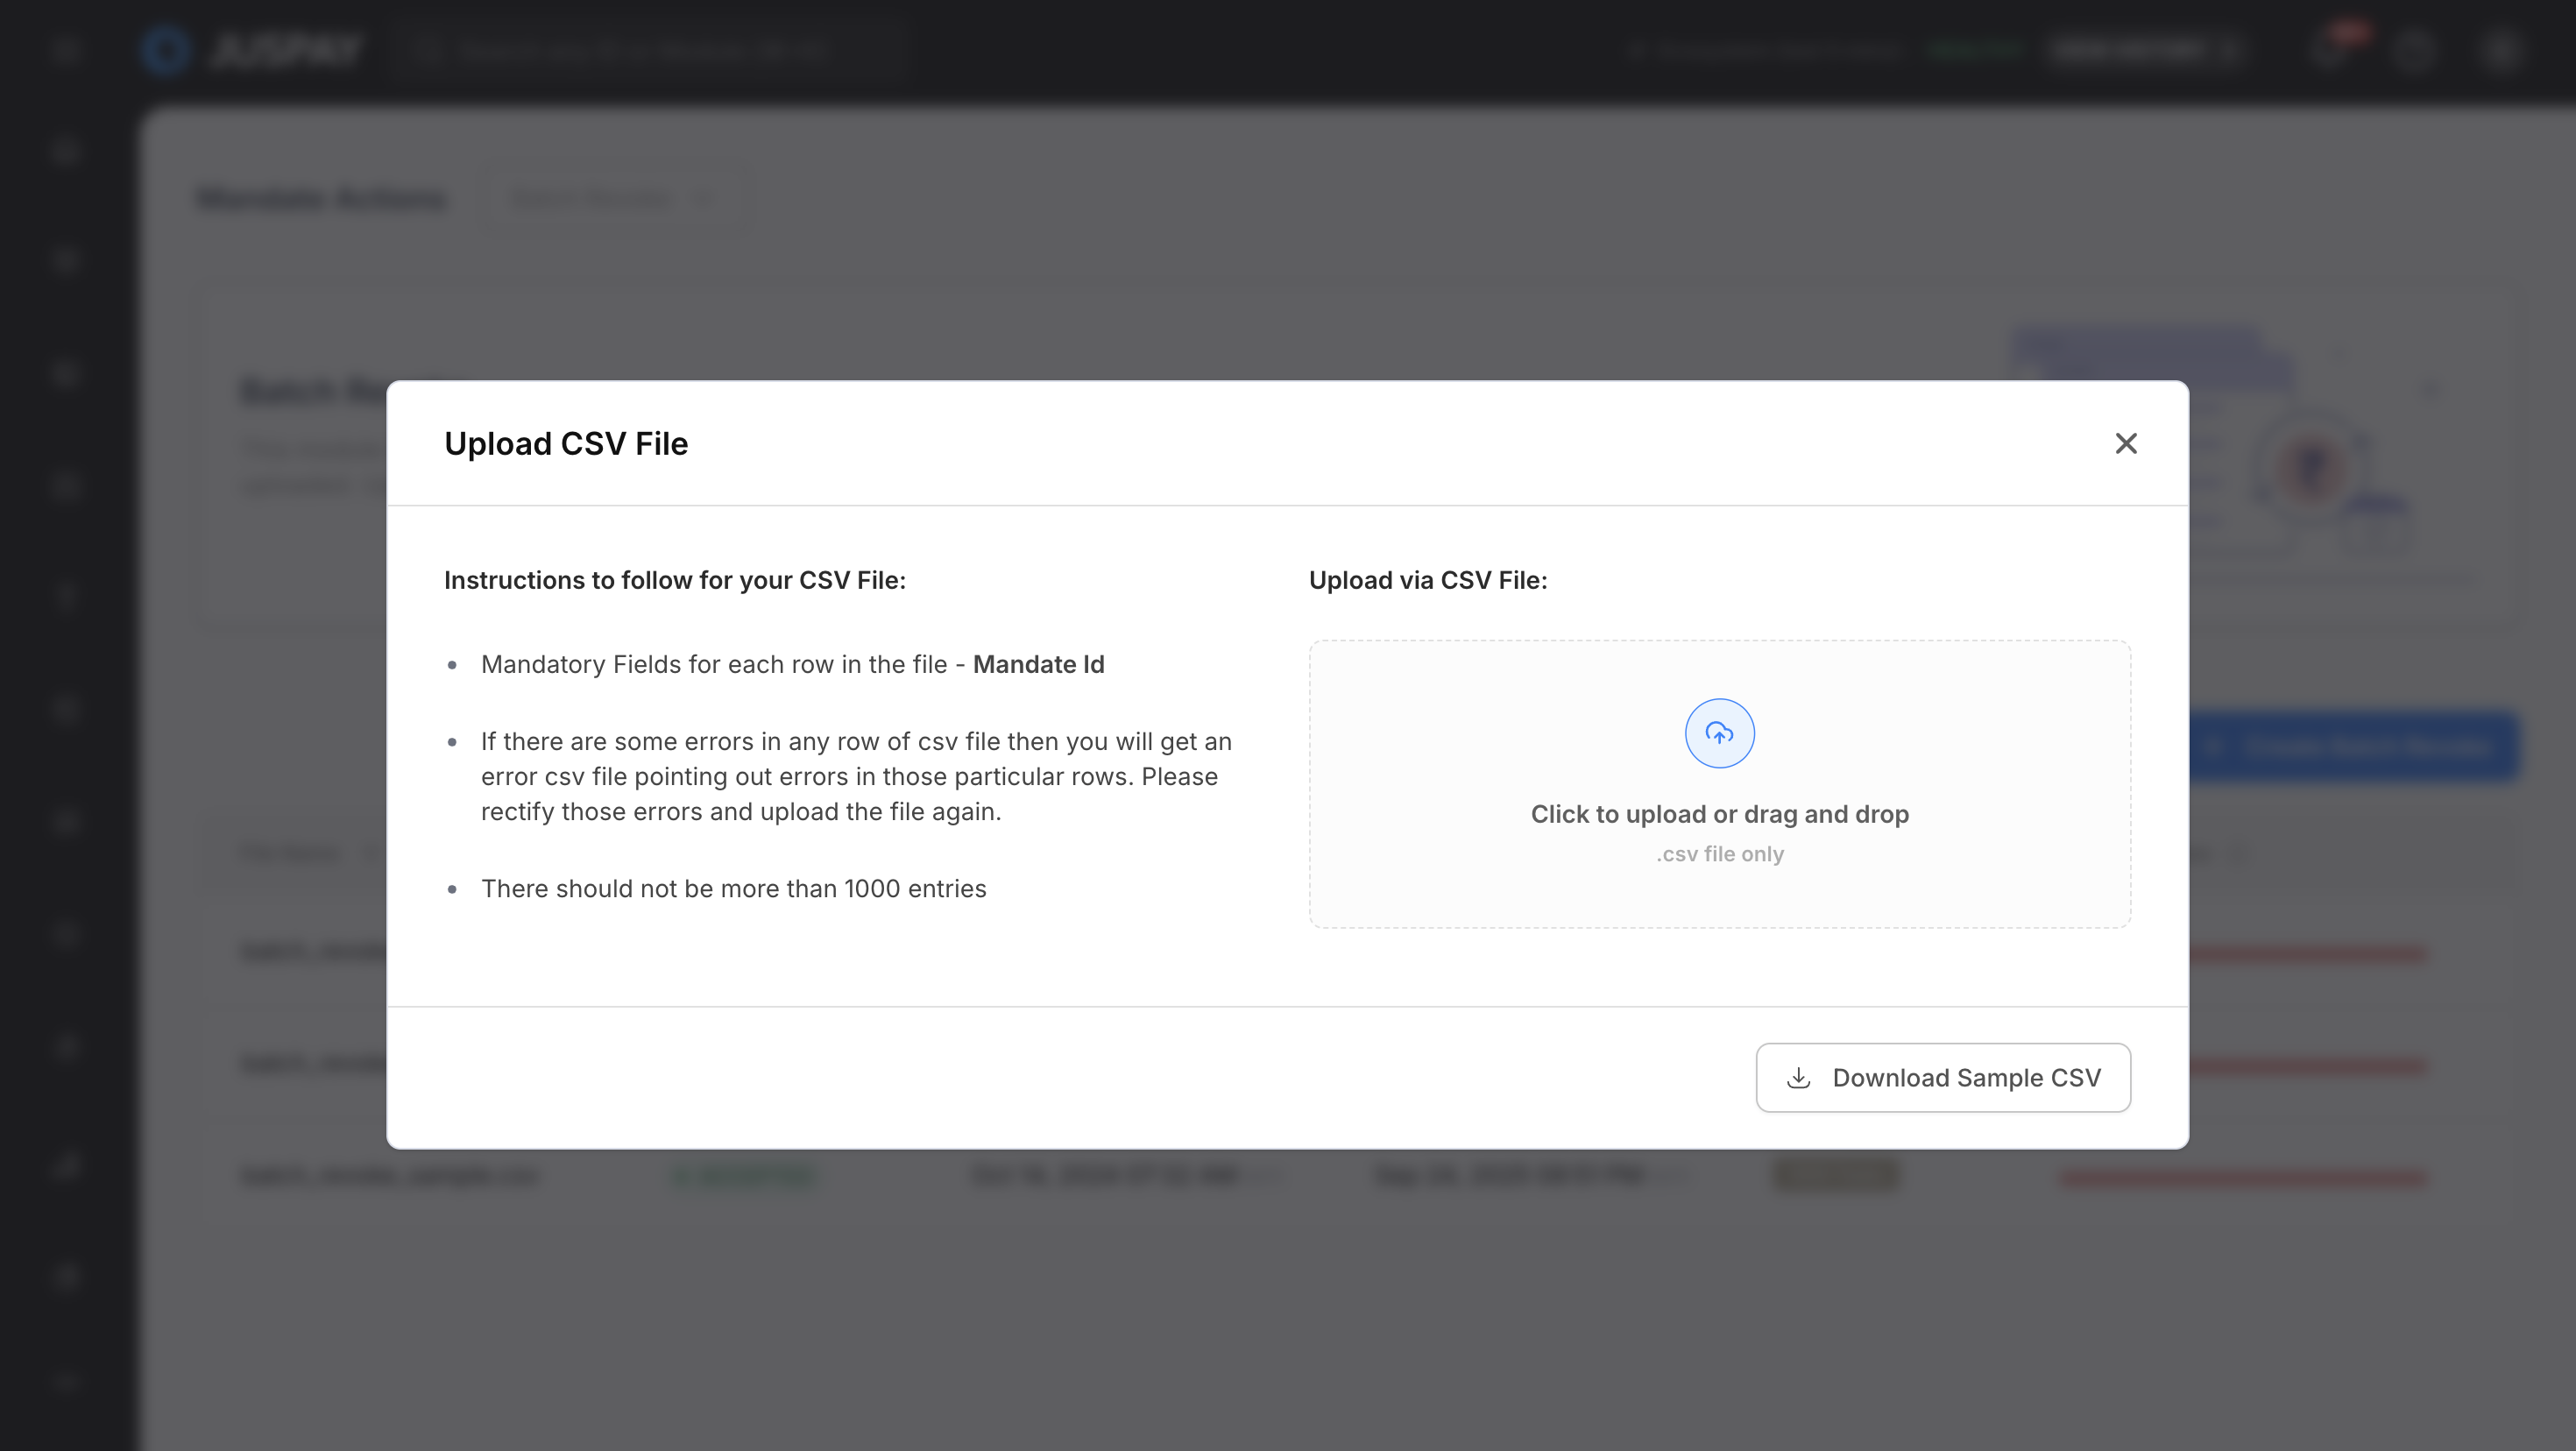
Step 3: Prepare and Upload CSV File
Download Sample File: Click on the sample file link to download the CSV template (
batch_revoke_sample.csv).Prepare Your Data: Fill in your revoke data following the CSV field specifications (see table below).
File Limitations:
Maximum 1000 rows per file
CSV format only
File size limitations apply
Upload Process:
Click "Choose File" or drag and drop your CSV file
The system validates the file format and structure
Mandatory fields are checked (Mandate ID)
Column types are validated (Mandate ID as String)
Step 4: File Processing and Validation
File Validation: The system performs the following checks:
CSV format validation
Mandatory field presence (mandate_id)
Data type validation for each column
Mandate ID validation (must be valid string identifier)
Mandate eligibility validation (must be revocable)
Row count validation (maximum 1000 rows)
Error Handling: If validation fails, specific error messages are displayed:
Missing mandatory fields
Invalid data types
Invalid mandate ID values
Mandate not eligible for revocation
File format errors
Row limit exceeded
Successful Upload: Upon successful validation:
File is queued for processing
Batch ID is generated
Initial status is set to processing
Mandate revocation processing begins
Step 5: Monitor Processing Status
Real-time Updates: The dashboard automatically updates with processing status.
Status Indicators:
ACCEPTED: Successfully processed revoke operations (Green indicator)
FAILED: Failed revoke attempts (Red indicator)
QUEUED: Revoke operations waiting in processing queue (Blue indicator)
Monitoring and Managing Batch Revoke Operations
Viewing Batch Revoke Details
Table View: The main interface displays all uploaded batch files with:
File Name: Name of the uploaded CSV file
File Upload Status: Current processing status with color-coded labels
Date Created: File upload timestamp
Last Modified: Last update timestamp
Total Tasks: Number of revoke requests in the file
Tasks Progress: Visual progress bar showing completion status
Actions: Sync with Gateway button for manual synchronization
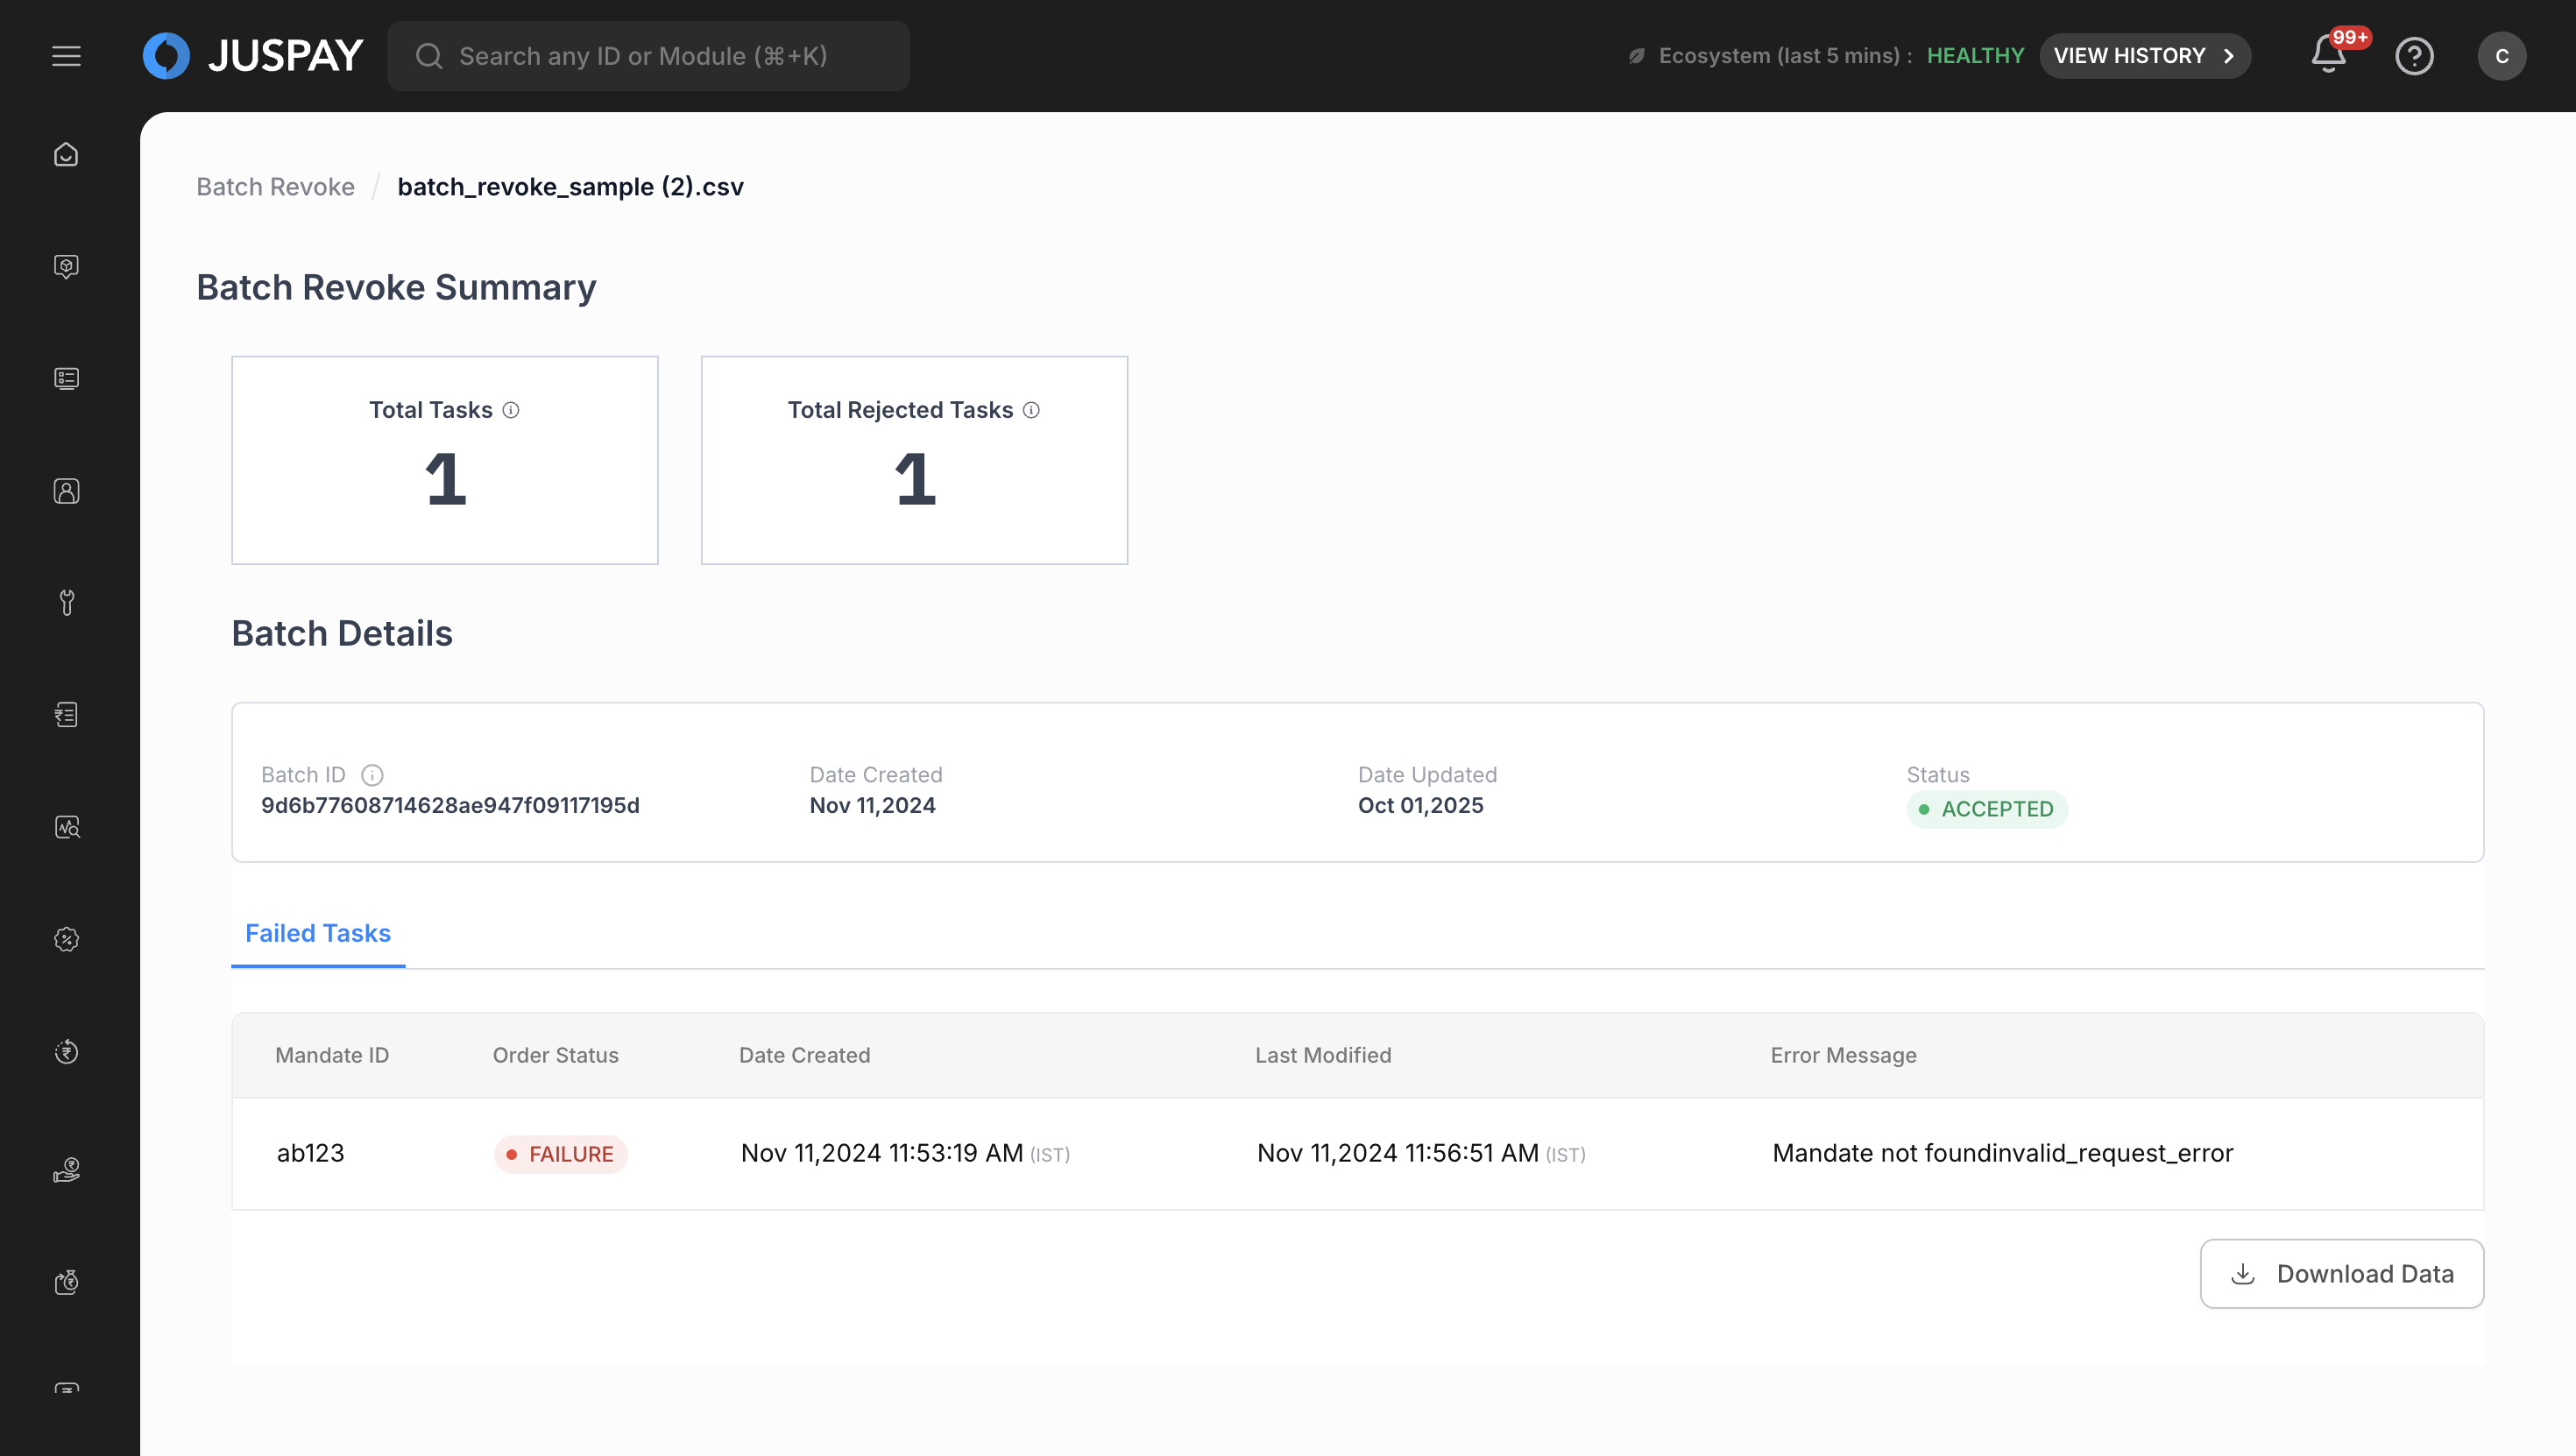
Batch Revoke - Table View Detailed View: Click on any filename to access detailed information:
Batch Details Card: Expandable/collapsible interface showing:
Batch ID: Unique identifier for the uploaded file
Date Created and Date Updated timestamps
Current status with color-coded indicators
Progress Statistics: Individual task counts for:
Total Accepted Tasks: Successfully processed revoke operations
Total Rejected Tasks: Failed revoke attempts
Total Queued Tasks: Revoke operations in processing queue
Batch Revoke - Detailed View
Search and Filter Capabilities
File Name Search:
Use the search input field with search icon
Enter filename to filter results
Search is case-sensitive and supports partial matches
Clear search using the cross icon
Table Sorting:
Click column headers to sort data
Available sorting for: File Name, Status, Date Created, Total Tasks
Toggle between ascending and descending order
Data Export and Download
Downloading Processed Data
Access Download: Click the "Download Data" button in the batch details view.
CSV Export: Downloads include:
Serial numbers (S.No column)
All processed revoke data with the following headers:
Mandate ID
Revoke Status
Original Mandate Status
Revocation Reason
Task Status
Error Message
Created At
Updated At
File Format:
CSV format with comma-separated values
Filename format:
batch_revoke.csvIncludes header row with column names
CSV File Upload Specifications
CSV Field Requirements
|
Field Name
|
Mandatory/Optional
|
Data Type
|
Description
|
Sample Value
|
Validation Rules
|
|---|---|---|---|---|---|
mandate_id
| Mandatory
| String
| Mandate identifier for the mandate to revoke permanently
| "MAN_456789123"
| Must be a valid string, cannot be empty
|
Revoke Validation Rules
Mandate ID Requirements:
Format: Must be a valid string identifier from an existing mandate
Length: No specific length restrictions, but should be reasonable
Existence: Mandate ID must exist in the system and correspond to an active or paused mandate
Status: Associated mandate must be in a revocable state (active, paused, or suspended)
Eligibility: Mandate must not have pending transactions or be in a non-revocable state
Revoke Processing Logic
Eligibility Criteria:
Revocable Status: Only mandates with revocable status can be permanently revoked
Transaction Checks: System verifies no pending or in-progress transactions
Business Rules: Compliance with business rules and regulatory requirements
Gateway Availability: Revoke operations depend on payment gateway availability
Processing Sequence:
Validation: Verify mandate_id exists and is eligible for revocation
Pre-revocation Checks: Validate business rules and compliance requirements
Queue Management: Add revoke requests to processing queue
Gateway Communication: Communicate revocation instructions to payment gateway
Status Update: Update mandate status to revoked
Audit Trail: Create comprehensive audit record for compliance
Revoke Behavior:
Permanent Action: Revocation is irreversible and permanently terminates the mandate
Immediate Effect: Revocation takes effect immediately upon processing
Payment Termination: All future payments under the mandate are permanently stopped
Compliance Recording: Full audit trail maintained for regulatory compliance
CSV Format Examples
CSV Format with Different Mandate Types:
File Upload Constraints
Maximum Rows: 1000 rows per CSV file
File Format: CSV (Comma Separated Values) only
Encoding: UTF-8 encoding recommended
File Size: Standard file size limitations apply
Column Order: Must match the specified header format (mandate_id)
Empty Values: Mandate ID field cannot be empty
Duplicate Prevention: Avoid duplicate mandate_id entries within the same file
Use Cases
Compliance-Driven Revocation
Export mandate data requiring regulatory compliance revocation
Prepare CSV file with mandate IDs for compliance-mandated termination
Upload file through Batch Revoke interface for permanent revocation
Monitor revoke processing status and download results for compliance reporting
Customer Termination Requests
Identify mandates that customers have requested to terminate permanently
Compile list of affected mandate IDs from customer service requests
Upload revoke file for permanent mandate termination
Track individual revoke status and provide confirmation to customers
Fraud Prevention and Security
Prepare CSV with mandate information for security-related revocations
Include mandate IDs identified through fraud detection systems
Process bulk revocations for immediate security protection
Use downloaded revoke data for security incident documentation
Business Relationship Termination
Set up bulk revocation operations for terminated business relationships
Create CSV files with mandate details for contract terminations
Upload revoke files for permanent mandate cessation
Monitor revoke success rates and maintain termination records
Troubleshooting
File Upload Validation Errors:
"Invalid file format": Ensure file is in CSV format with proper comma separation
"Missing mandatory fields": Verify that mandate_id column is present and not empty
"Row limit exceeded": Reduce file size to maximum 1000 rows per upload
"Invalid data type": Check that mandate_id field contains only string values
"Mandate ID not found": Ensure mandate IDs exist in the system and correspond to actual mandates
"Mandate not eligible for revocation": Verify mandate is in a revocable state (not already revoked or in non-revocable status)
Revoke-Specific Errors:
"Mandate already revoked": Mandate is already in a revoked state and cannot be revoked again
"Revocation not permitted": Business rules or compliance requirements prevent revocation
"Active transactions detected": Mandate has active transactions that must be completed first
"Gateway rejection": Payment gateway rejected the revoke request due to business rules
"Compliance validation failed": Revocation does not meet regulatory compliance requirements
Permissions and Roles
Access to the Batch Revoke module is controlled by the following permissions:
Settings Mandate Access: Required for accessing the batch revoke interface (ACL:
settings_mandate)Settings Mandate Write Permission: Required for creating and uploading batch revoke files (ACL:
settings_mandatewith ReadWrite access)Settings Mandate Read Permission: Needed to view batch revoke status and download processed data (ACL:
settings_mandate)Revoke Operations Access: Required for performing mandate revoke operations (ACL:
settings_mandate)Gateway Sync Permission: Required for manual gateway synchronization operations (ACL:
settings_mandate)