

Priority Logic: A Comprehensive Guide
Overview
The Priority Logic module provides comprehensive gateway routing and decision-making capabilities for payment processing through the Juspay payment platform. It offers configuration and management tools for setting up intelligent routing rules that determine how transactions are processed across different payment gateways based on various business criteria and performance metrics.
Accessing the Module
Log in to the Juspay dashboard.
From the main navigation menu on the left, click on PG Control Center.
Navigate to the Gateway Management section.
Select Priority Logic from the gateway management tabs.
The navigation URL for this module is https://portal.juspay.in/gateways/priority-logics

Dashboard Overview
The Priority Logic module displays two primary sections:
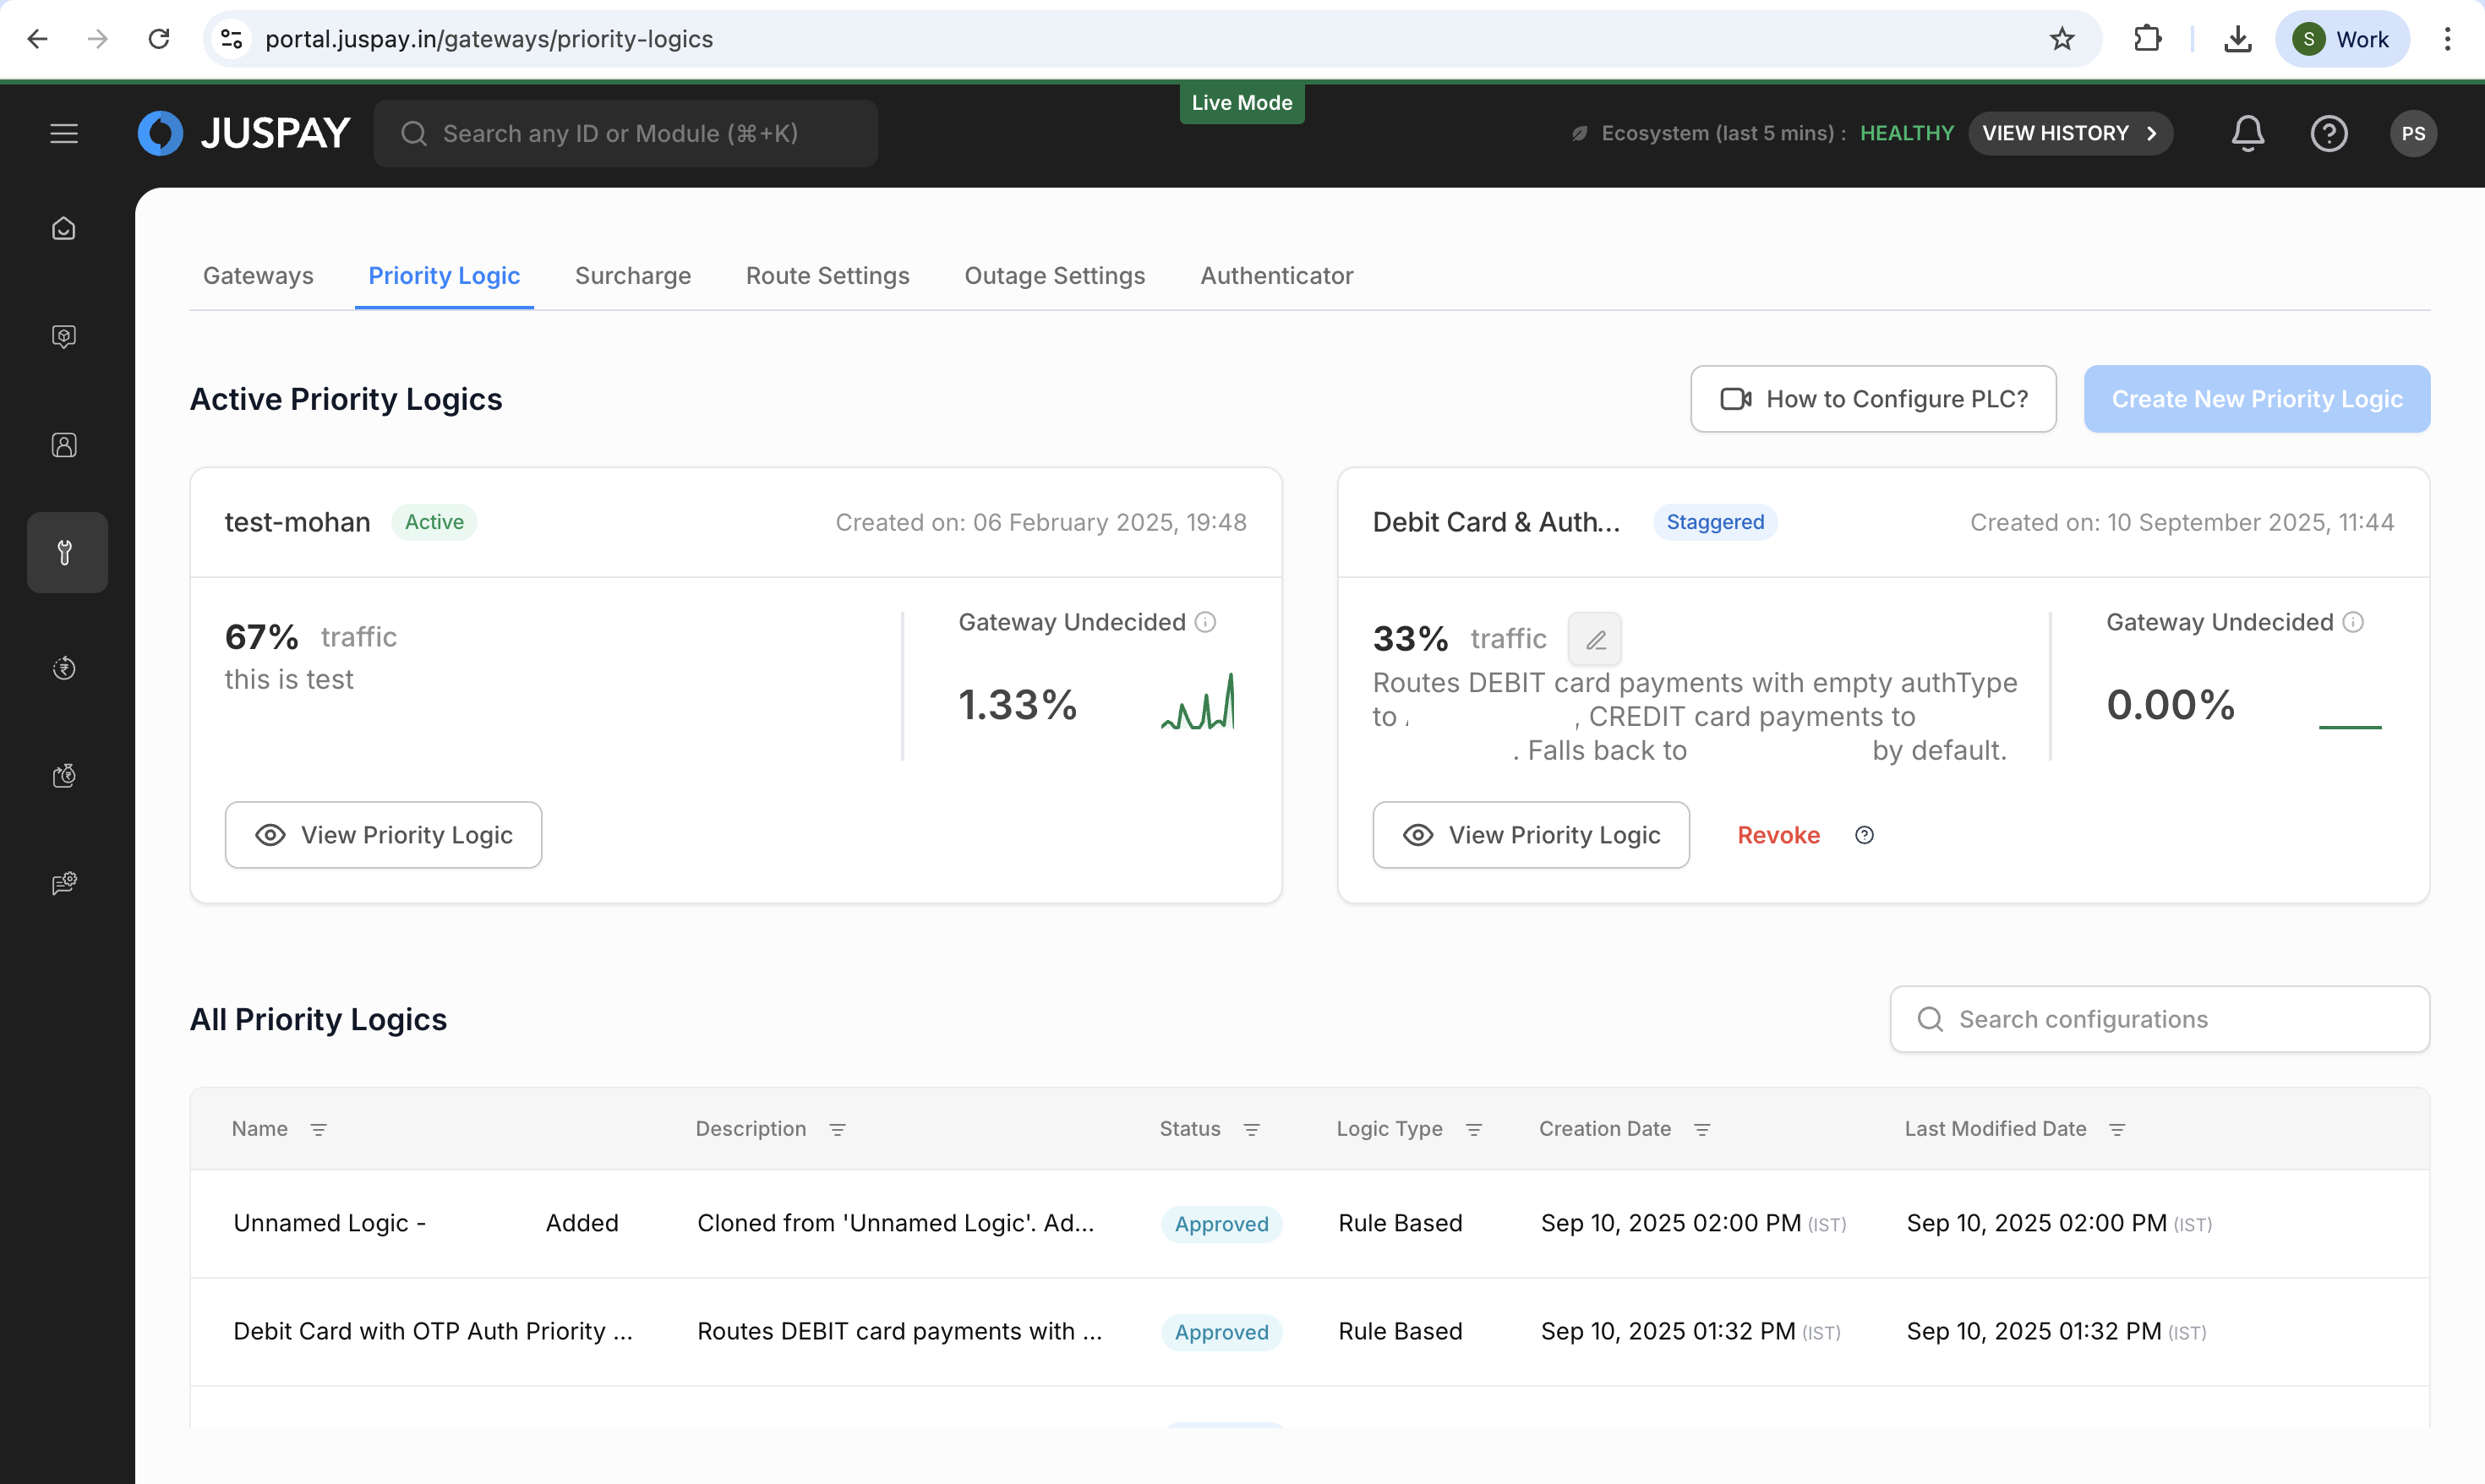
Active Priority Logics Section
This section shows currently active priority logic configurations with real-time performance metrics:
Configuration Name: Display name of the active priority logic.
Traffic Percentage: Shows the percentage of traffic being routed through this configuration
Gateway Undecided: Displays the percentage of transactions where gateway routing decisions are pending or undetermined
Performance Indicators: Real-time metrics showing routing effectiveness and decision accuracy
All Priority Logics Table
A comprehensive table listing all priority logic configurations with the following columns:
Name: Configuration identifier and display name
Description: Brief explanation of the priority logic purpose and scope
Status: Current state of the configuration (Active, Inactive, Pending, etc.)
Logic Type: Configuration approach used (Code Based, Rule Based, etc.)
Creation Date: Timestamp when the configuration was originally created
Last Modified Date: Timestamp of the most recent configuration update
Create New Priority Logic
The "Create new Priority Logic" feature is a comprehensive gateway routing configuration tool that allows merchants to create intelligent payment routing rules. This feature enables you to set up custom routing logic that determines how payment transactions are directed across different payment gateways based on various business criteria, performance metrics, and transaction characteristics.
Prerequisites and Permissions
Before creating Priority Logic configurations, ensure you have the appropriate access:
Required Permissions:
Basic Access: gatewaysprioritylogic ACL permission is required to access the Priority Logic module
Creation Rights: Same gatewaysprioritylogic permission allows creation of new configurations
Maker-Checker Workflow:
Maker Mode: Users with gatewaysprioritylogic permission can create and submit Priority Logic configurations
Checker Mode: When maker-checker is enabled, configurations require approval from users with checker permissions
Auto-Approval: In environments where maker-checker is disabled, configurations may be auto-approved based on system settings
Environment-Specific Requirements:
Production Environment: Additional validation and approval steps may be required
Code-Based Configurations: May require enhanced review in production environments
Enforce Rules: Configurations with enforce rules enabled may need special approval due to risk implications
Core Purpose
Priority Logic enables you to create custom routing rules that determine how payment transactions are directed across different payment gateways based on various business criteria, performance metrics, and transaction characteristics.
Key Components of Creating Priority Logic
1. Configuration Types
Rule-Based UI: Visual interface for creating routing rules using conditions and gateways
Intuitive drag-and-drop interface for rule creation
Visual condition builder with dropdown selections
Gateway priority configuration with percentage distribution
Real-time validation and error checking
2. Rule Creation Features
Conditional Routing: Set up rules based on transaction attributes including:
Payment Method: VISA, Mastercard, UPI, Netbanking, Wallets, etc.
Transaction Amount (monetary value of the payment transaction): Greater than, less than, between ranges
Card Issuer (bank or financial institution that issued the payment card): Specific banks and financial institutions
Card Issuer Country: Geographic routing based on card origin
Currency Type (transaction currency code): INR, USD, EUR, and 100+ supported currencies
Customer ID (unique identifier for the customer making the payment): Route specific customers to preferred gateways
Order ID (unique identifier for the specific order or transaction): Transaction-specific routing rules
Custom Fields (UDF 1-10): User-defined fields for merchant-specific routing
Card BIN (Bank Identification Number - first 6 or 8 digits of card number): First 6 or 8 digits of card number
Payment Source: PSP names for UPI payments (PhonePe, GPay, etc.)
UPI Handle (specific UPI identifier for UPI Collect transactions): Specific UPI handles for UPI Collect
Gateway Priority: Define the order of gateway preference for each rule
Drag-and-drop gateway ordering
Percentage-based traffic distribution
Fallback gateway configuration
Gateway-specific settings and parameters
Volume-Based Distribution: Split traffic percentages across multiple gateways
Percentage allocation across multiple gateways
Staggered rollout capabilities
Real-time traffic monitoring
Default Gateway Configuration: Fallback gateways when no rules match
Always-available fallback options
Cascading fallback logic
Emergency routing during outages
Performance-based automatic switching
3. Advanced Capabilities
Enforce Rules: Force transactions to only use specified gateways (no fallback)
Strict routing enforcement
No fallback to other gateways
Test Case Validation: Automatic validation of rules before activation
Comprehensive rule testing with sample transactions
Import/Export: Upload JSON configurations or write custom code
JSON file upload for bulk configuration
Code editor for advanced custom logic
Configuration templates and examples
Rule Replication: Copy existing configurations as templates
Clone successful configurations
Modify existing rules for new scenarios
Step-by-Step Usage Instructions
Accessing Priority Logic
Navigate to Gateway Management
From the dashboard homepage, click on PG Control Center in the main navigation
The system will display the gateway management interface with 8 tabs
Select Priority Logic Tab
Click on the Priority Logic tab (3rd tab in the sequence)
The system will navigate to /gateways/priority-logics
Wait for the module to load completely
Verify Access
Ensure you have the required gatewaysprioritylogic permission
If access is denied, contact your administrator for permission assignment
Creating New Priority Logic
Step 1: Initiate Creation Process
Access Creation Interface
From the Priority Logic main page, click on "Create New Priority Logic" or "Add New Configuration" button
The system will open the configuration creation interface
Choose between Advanced Configuration or Volume Based Routing based on your needs
Select Configuration Type
Rule-Based UI: Choose this for visual rule creation with drag-and-drop interface
Code-Based: Select this for advanced JavaScript-based routing logic (may require additional approval in production)
Import Rule: Use this option to upload existing JSON configurations
Step 2: Basic Configuration Details
Enter Basic Information
Configuration Name (unique identifier for the priority logic configuration, must be descriptive and follow naming conventions): Provide a unique, descriptive name for your priority logic
Description: Add detailed description explaining the purpose and scope of the routing rules
Configuration Type: Confirm your selection (Rule-Based UI or Code-Based)
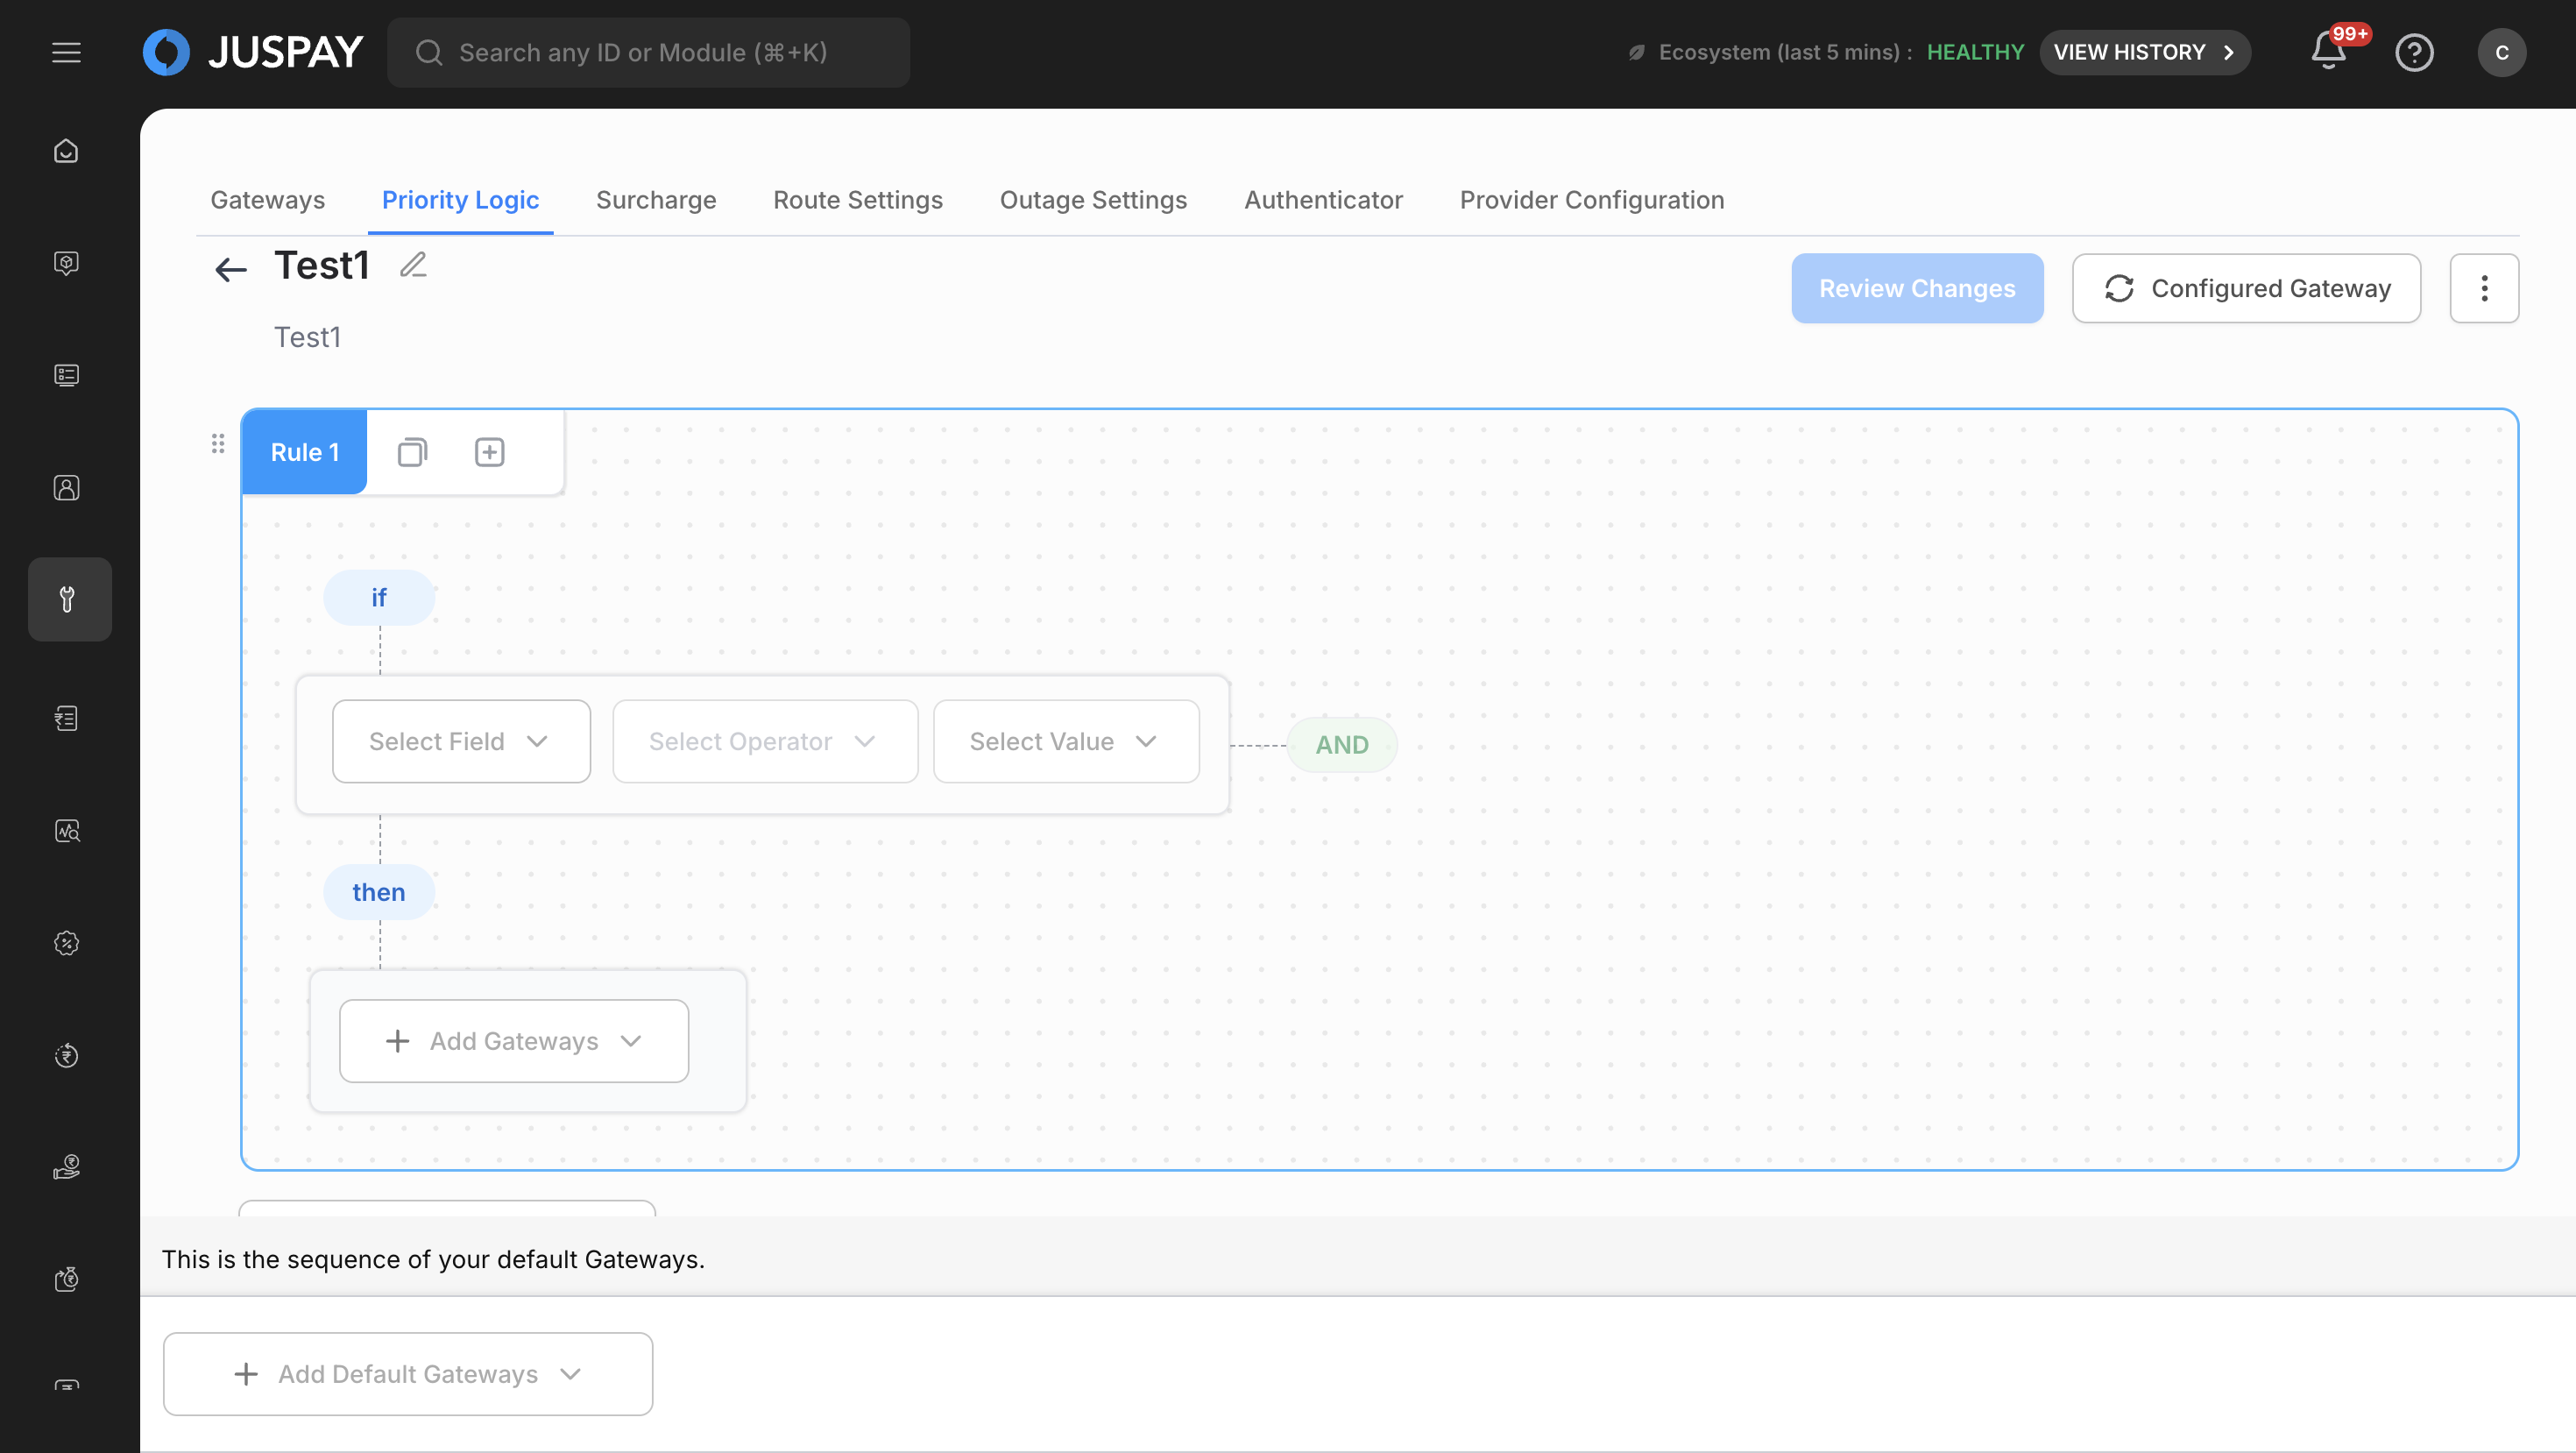
Step 3: Configure Routing Rules (Rule-Based UI)
Create Routing Conditions
Click "Add Rule" to create your first routing rule
Define conditions using the visual condition builder:
Select field type (Payment Method, Amount, Card Issuer, etc.)
Choose operator (equals, greater than, less than, contains, etc.)
Enter or select values from dropdown lists
Add multiple conditions using AND/OR logic operators
Set Gateway Priority
Drag and drop gateways to set priority order
Configure percentage distribution for traffic splitting
Enable or disable fallback options
Configure Volume-Based Distribution (Optional)
Add volume-based distribution rules for traffic splitting
Set percentage allocation across multiple gateways
Set Default Gateways
Configure fallback gateways for when no rules match
Set cascading fallback logic
Configure emergency routing options
Step 4: Advanced Configuration (Code-Based)
Write Custom Logic
Use the JavaScript code editor with syntax highlighting
Implement custom routing algorithms
Add complex conditional logic and calculations
Import external libraries if needed
Test and Validate Code
Use the built-in validation tools
Test with sample transaction data
Check for syntax errors and logical issues
Optimize performance and efficiency
Step 5: Validation and Testing
Automatic Validation
The system automatically generates test cases based on your rules
Review validation results and conflict detection
Address any errors or warnings highlighted by the system
Ensure all rules are properly configured and non-conflicting
Manual Testing
Test with sample transaction scenarios
Verify routing behavior matches expectations
Check fallback and error handling scenarios
Validate performance impact and efficiency
Step 6: Review and Comparison
Review Configuration
Review all rules and settings in the summary view
Compare with currently active priority logic (if any)
Analyze impact on transaction routing and performance
Review cost and efficiency implications
Step 7: Approval and Activation
Submit for Approval (if Maker-Checker is enabled)
Submit configuration for approval workflow
Add approval comments and justification
Track approval status and notifications
Address any feedback from approvers
Choose Activation Method
Immediate Activation: Activate immediately after approval
Staggered Activation: Gradually migrate traffic with percentage rollout
Manual Activation: Activate manually at a later time
Step 8: Monitoring and Optimization
Monitor Performance
Track transaction success rates and routing effectiveness
Monitor gateway performance and load distribution
Analyze cost impact and optimization opportunities
Set up alerts for performance degradation
Optimize and Adjust
Make adjustments based on performance data
Update rules for changing business requirements
Optimize for cost and efficiency improvements
Plan regular reviews and updates
Managing Existing Priority Logic
View Configurations
Browse existing priority logic configurations in the main list
Use filters and search to find specific configurations
View configuration details and status information
Edit and Update
Click on any configuration to view details
Use "Edit" or "Create Replica" options to modify existing rules
Follow the same creation workflow for updates
Activation Management
Activate, deactivate, or schedule configurations
Monitor active configuration performance
Switch between different configurations as needed
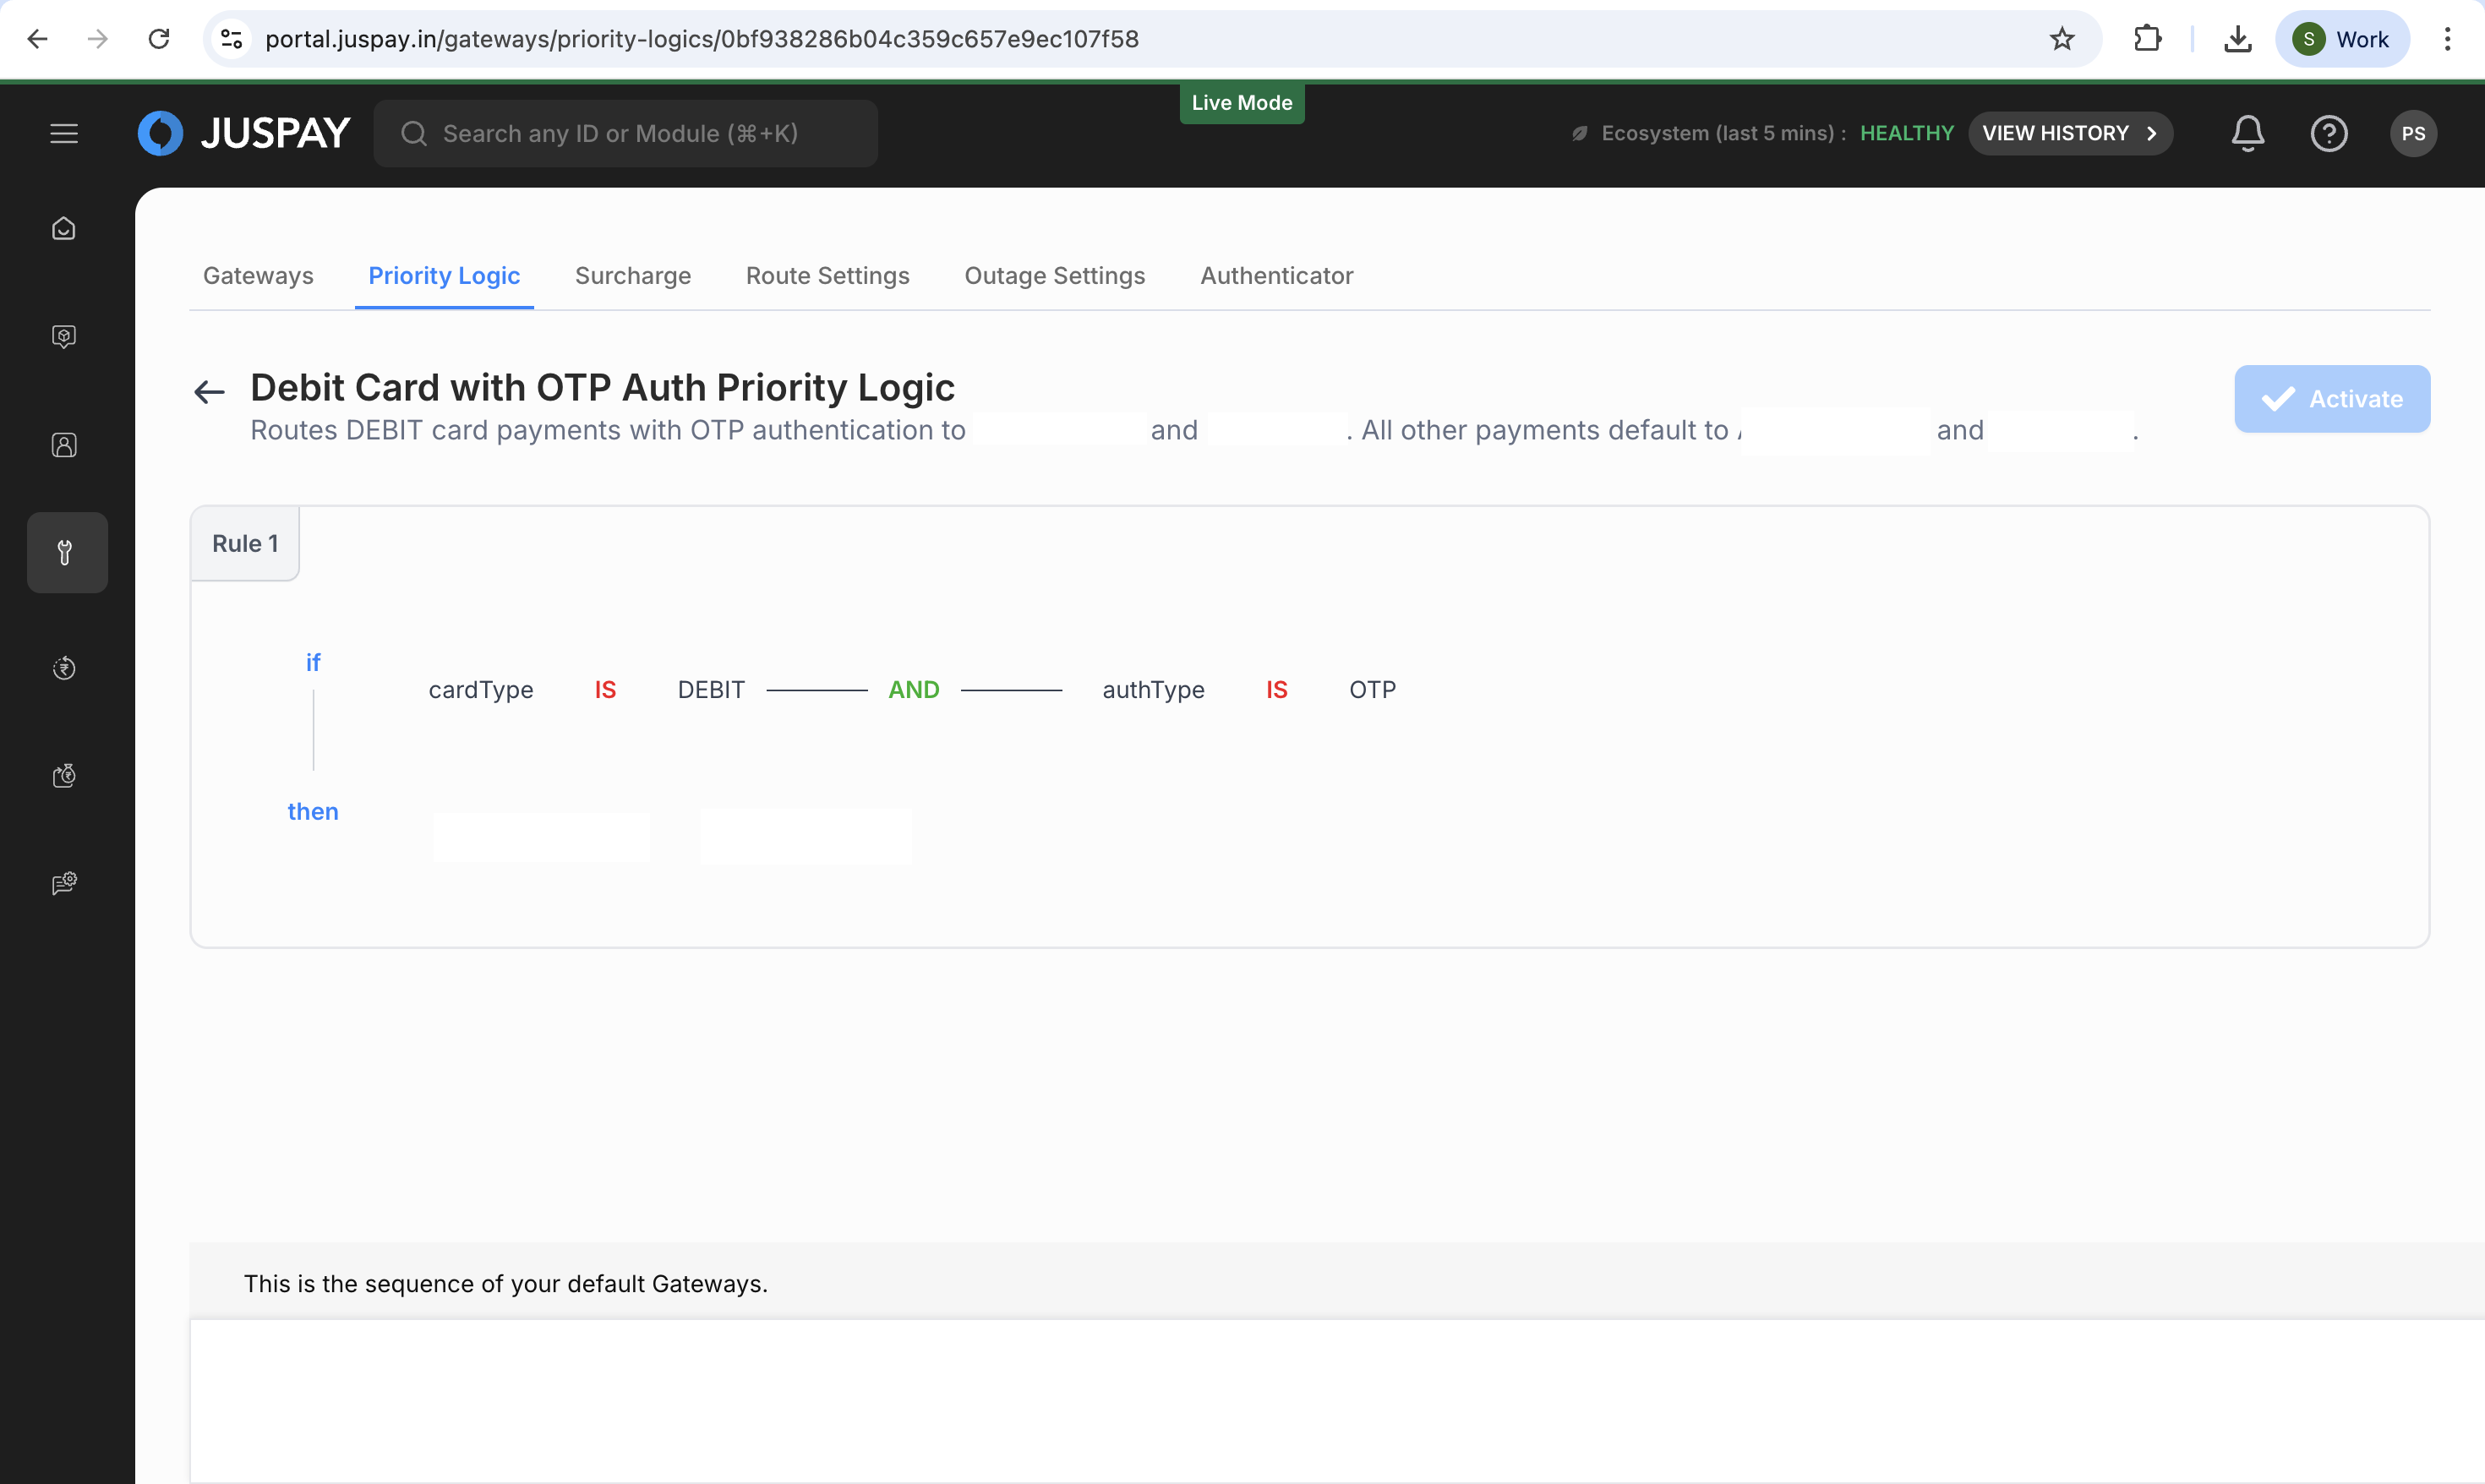
How to Make an Approved Priority Logic Active
When a Priority Logic configuration has been approved but is not yet active, follow these steps to activate it:
Navigate to Priority Logic List
Go to Gateways → Priority Logics
Locate the approved configuration in the "All Priority Logics" table
The status should show "Approved" for configurations ready for activation
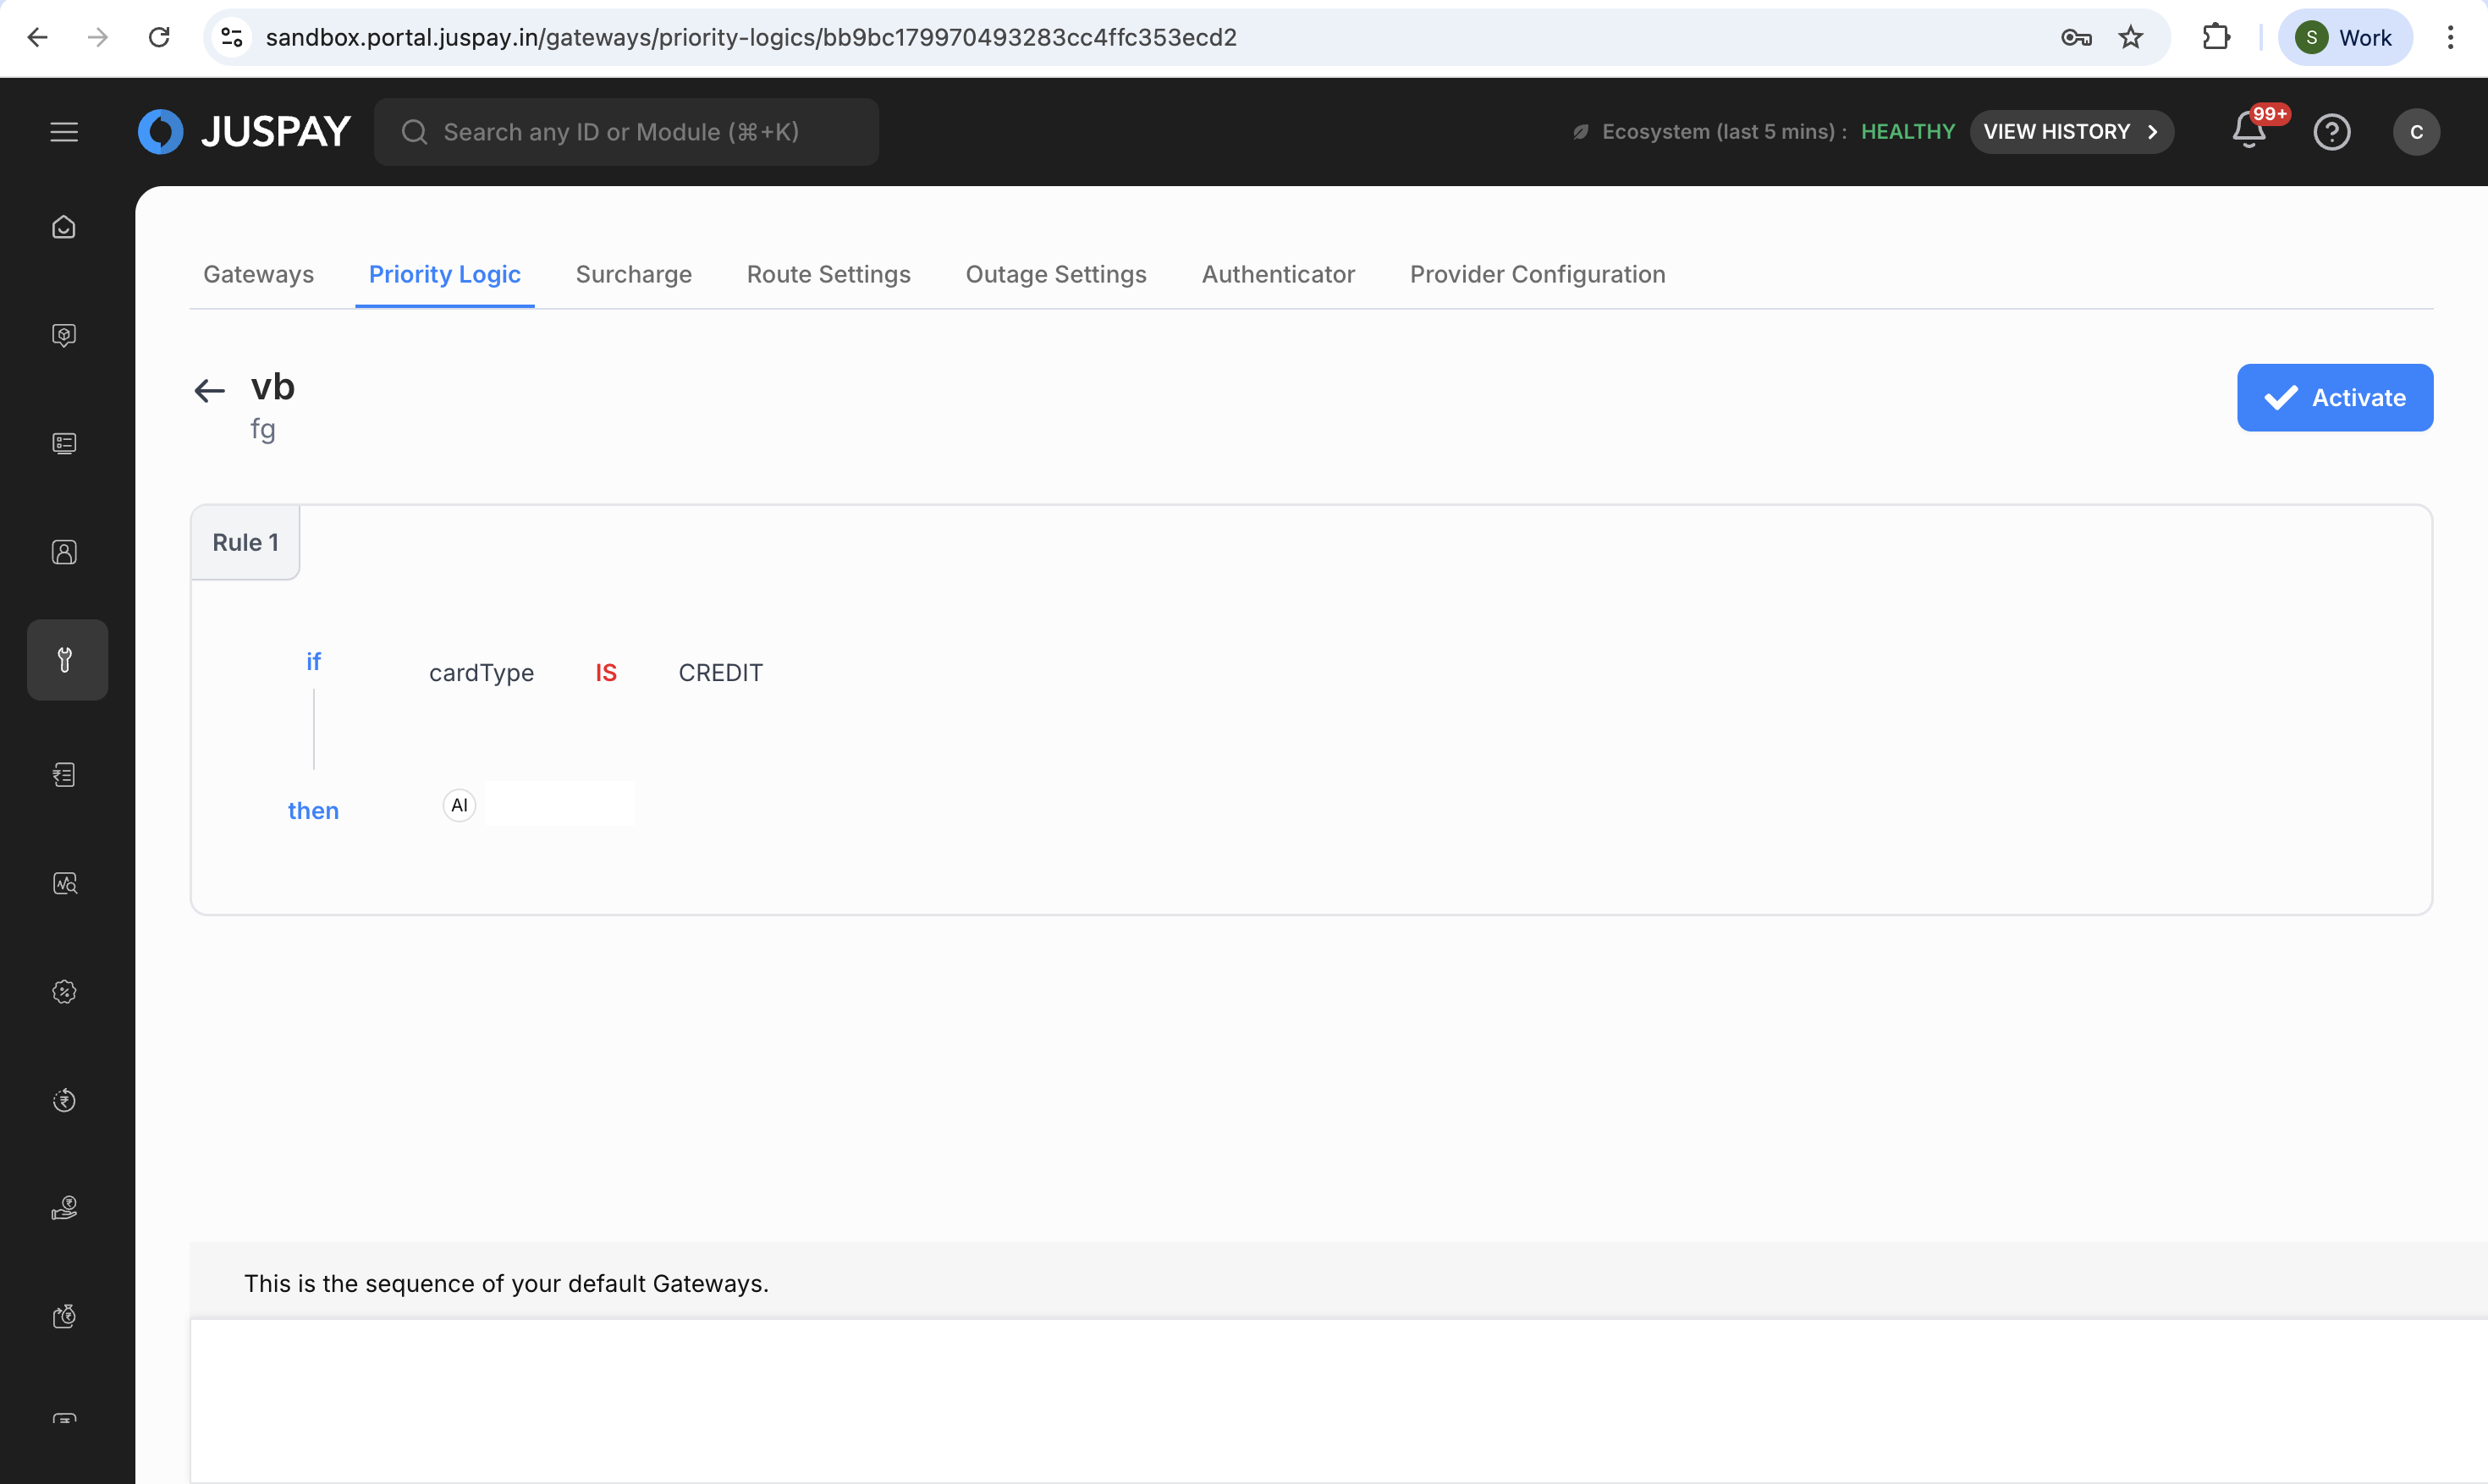
Activate the Configuration
Click on the approved Priority Logic configuration
Click the "Activate" button in the configuration details view
Choose activation method:
Immediate Activation: Activates the configuration immediately, routing 100% traffic through it
Staggered Activation: Gradually migrates traffic with a specified percentage
Confirm Activation
Review the activation settings and impact
Confirm the activation when prompted
Monitor the configuration status change from "Approved" to "Active"
How to Edit a Priority Logic Configuration
Priority Logic configurations cannot be directly edited once created. Instead, you must clone the existing configuration and create a new one:
Clone Existing Configuration
Navigate to the Priority Logic you want to modify
Click on the configuration to view its details
Click the "Create Replica" or "Copy Config" button
This creates a copy of the existing configuration with all current settings
Modify the Cloned Configuration
The system opens the cloned configuration in edit mode
Make necessary changes to rules, conditions, gateways, or settings
Update the configuration name to distinguish it from the original
Add or modify the description to reflect the changes made
Save and Submit
Follow the standard creation workflow for the modified configuration
Submit for validation and approval (if maker-checker is enabled)
Once approved, you can activate the new configuration
Deactivate Original Configuration
After successfully activating the new configuration
Deactivate or delete the original configuration if no longer needed
Ensure smooth transition between configurations
How to Increase or Decrease Stagger Percentage
For configurations using staggered activation, you can adjust the traffic percentage:
Access Stagger Controls
Navigate to the active Priority Logic configuration
Locate the stagger percentage controls in the configuration dashboard
Current stagger percentage is displayed in the "Active Priority Logics" section
Modify Stagger Percentage
Click on the stagger percentage value or "Edit Stagger" option
Enter the new percentage value (1-99%)
Increase: Higher percentage routes more traffic through the new configuration
Decrease: Lower percentage routes less traffic through the new configuration
Apply Changes
Confirm the new stagger percentage
Changes take effect immediately
Monitor traffic distribution and performance metrics
Complete Migration
Gradually increase stagger percentage based on performance
When confident, set to 100% to complete the migration
Deactivate the previous configuration once migration is successful
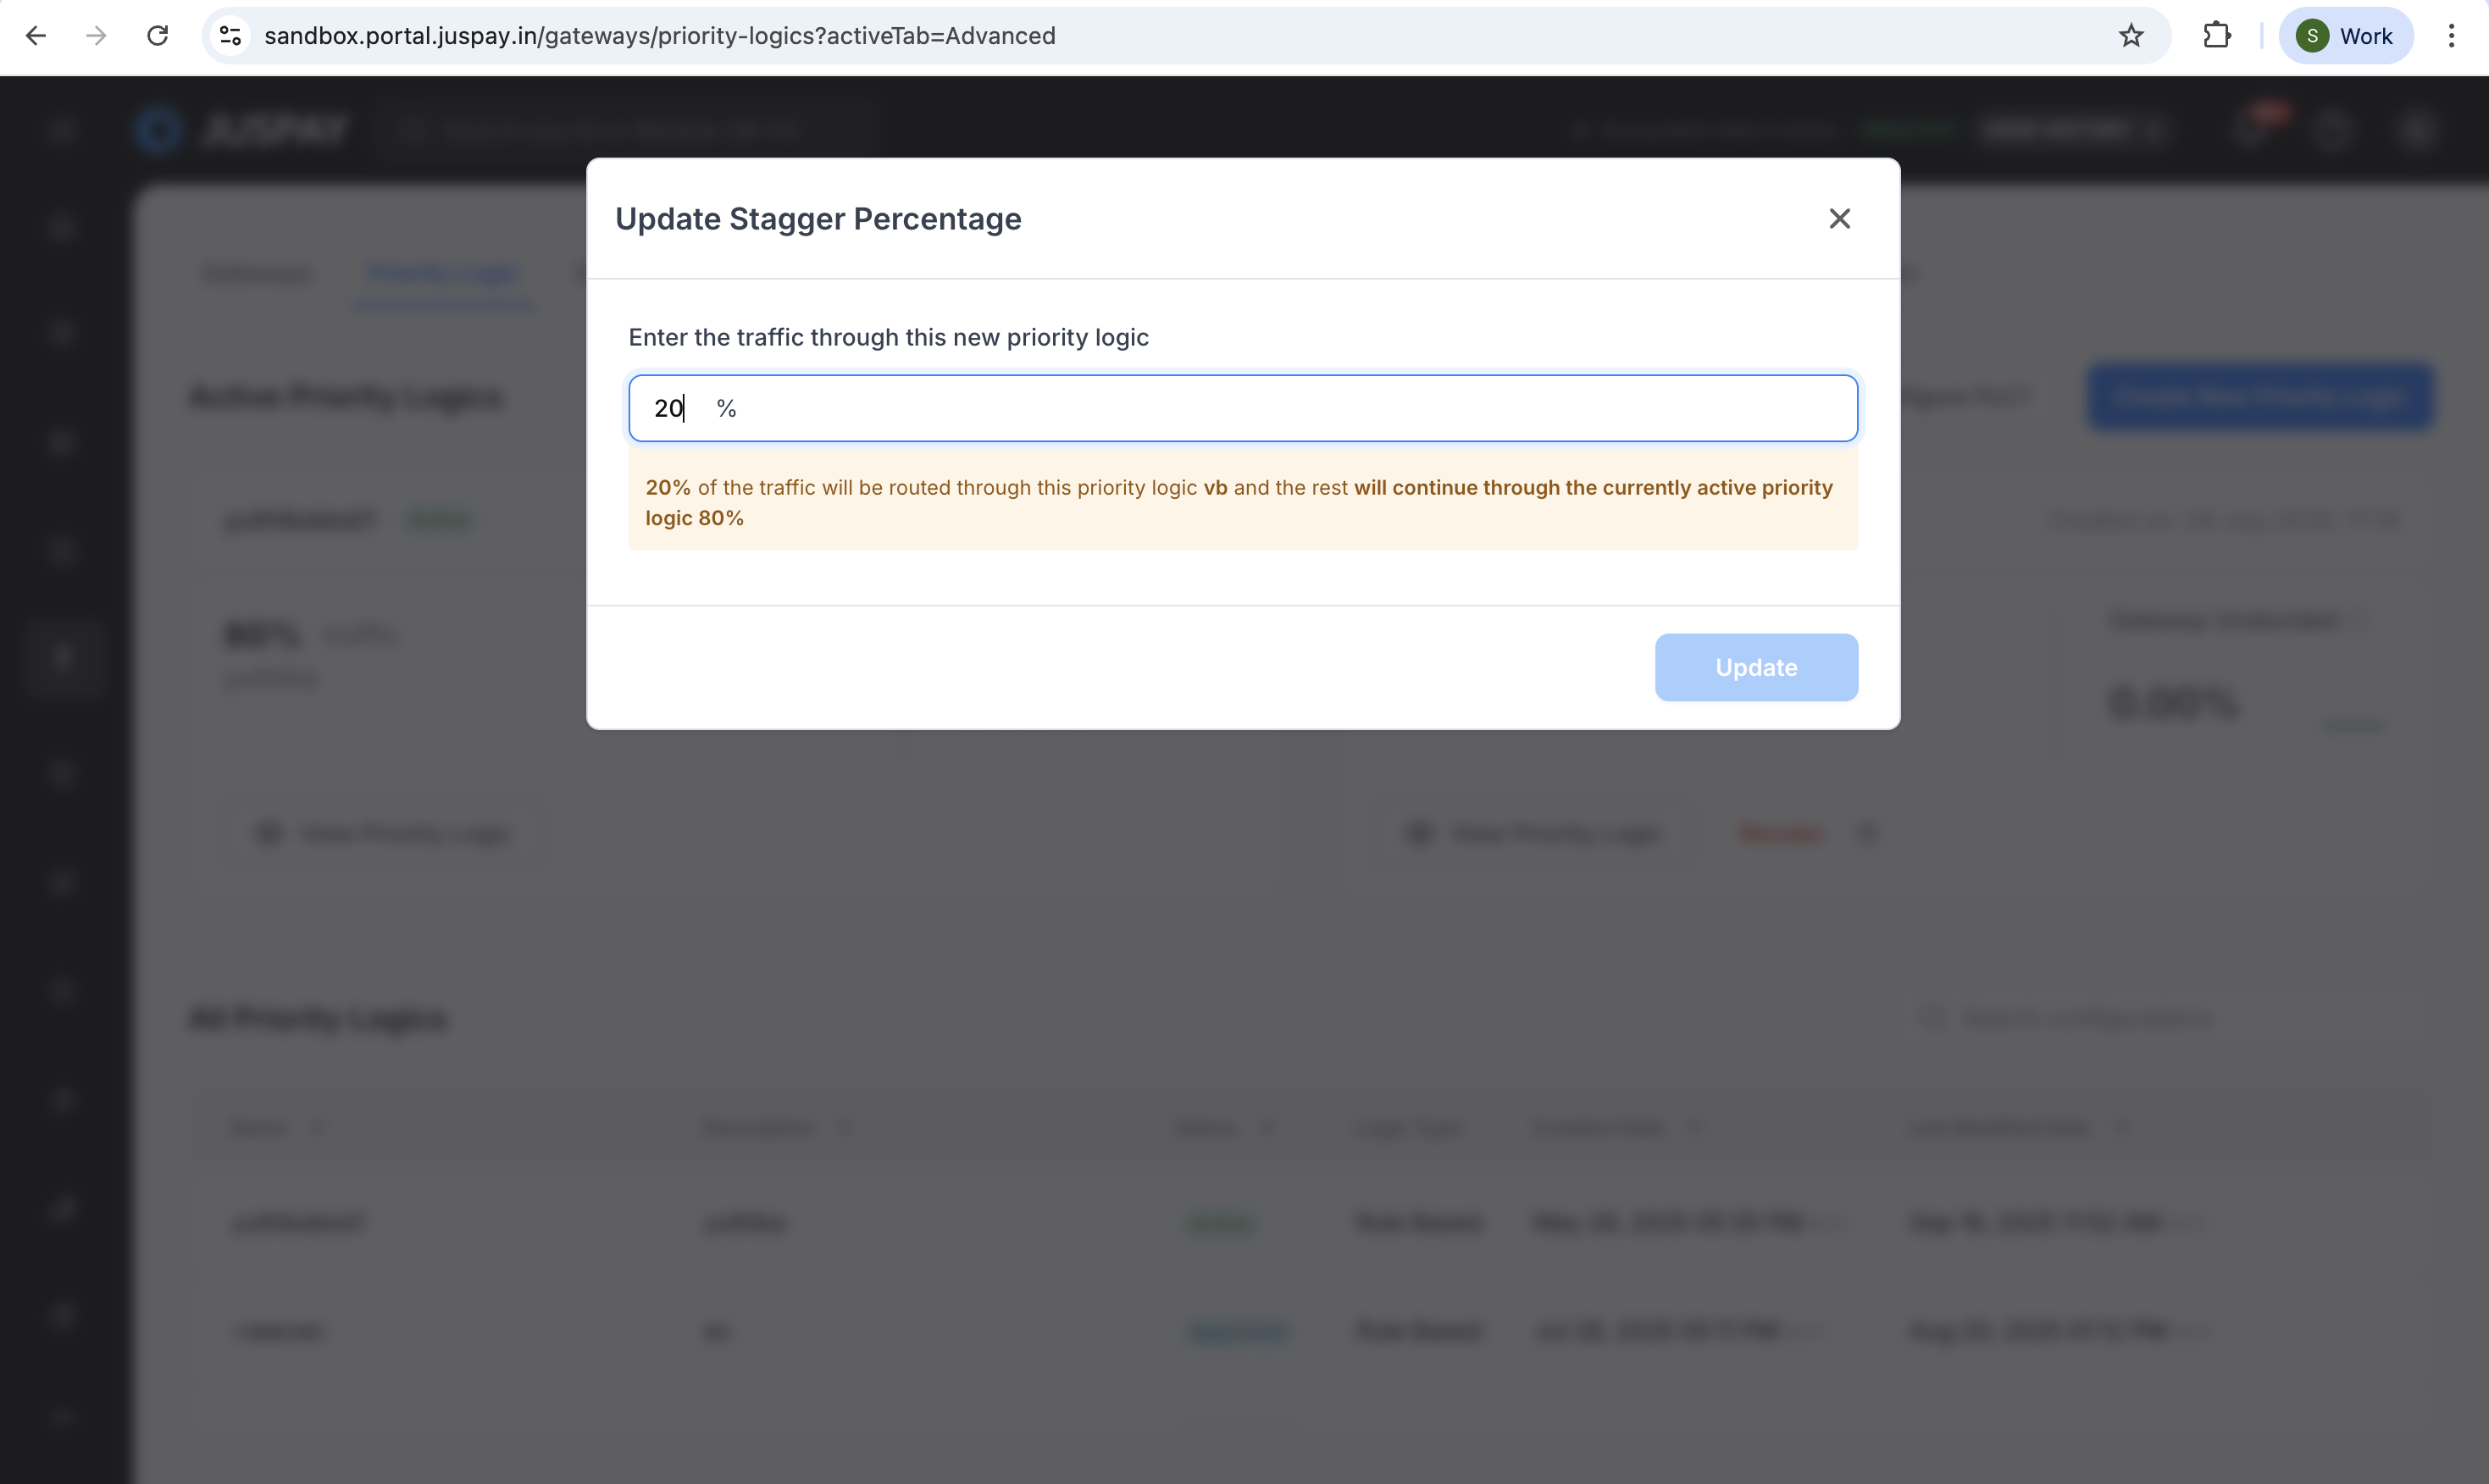
Note: Stagger percentage represents the portion of traffic routed through the new Priority Logic, with the remaining traffic continuing through the previously active configuration.
Scheduled PLC
Scheduled PLC allows you to pre-plan and automate the activation of Priority Logic configurations at specific dates and times. This feature is particularly useful for:
Planning Gateway Migrations: Schedule gateway failover testing, new gateway onboarding, or switching primary gateways during low-traffic periods (typically 2:00 AM - 5:00 AM IST for most businesses) to minimize customer impact
Business Rule Campaign Changes: Implement time-sensitive routing rules for flash sales, festival promotions, or high-volume events that require specific gateway configurations (e.g., routing to higher-capacity gateways during Diwali or Black Friday sales)
Creating a Scheduled PLC
Step 1: Prepare Your Priority Logic Configuration
Create or Clone a Priority Logic Configuration:
Follow the standard "Create New Priority Logic" workflow
Configure all routing rules, conditions, and gateway settings
Complete validation and testing to ensure the configuration is production-ready
Submit for Approval:
Submit your configuration through the maker-checker workflow if enabled
Ensure the configuration reaches "Approved" status before scheduling
Note: Only "Approved" configurations can be scheduled
Step 2: Access Scheduling Interface
Navigate to Gateways → Priority Logics
Click on the Approved configuration you want to schedule
In the configuration details view, locate the "Schedule Activation" option
Step 3: Configure Schedule Parameters
Set Activation Date and Time:
Click on "Schedule Activation" or "Set Schedule" button
Use the date-time picker to select:
Date: Choose the target activation date
Time: Specify the exact time for activation (typically in your local timezone)
The system displays the scheduled time in UTC for reference
Set Deactivation Date and Time (Optional):
You can configure a Scheduled PLC to be active only for a stipulated time period:
Note: Setting a deactivation date and time is optional. If you don't set a deactivation time, the Scheduled PLC will remain active indefinitely until manually deactivated.
After setting the activation time, you have the option to set a deactivation time
Use the date-time picker to select:
Date: Choose the target deactivation date
Time: Specify the exact time for deactivation
When both activation and deactivation times are configured:
The PLC becomes active at the scheduled activation time
The PLC automatically deactivates at the scheduled deactivation time
The status changes from "Scheduled" → "Active" → "Inactive"
After deactivation, transactions will use the next available active PLC or default routing
This is useful for temporary routing configurations (e.g., during high-traffic events, testing new gateways, or planned maintenance windows)
Configure Activation Method:
Immediate Effect: The configuration becomes active at the scheduled time without gradual traffic migration
Staggered Activation: Optionally configure staggered rollout to gradually shift traffic
Step 4: Review and Confirm
Review all schedule parameters:
Activation date and time
Configuration details
Activation method
Click "Confirm Schedule" to finalize
The configuration status updates to "Scheduled" with the activation timestamp displayed
Step 5: Monitor Scheduled Activation
Before Activation:
The configuration remains in "Scheduled" status
Monitor for any changes to gateways or business conditions that might affect the scheduled activation
Prepare to verify routing behavior after activation
At Activation Time:
The system automatically activates the configuration at the scheduled time
Status changes from "Scheduled" to "Active"
Traffic routing transitions according to the configured activation method
After Activation:
Verify that the configuration is routing transactions as expected
Monitor performance metrics and gateway distribution
Check for any unexpected behavior or errors
Use Cases
Use Case 1: Gateway Performance Optimization
Scenario: Operations team needs to optimize transaction routing based on gateway performance metrics.
Configuration:
Rule-based routing with performance conditions
Gateway priority based on success rates
Automatic failover for underperforming gateways
Outcome: Improved transaction success rates and optimized gateway utilization.
Use Case 2: Business Rule Implementation
Scenario: Business team needs to implement specific routing rules based on transaction characteristics and commercial agreements.
Configuration:
Transaction amount-based routing rules
Card issuer and currency-specific routing
Commercial agreement compliance routing
Outcome: Alignment with business objectives and revenue optimization.
Use Case 3: Disaster Recovery and Failover Management
Scenario: Technical team needs to ensure business continuity during gateway outages or technical issues.
Configuration:
Robust failover logic with cascading gateways
Emergency routing during outages
Automated recovery processes
Outcome: Business continuity during outages with minimized transaction failures.
Troubleshooting
Configuration Validation Errors
"Configuration Name already exists"
Cause: Attempting to create a priority logic with a name that's already in use
Resolution: Choose a unique name for your configuration
"Please provide Code field"
Cause: Code-based configuration submitted without JavaScript code
Resolution: Add the required JavaScript code in the code editor
"Need atleast 1" (Default Gateways)
Cause: No default gateways configured
Resolution: Add at least one default gateway for fallback routing
File Upload Errors
"Invalid File! Please upload Json file"
Cause: Attempting to upload a non-JSON file for rule import
Resolution: Ensure the file is in valid JSON format before uploading
"Invalid Json Format"
Cause: JSON file contains syntax errors or invalid structure
Resolution: Validate JSON syntax and ensure proper structure
API and System Errors
"You do not have access"
Cause: User lacks required permissions for the operation
Resolution: Contact administrator to assign gatewaysprioritylogic permissions
"Something went wrong. Please try again"
Cause: General system error during API operations
Resolution: Retry the operation; contact support if issue persists
"Error! Try Syncing again"
Cause: Network or data synchronization issues
Resolution: Refresh the page and retry the operation
Code-Based Configuration Errors
COMPILATION_ERROR
Cause: JavaScript code contains syntax errors or invalid logic
Resolution: Review and fix JavaScript syntax errors in the code editor
CODE_TOO_LARGE
Cause: JavaScript code exceeds size limitations
Resolution: Optimize and reduce the size of your custom code
INVALID_GATEWAY
Cause: Referenced gateway is not properly configured
Resolution: Verify gateway names and ensure they are properly configured
GATEWAY_NOT_SUPPORTED
Cause: Attempting to use an unsupported gateway
Resolution: Use only supported and enabled gateways in your configuration
Validation Warnings
"No Gateway Selected"
Cause: Rule created without selecting any gateways
Resolution: Add at least one gateway to the rule configuration
"Invalid Conditions"
Cause: Rule conditions are incomplete or incorrectly formatted
Resolution: Review and complete all condition fields with valid values
Statuses & Indicators
Rule Status
Active: Rule is live and routing transactions
Inactive: Rule exists but is not processing transactions
Draft: Rule is being created or edited, not yet submitted
Pending Approval: Rule awaiting maker-checker approval
Scheduled: Rule approved and scheduled for future activation
Gateway Status Within Rules
Primary: Highest priority gateway in the routing order
Secondary: Backup gateway for fallback scenarios
Disabled: Gateway temporarily excluded from routing
Fallback Enabled: Gateway will be used if higher priority gateways fail
Approval Status
Approved: Changes approved and ready for activation
Rejected: Changes rejected with reviewer comments
Under Review: Currently being evaluated by approvers
Auto-Approved: Automatically approved based on criteria