

Batch Delete VPA
Overview
The Batch Delete VPA module provides comprehensive bulk Virtual Payment Address deletion capabilities for processing multiple VPA deletion requests simultaneously through CSV file uploads. It offers real-time progress tracking, status monitoring, and detailed reporting for all VPA deletion operations processed through the Juspay payment platform.
This module is designed for a wide range of users, including:
UPI Operations Teams: For managing VPA lifecycle and compliance requirements efficiently and monitoring VPA deletion performance across different customer segments with comprehensive UPI logs.
Banking Teams: For bulk VPA deletion and UPI address management, system compliance management, and tracking VPA deletion status across multiple customer records with detailed banking trails.
Compliance Teams: To process VPA deletions for regulatory compliance in bulk, track deletion status, and provide comprehensive UPI compliance management for enhanced regulatory adherence.
Accessing the Module
Log in to the Juspay dashboard.
From the main navigation menu on the left, click on Payments.
Select Bulk Operations from the Payments submenu.
Click on the Batch Delete VPA tab from the bulk operations navigation.
The navigation URL for this module is https://portal.juspay.in/batch/batch-vpa-deletes
 .
.

Step-by-Step Usage Instructions
Creating Batch Delete VPA
Step 1: Access the Batch Delete VPA Interface
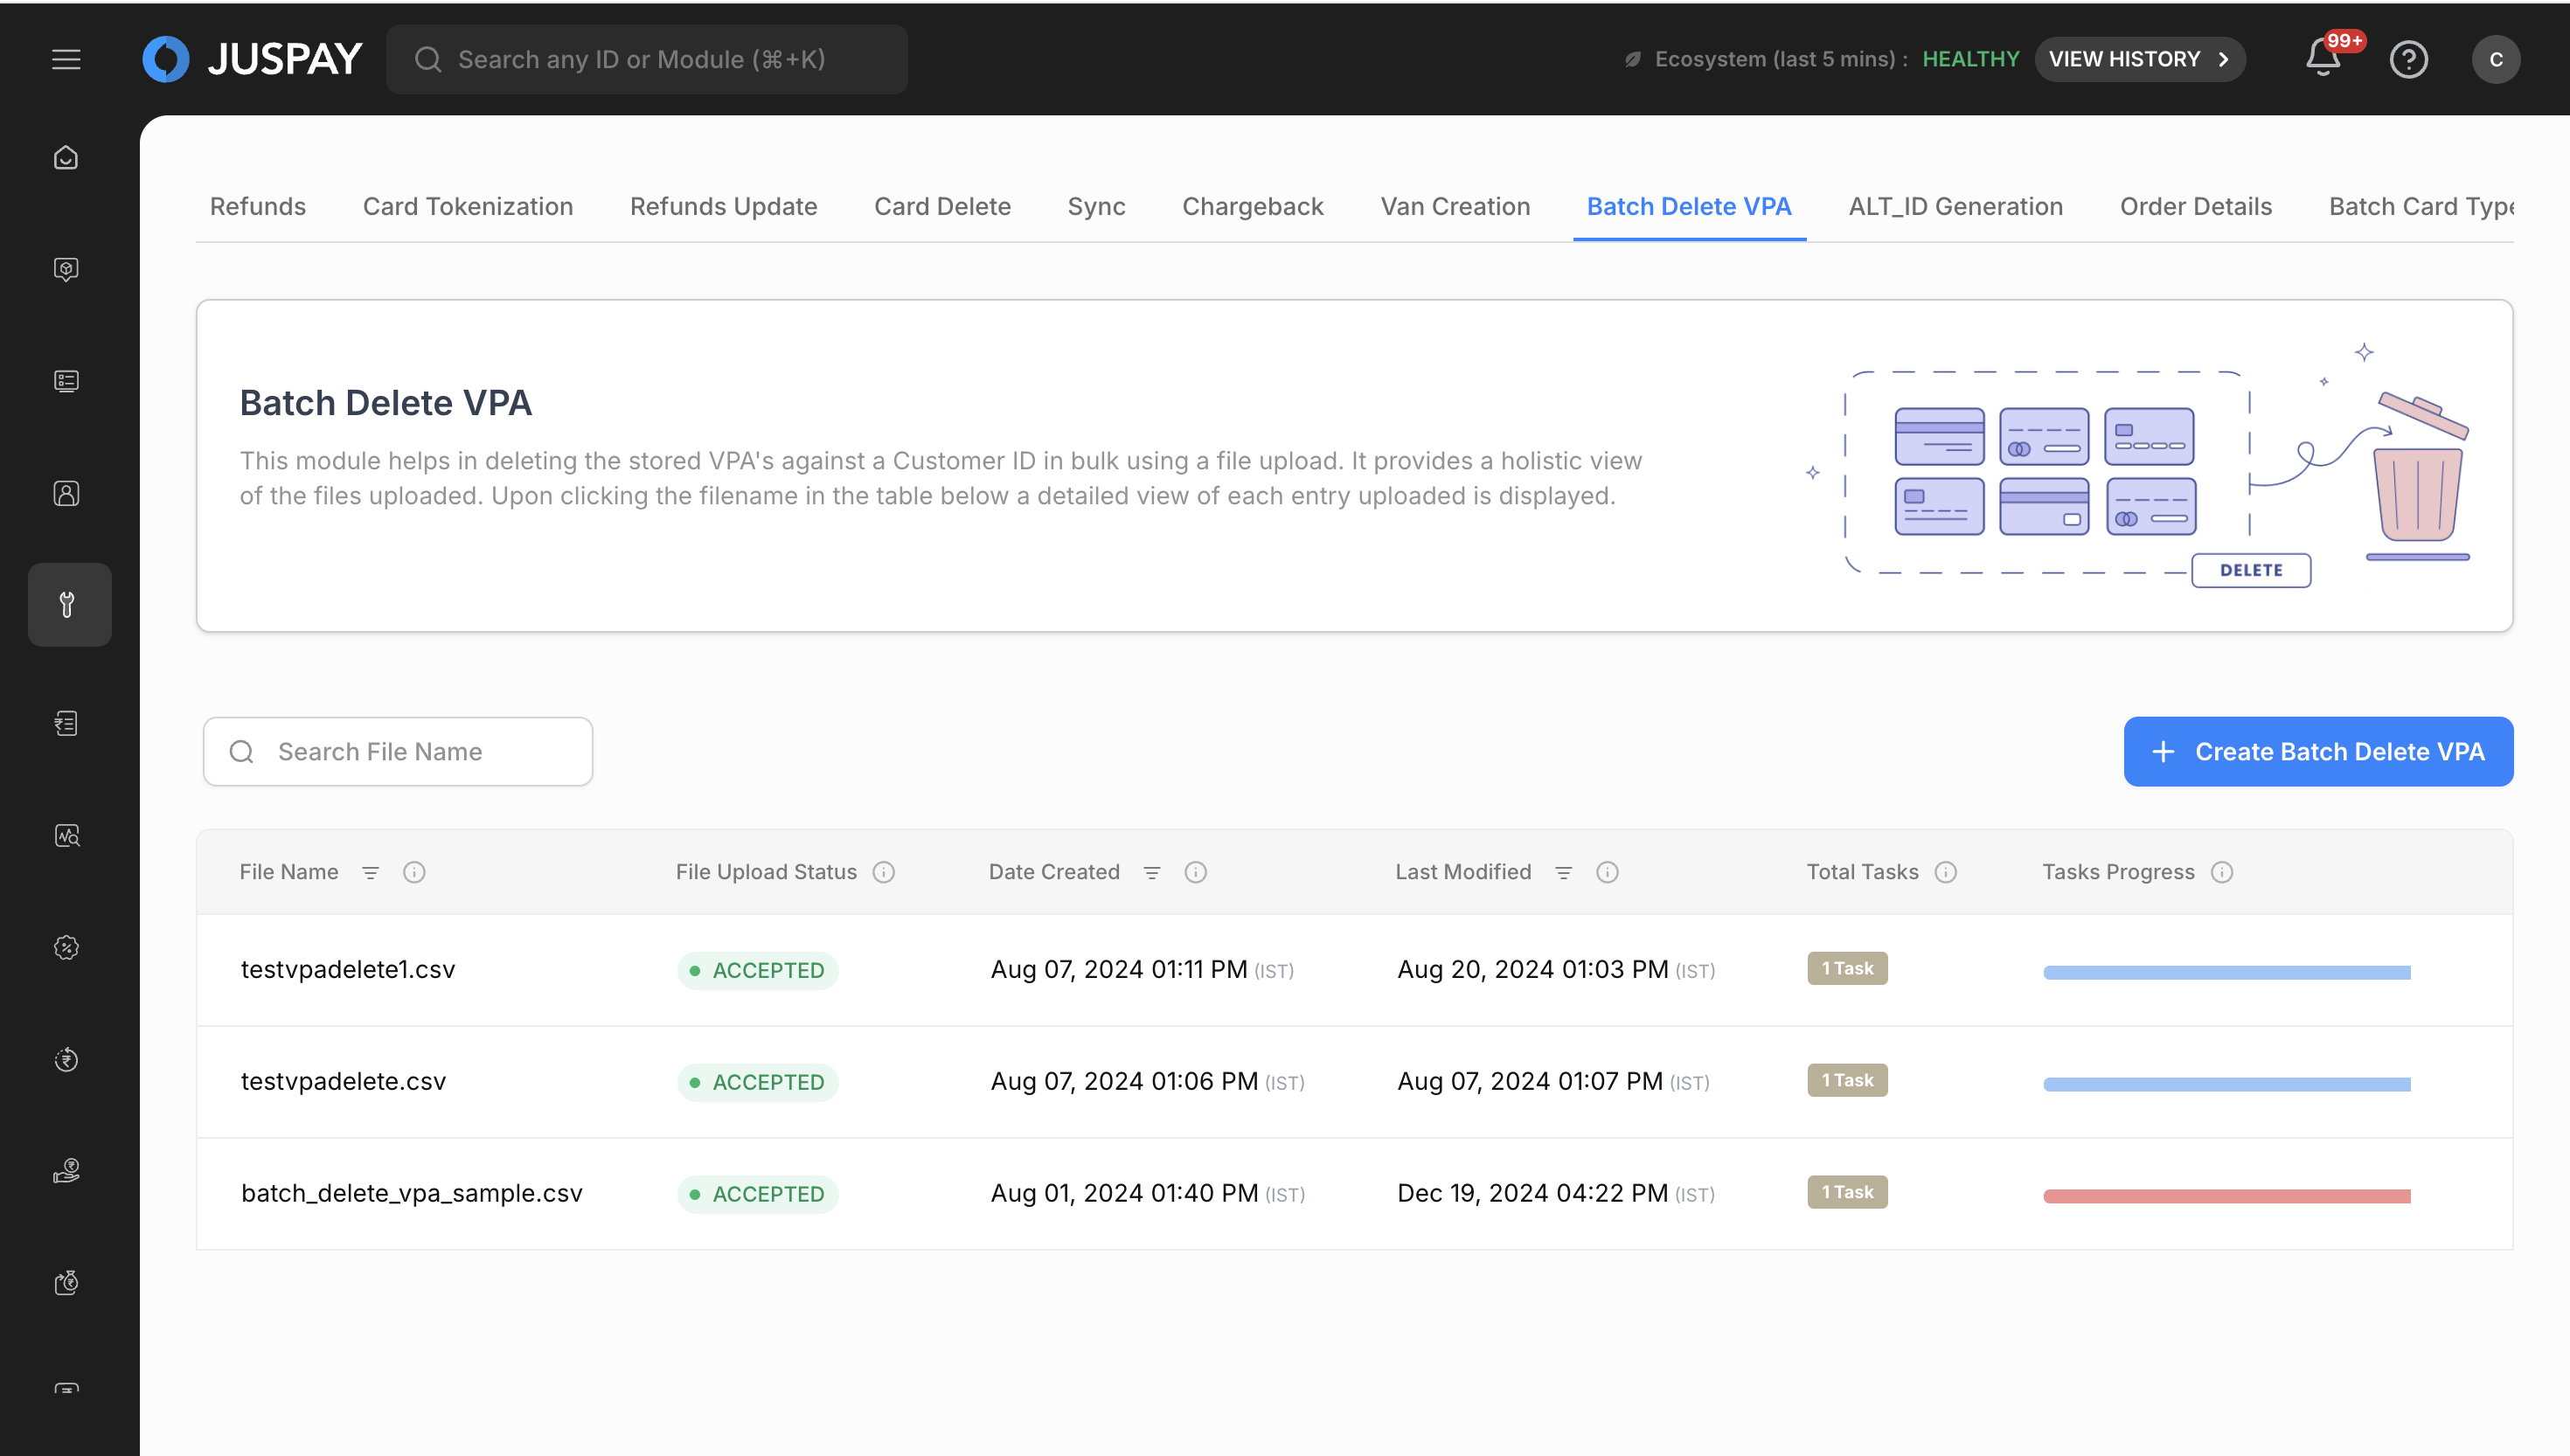
Navigate to the Batch Delete VPA module using the steps above.
You will see the main dashboard with a description: "This module helps in deleting VPAs in bulk using a file upload. It provides a holistic view of the files uploaded. Upon clicking the filename in the table below a detailed view of each VPA deletion uploaded is displayed."
The interface displays any previously uploaded batch VPA deletion files in a table format.
Step 2: Initiate New Batch Delete VPA Upload
Click the "Create Batch Delete VPA" button (visible only to users with appropriate permissions).
If maker-checker workflow is enabled for your account, you will first see a description modal:
Enter a description for the batch VPA deletion request in the text field.
Click "Submit" to proceed to the file upload interface.
If maker-checker is not enabled, you will directly access the file upload interface.
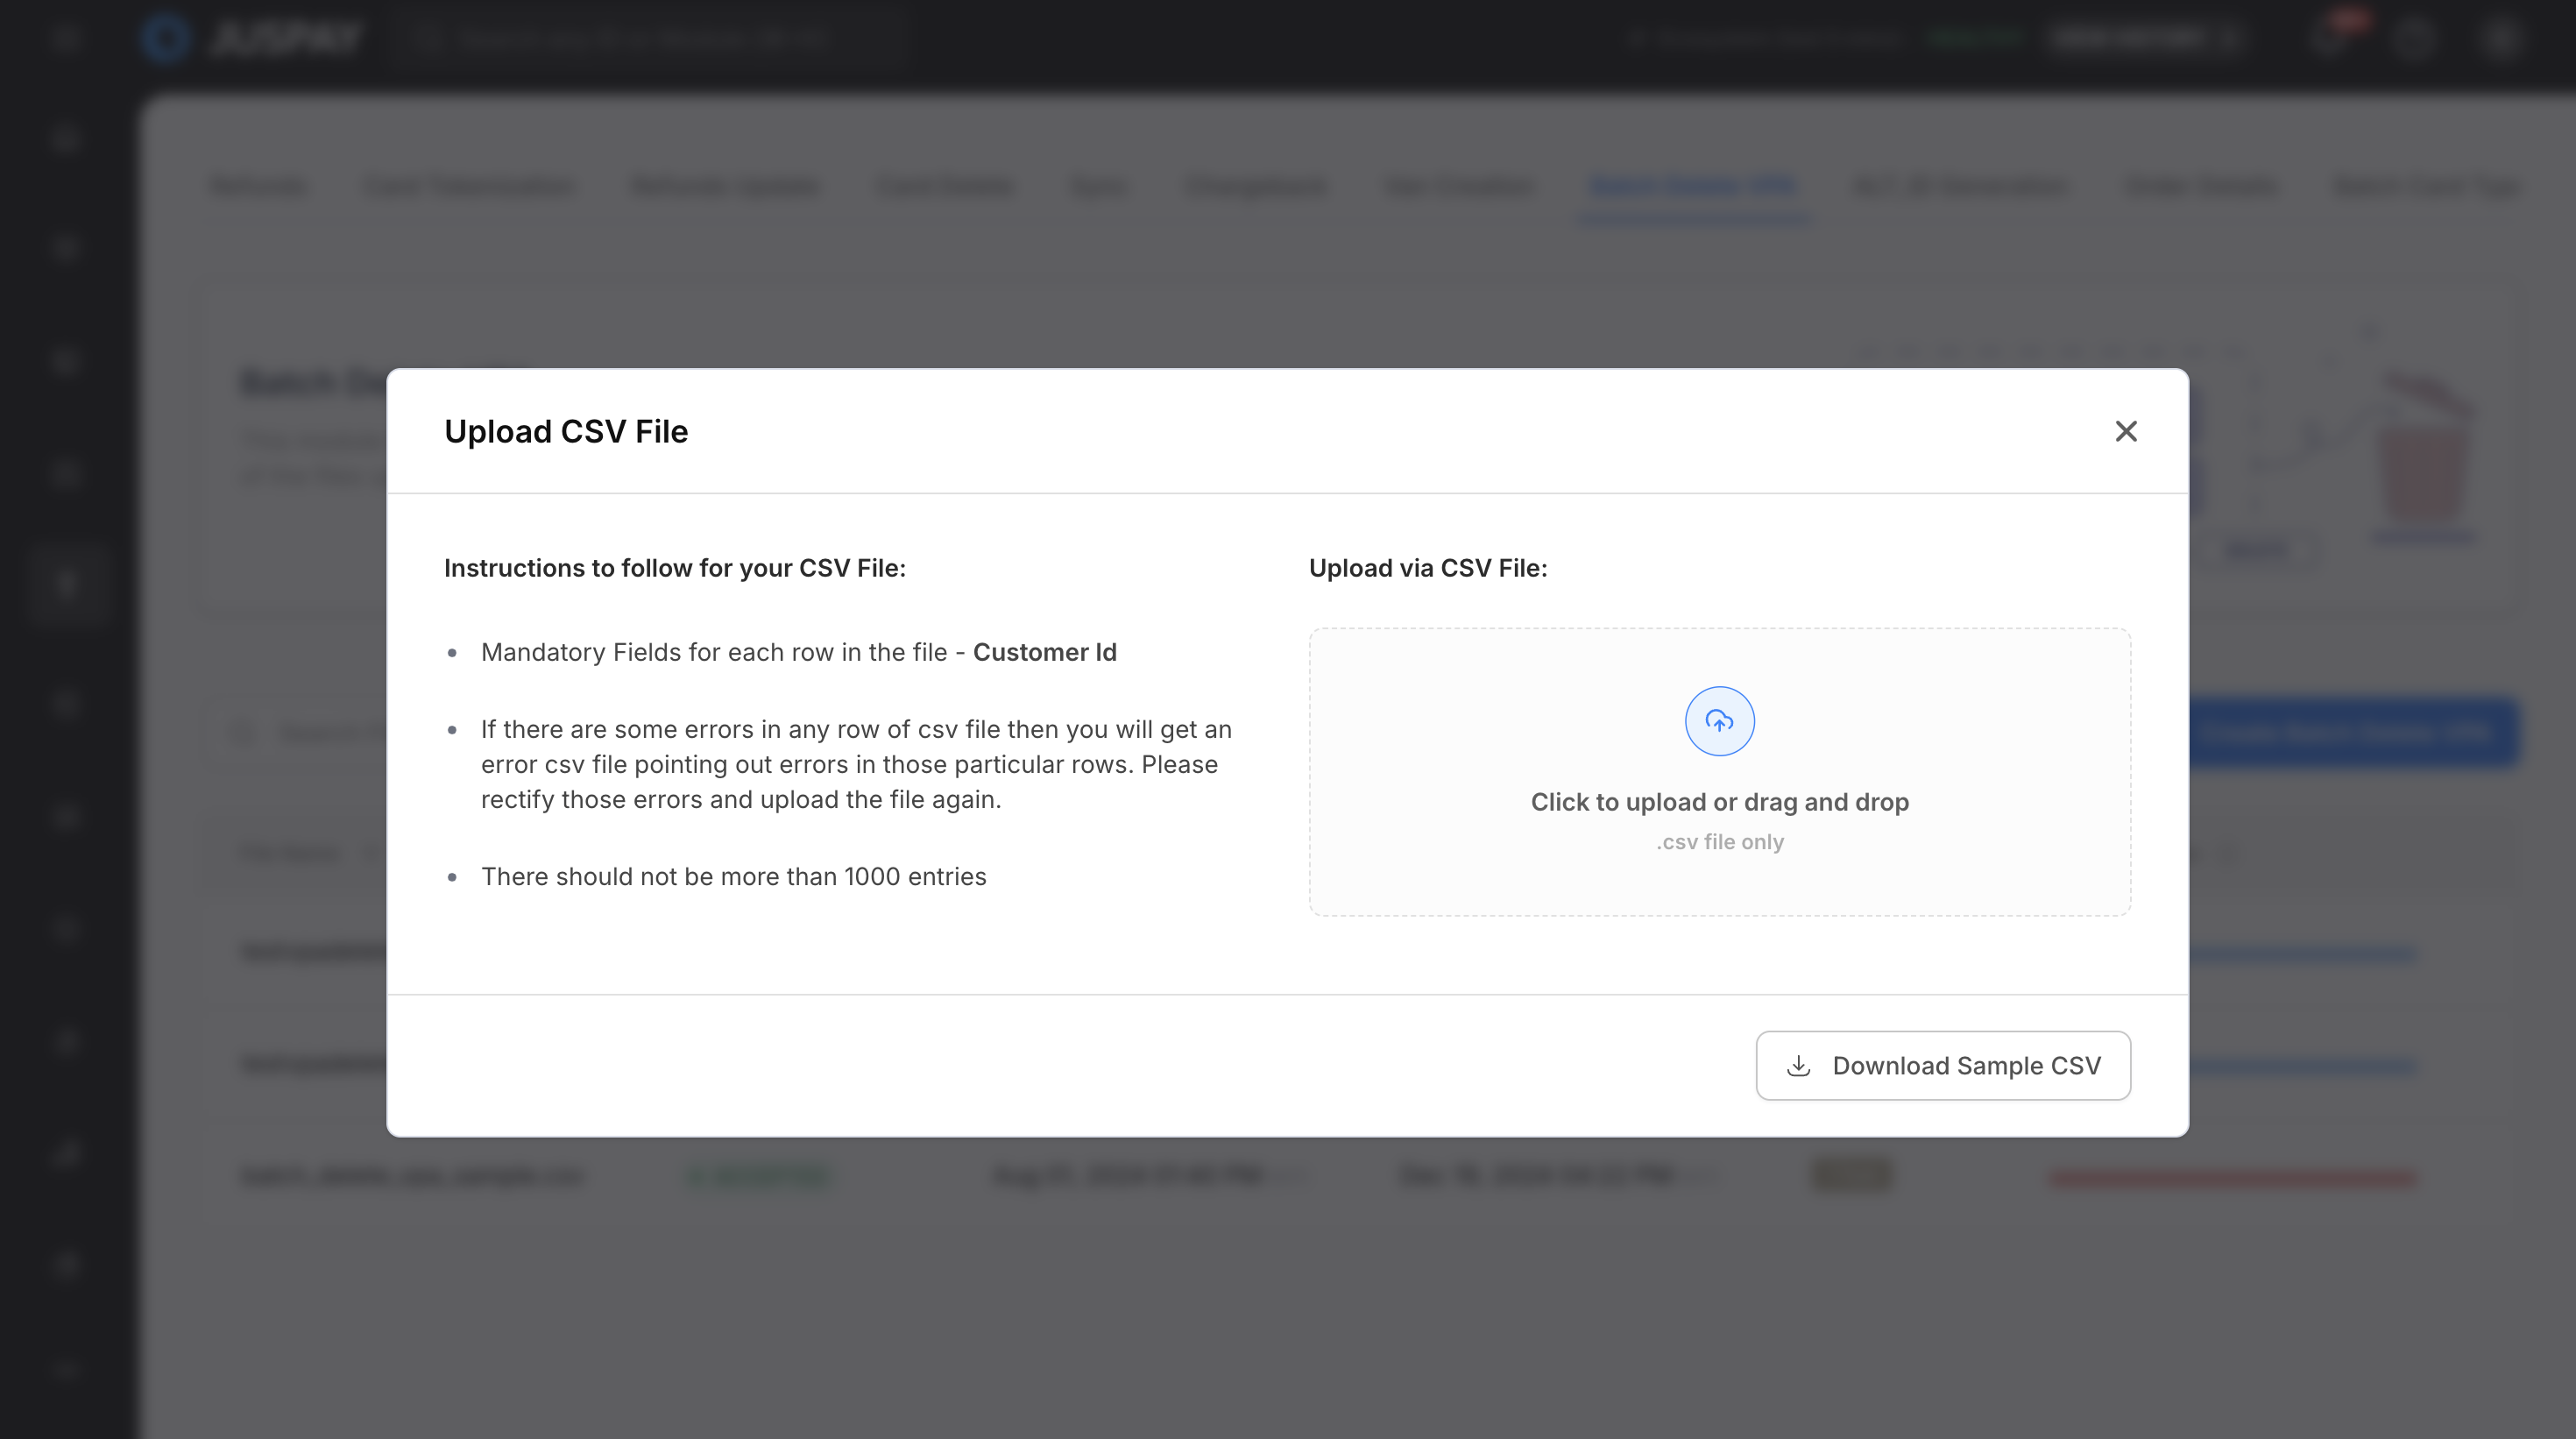
Step 3: Prepare and Upload CSV File
Download Sample File: Click on the sample file link to download the CSV template (
batch_delete_vpa_sample.csv).Prepare Your Data: Fill in your customer data following the CSV field specifications (see table below).
File Limitations:
Maximum 1000 rows per file
CSV format only
File size limitations apply
Upload Process:
Click "Choose File" or drag and drop your CSV file
The system validates the file format and structure
Mandatory fields are checked (Customer Id)
Column types are validated (Customer Id as String)
Step 4: File Processing and Validation
File Validation: The system performs the following checks:
CSV format validation
Mandatory field presence (customer_id)
Data type validation for each column
Customer ID existence validation
VPA ownership verification
UPI compliance validation
Row count validation (maximum 1000 rows)
Error Handling: If validation fails, specific error messages are displayed:
Missing mandatory fields
Invalid customer ID (customer not found)
No VPAs associated with customer
UPI compliance validation failures
File format errors
Row limit exceeded
Successful Upload: Upon successful validation:
File is queued for processing
Batch ID is generated
Initial status is set to processing
VPA deletion process begins
Step 5: Monitor Processing Status
Status Indicators:
ACCEPTED: Successfully deleted VPAs (Green indicator)
FAILED: Failed VPA deletion attempts (Red indicator)
QUEUED: VPA deletion requests waiting in processing queue (Blue indicator)
Monitoring and Managing Batch Delete VPA
Viewing Batch Delete VPA Details
Table View: The main interface displays all uploaded batch files with:
File Name: Name of the uploaded CSV file
File Upload Status: Current processing status with color-coded labels
Total Customers: Number of VPA deletion requests in the file
Date Created: File upload timestamp
Last Modified: Last update timestamp
Total Tasks: Number of VPA deletion requests in the file
Tasks Progress: Visual progress bar showing completion status
Actions: Sync with Gateway button for manual synchronization
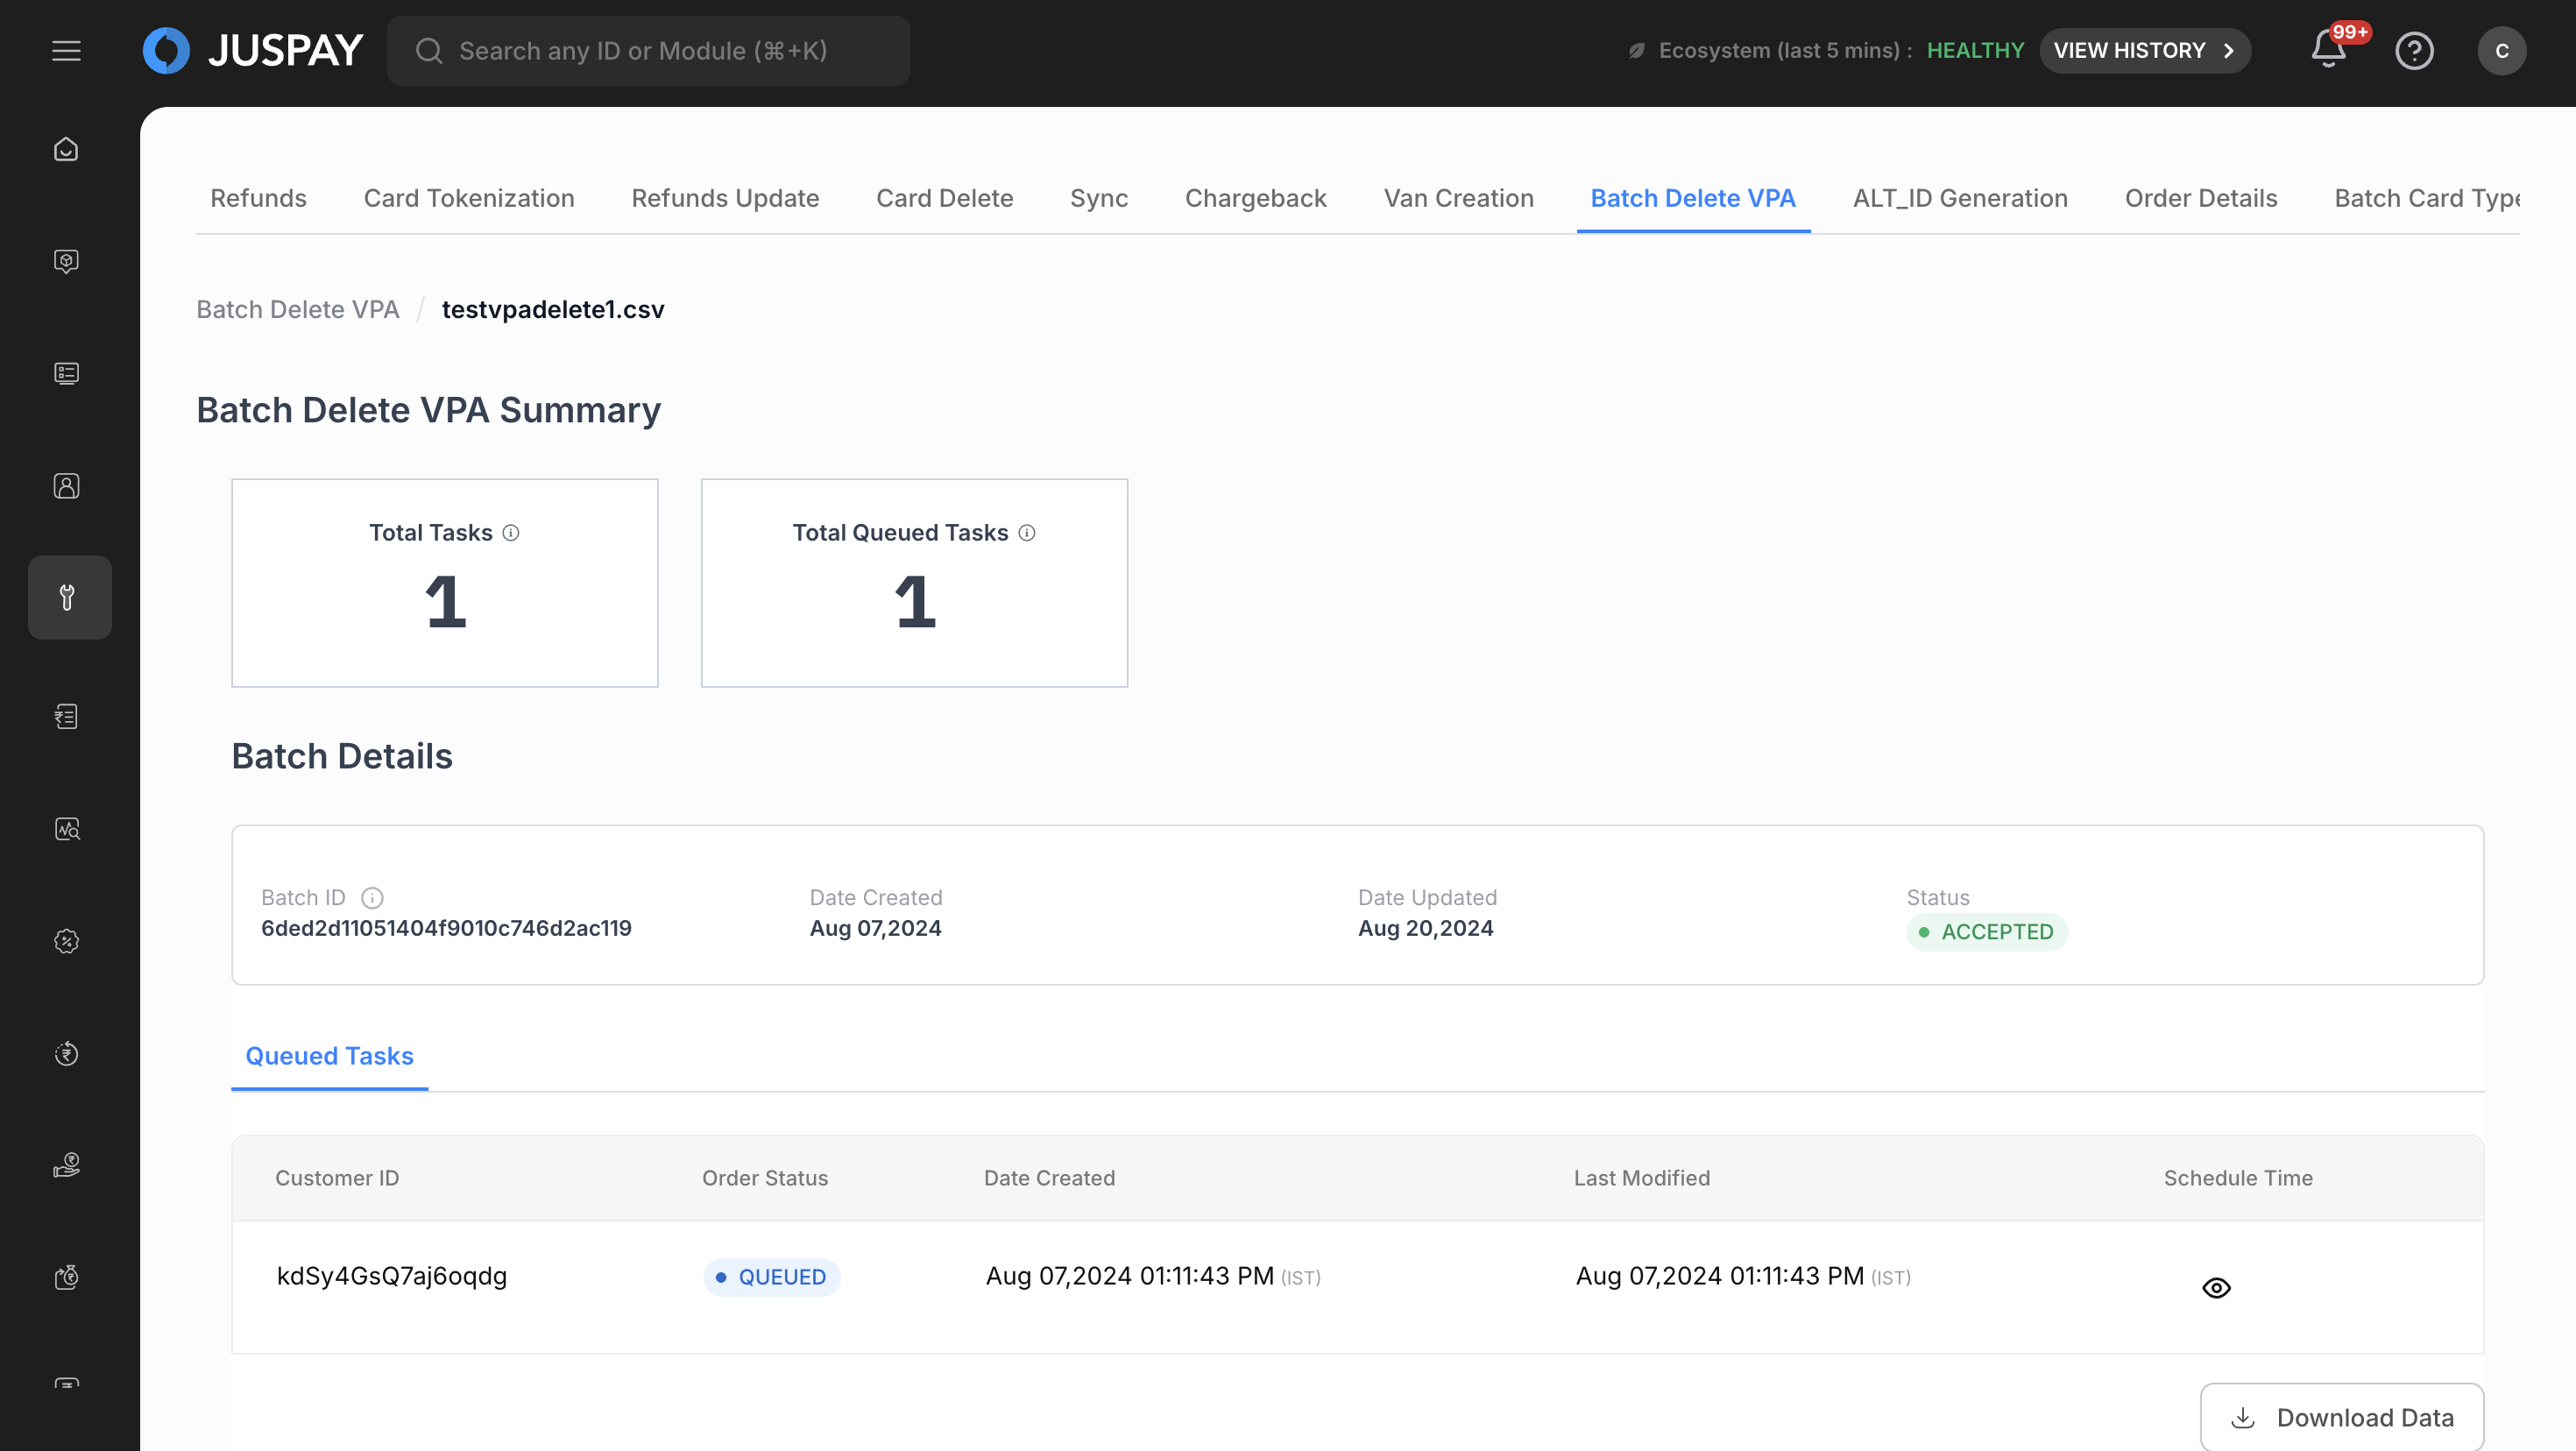
Batch Delete VPA - Table View Detailed View: Click on any filename to access detailed information:
Batch Details Card: Expandable/collapsible interface showing:
Batch ID: Unique identifier for the uploaded file
Date Created and Date Updated timestamps
Total Customers with count formatting
Current status with color-coded indicators
Progress Statistics: Individual task counts for:
Total Accepted Tasks: Successfully deleted VPAs
Total Rejected Tasks: Failed VPA deletion attempts
Total Queued Tasks: VPA deletions in processing queue
Search and Filter Capabilities
File Name Search:
Use the search input field with search icon
Enter filename to filter results
Search is case-sensitive and supports partial matches
Clear search using the cross icon
Table Sorting:
Click column headers to sort data
Available sorting for: File Name, Status, Total Customers, Date Created, Total Tasks
Toggle between ascending and descending order
Data Export and Download
Downloading Processed Data
Access Download: Click the "Download Data" button in the batch details view.
CSV Export: Downloads include:
Serial numbers (S.No column)
All processed VPA deletion data with the following headers:
Customer ID
VPA Count Deleted
Deletion Status
UPI Addresses Removed
Compliance Status
Task Status
Error Message
Created At
Updated At
File Format:
CSV format with comma-separated values
Filename format:
batch_delete_vpa.csvIncludes header row with column names
CSV File Upload Specifications
CSV Field Requirements
|
Field Name
|
Mandatory/Optional
|
Data Type
|
Description
|
Sample Value
|
Validation Rules
|
|---|---|---|---|---|---|
customer_id
| Mandatory
| String
| Customer identifier for VPA deletion
| "CUST_123456789"
| Must be valid existing customer ID with associated VPAs
|
Customer ID Validation Rules
Customer ID Requirements:
Format: Alphanumeric string identifier
Existence Check: Customer ID must exist in the system
VPA Association: Customer must have associated VPAs for deletion
Length: Must be non-empty string
Characters: Letters, numbers, underscores, and hyphens allowed
Case Sensitivity: Case-sensitive matching
Purpose: Identifies customer whose VPAs will be deleted
CSV Format Examples
Complete CSV Format with Sample Data:
File Upload Constraints
Maximum Rows: 1000 rows per CSV file
File Format: CSV (Comma Separated Values) only
Encoding: UTF-8 encoding recommended
File Size: Standard file size limitations apply
Column Order: Must match the specified header format (customer_id)
Empty Values: Customer ID field is mandatory and cannot be empty
Customer Validation: All customer IDs must exist in the system and have associated VPAs
Use Cases
UPI Compliance Management
Export customer data requiring VPA deletion for regulatory compliance
Prepare CSV file with customer IDs for bulk VPA removal
Upload file through Batch Delete VPA interface
Monitor processing status and download results for compliance reporting
Customer Account Closure
Prepare CSV with customer IDs for account closure requiring VPA deletion
Include customer IDs for complete UPI address removal
Upload file for automated VPA deletion processing
Track individual deletion status and generate closure confirmation reports
UPI Address Lifecycle Management
Compile customer data from various UPI management sources
Create CSV with customer IDs requiring VPA cleanup for system maintenance
Process bulk VPA deletions and export results for UPI management
Use downloaded data for UPI compliance tracking and regulatory reporting
Troubleshooting
File Upload Validation Errors:
"Invalid file format": Ensure file is in CSV format with proper comma separation
"Missing mandatory fields": Verify that customer_id column is present and not empty
"Row limit exceeded": Reduce file size to maximum 1000 rows per upload
"Customer not found": Check that all customer IDs exist in the system before upload
"No VPAs associated": Ensure customers have associated VPAs that can be deleted
"UPI compliance failure": Verify that VPA deletion complies with UPI regulations
Permissions and Roles
Access to the Batch Delete VPA module is controlled by the following permissions:
VPA Deletion Module Access: Required for accessing the batch delete VPA interface (ACL:
delete_vpa)VPA Deletion Write Permission: Required for creating and uploading batch VPA deletion files (ACL:
delete_vpawith ReadWrite access)VPA Deletion Read Permission: Needed to view batch VPA deletion status and download processed data (ACL:
delete_vpa)