

Monitoring Reports
Overview
The Monitoring Reports module provides comprehensive reporting capabilities for monitoring system events, transaction data, and operational metrics within the Juspay payment platform. It offers two distinct types of reports: Custom Reports and Standard Reports, each with different functionality and user operations for different reporting perspectives.
This module is designed for a wide range of users, including:
Operations Teams: For creating and managing custom reports to monitor system performance, transaction patterns, and operational metrics with comprehensive data analysis and audit trails.
Finance Teams: For accessing standard reports and creating custom financial reports to track revenue metrics, transaction volumes, and business performance across multiple dimensions.
Compliance Teams: To generate regulatory reports, maintain compliance documentation, and create custom reports for audit trails and regulatory reporting requirements.
Accessing the Module
Log in to the Juspay dashboard.
From the main navigation menu on the left, click on Payments.
Select Monitoring from the Payments submenu.
Click on Reports from the monitoring navigation options.
The navigation URL for this module is https://portal.juspay.in/reports
 .
.
Dashboard Overview
The Monitoring Reports module is built on the ReportRouterTabs framework, which provides a consistent navigation interface across all reports sections. The system uses EntityScaffold framework to ensure standard navigation and operation patterns across all report management functions.
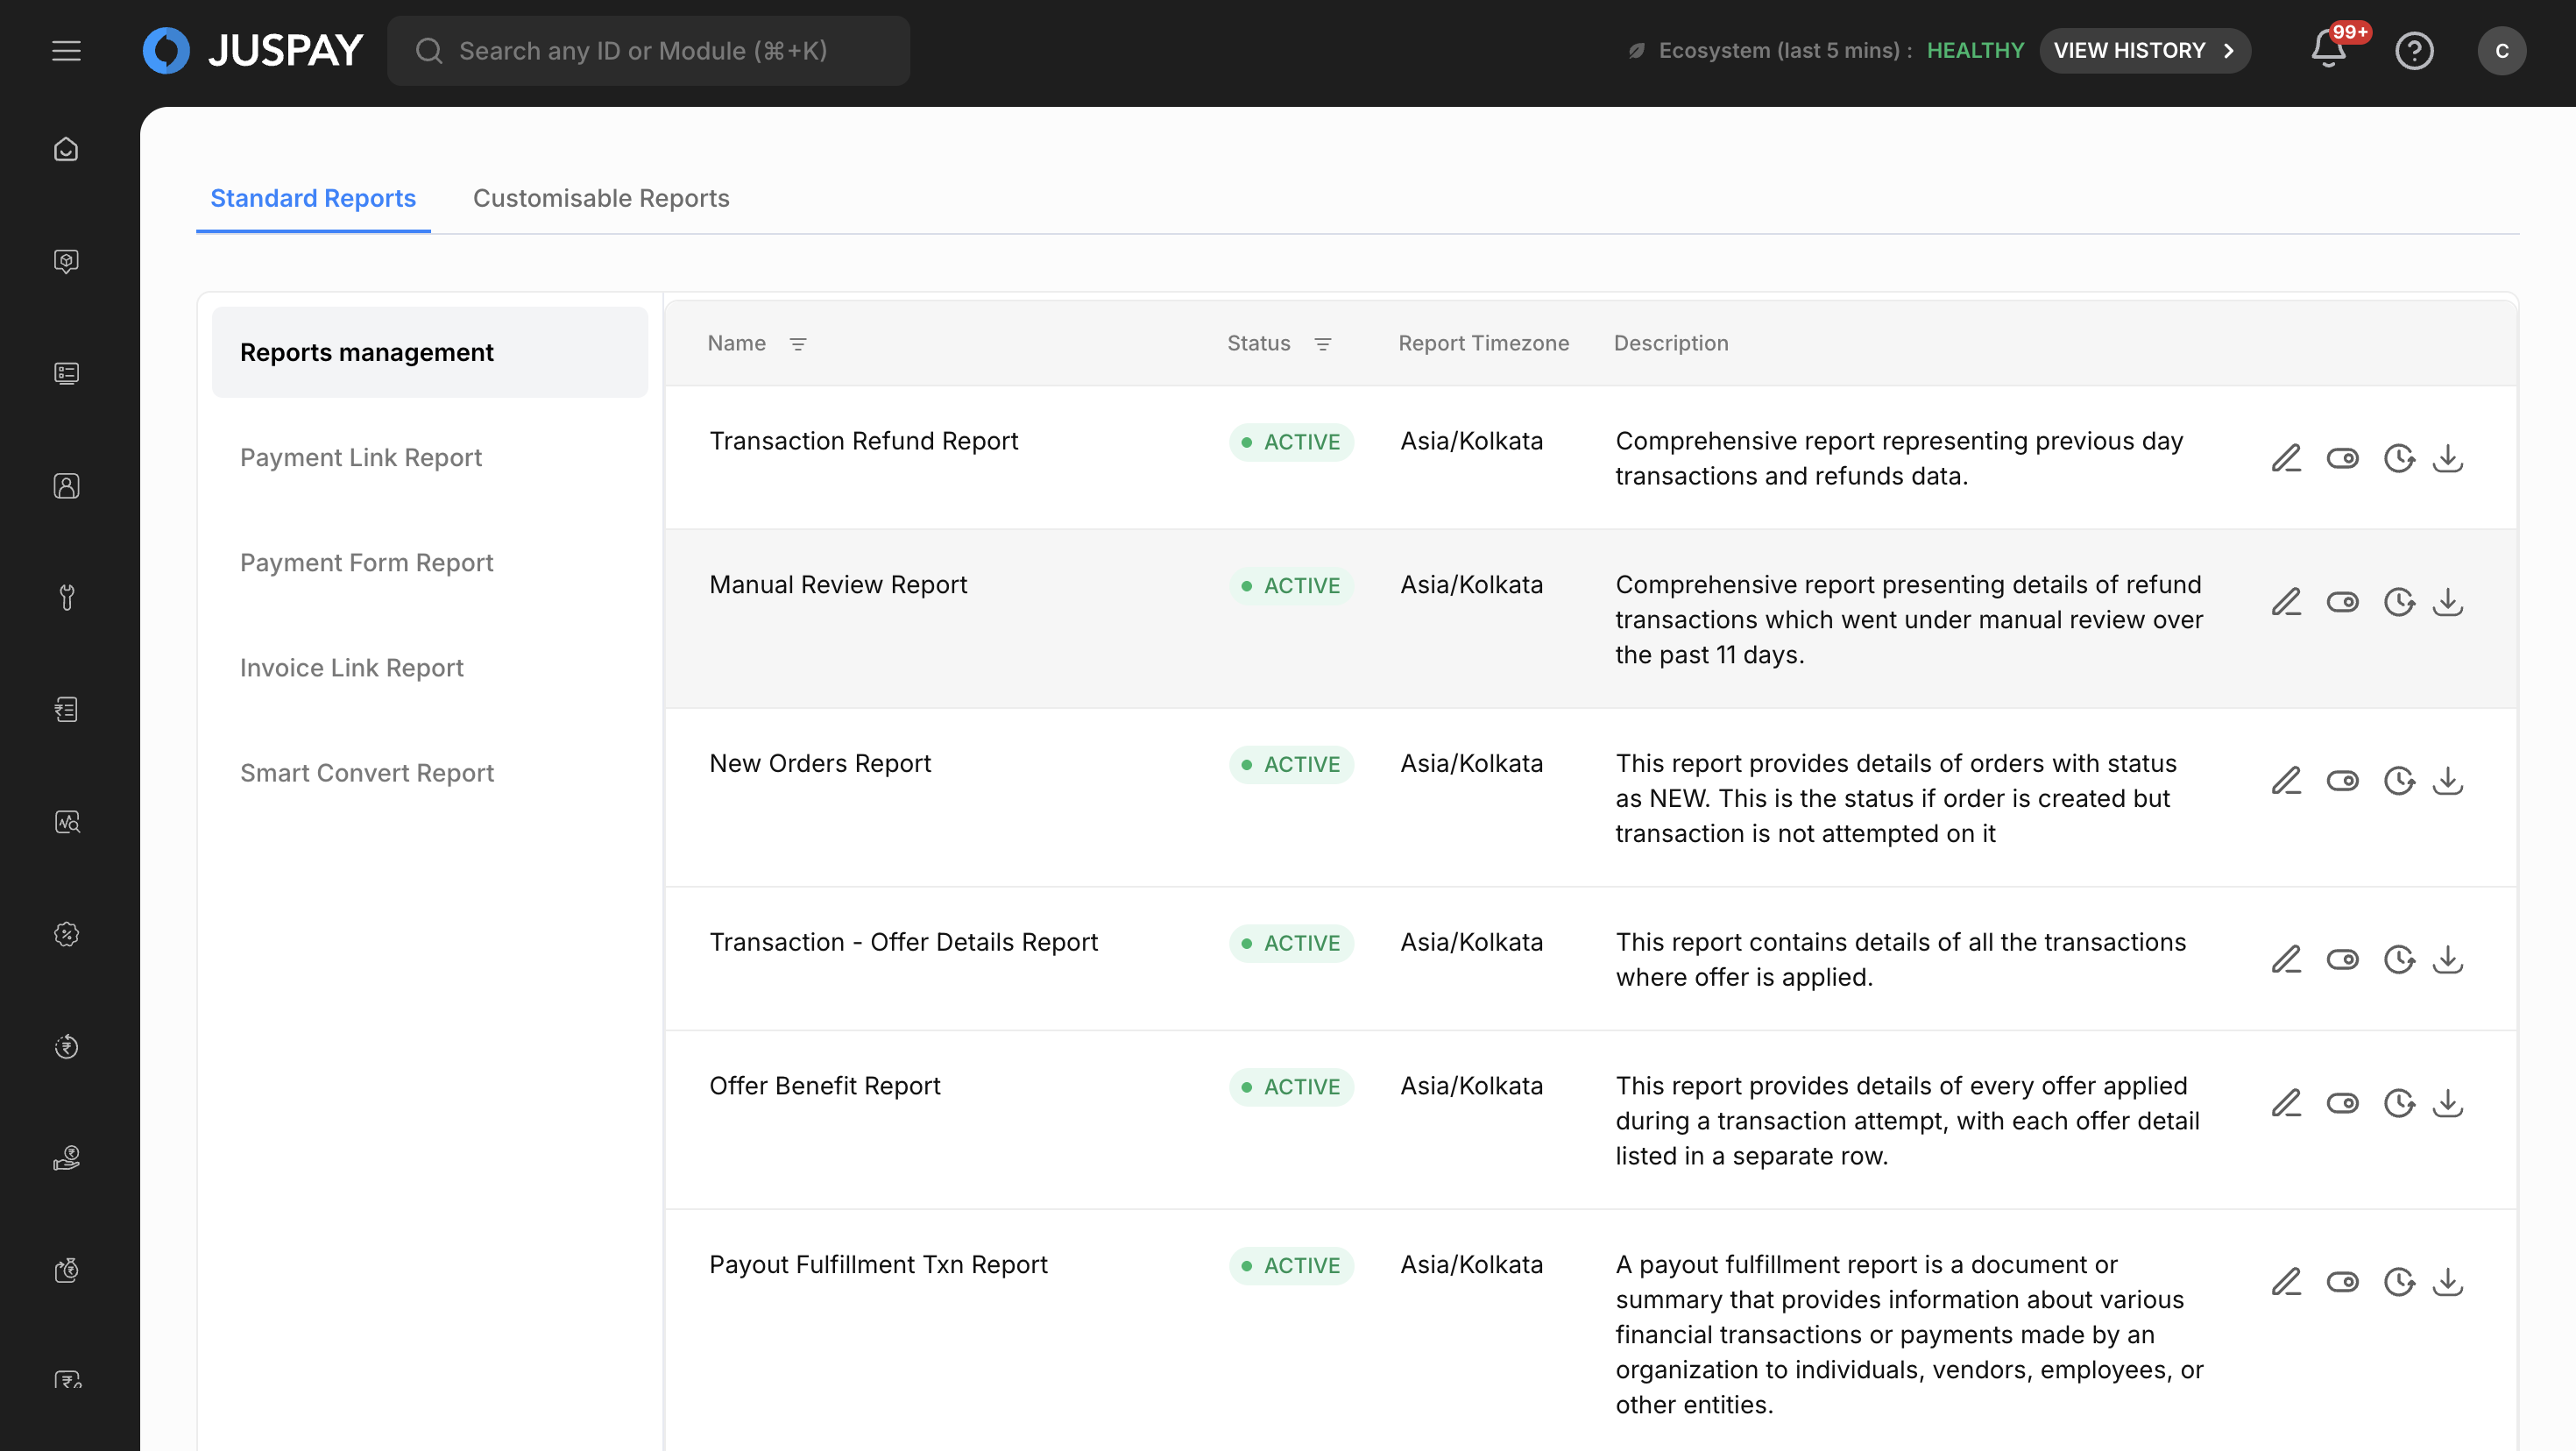
Report List Interface
The main reports interface displays all configured reports in a comprehensive table format:
Table Columns:
Alert Name: The name of your configured report
Date Created: When the report was originally created
Status: Current report status with color-coded indicators:
ACTIVE (Green): Report is currently active and generating
INACTIVE (Red): Report is disabled or deactivated
Monitor Every: Frequency of report generation (15 Minutes, 30 Minutes, 1 Hour, 3 Hours, 6 Hours, 1 Day, 1 Week, 1 Month)
Schedule Time: When the report is scheduled to run with timezone display
Email: Email recipients configured for report delivery
Table Features:
Search Functionality: Search reports by name, status, creation date, or email recipients using "Search Report Table"
Sortable Columns: Click column headers to sort reports by different criteria
Pagination: 10 reports per page with navigation controls
Row Navigation: Click any report row to view detailed report information
Step-by-Step Usage Instructions
Creating New Custom Reports
Report Configuration Process
Click "Create New Report" button to start the report creation process.
Monitoring Reports Configure Report Source by selecting from available data sources:
Transaction (txn): Monitor transaction-level data and performance
Refund: Track refund patterns and success rates
Payout (fulfillment-txn): Monitor payout fulfillment data (available for non-reseller, non-Juspay contexts when payouts enabled)
Select Report Type:
Raw View: Detailed transaction-level data (available for non-reseller, non-Juspay contexts)
Summarised View: Aggregated data with metrics (available for all contexts, only option for reseller/Juspay)
Payout Limitation: Only Raw View available for fulfillment-txn source
Choose Report Metrics (Required for Summarised View):
Success Rate: Percentage of successful transactions/operations
Total Volume: Total number of transactions/operations
Success Volume: Number of successful transactions/operations
Total Amount: Monetary value of transactions/operations
Select Report Dimensions (Required):
Choose up to 6 dimensions for report monitoring
Use the "Select Report Dimension" dropdown with search functionality
Validation: Must select at least 1 dimension for report generation
Configure Report Duration:
Yesterday (86400 seconds): Previous day's data
Last 7 days (604800 seconds): Week-long data analysis
Last 30 Days (2592000 seconds): Monthly data analysis
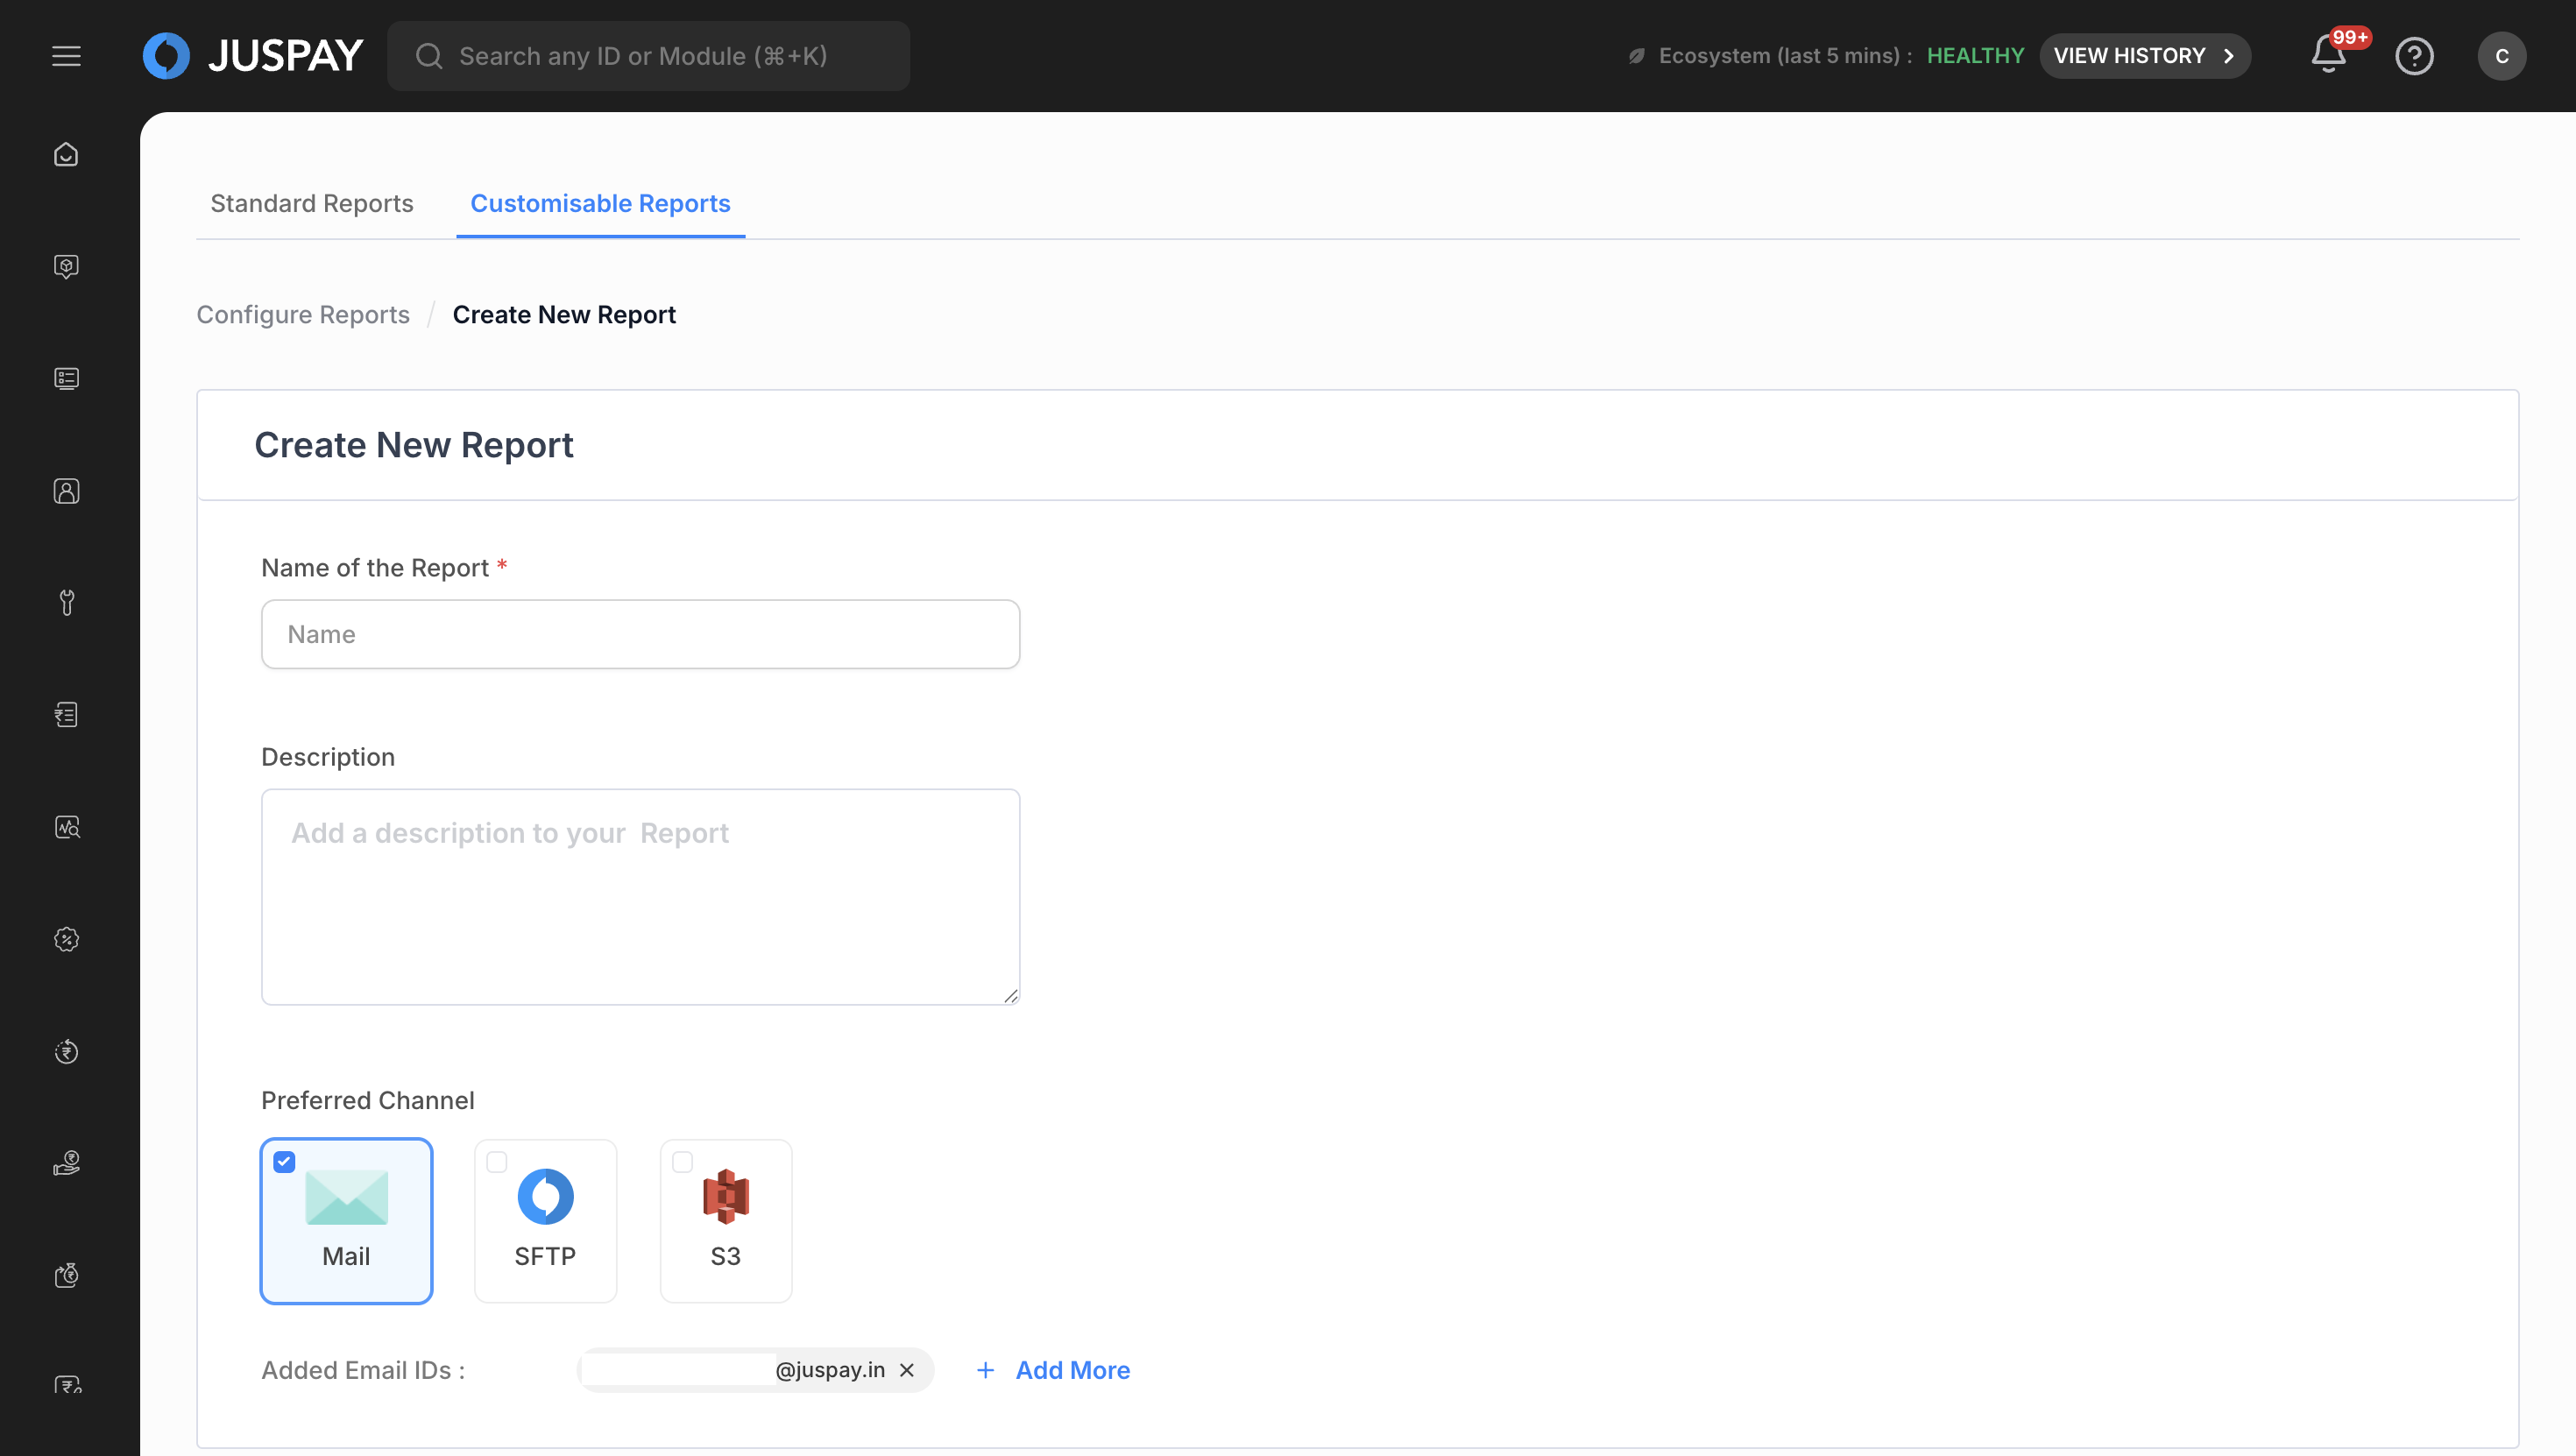
Report Details Configuration
Enter Report Name (Required):
Use "Name of the Report" field with placeholder "Name"
Validation: Cannot be empty, maximum 50 characters
Add Description (Optional):
Use multi-line text input with 4 rows
Placeholder text: "Add a description to your Report"
Configure Email Recipients (Required):
Enter email addresses using MonitoringEmailInput with comma separation
Validation rules:
Cannot be empty: "Please Enter Mail ID(s)" error
Valid email format required: "Enter valid email address" error
Email field controlled by
is_email_report_enabledCAC flag
Set Delivery Channels (Required):
Email: Standard email delivery (when email reporting is enabled)
SFTP: "Send Report at SFTP" checkbox for secure file transfer protocol delivery
S3: "Send Report at S3" checkbox for Amazon S3 bucket delivery
Requirement: At least one delivery channel must be selected
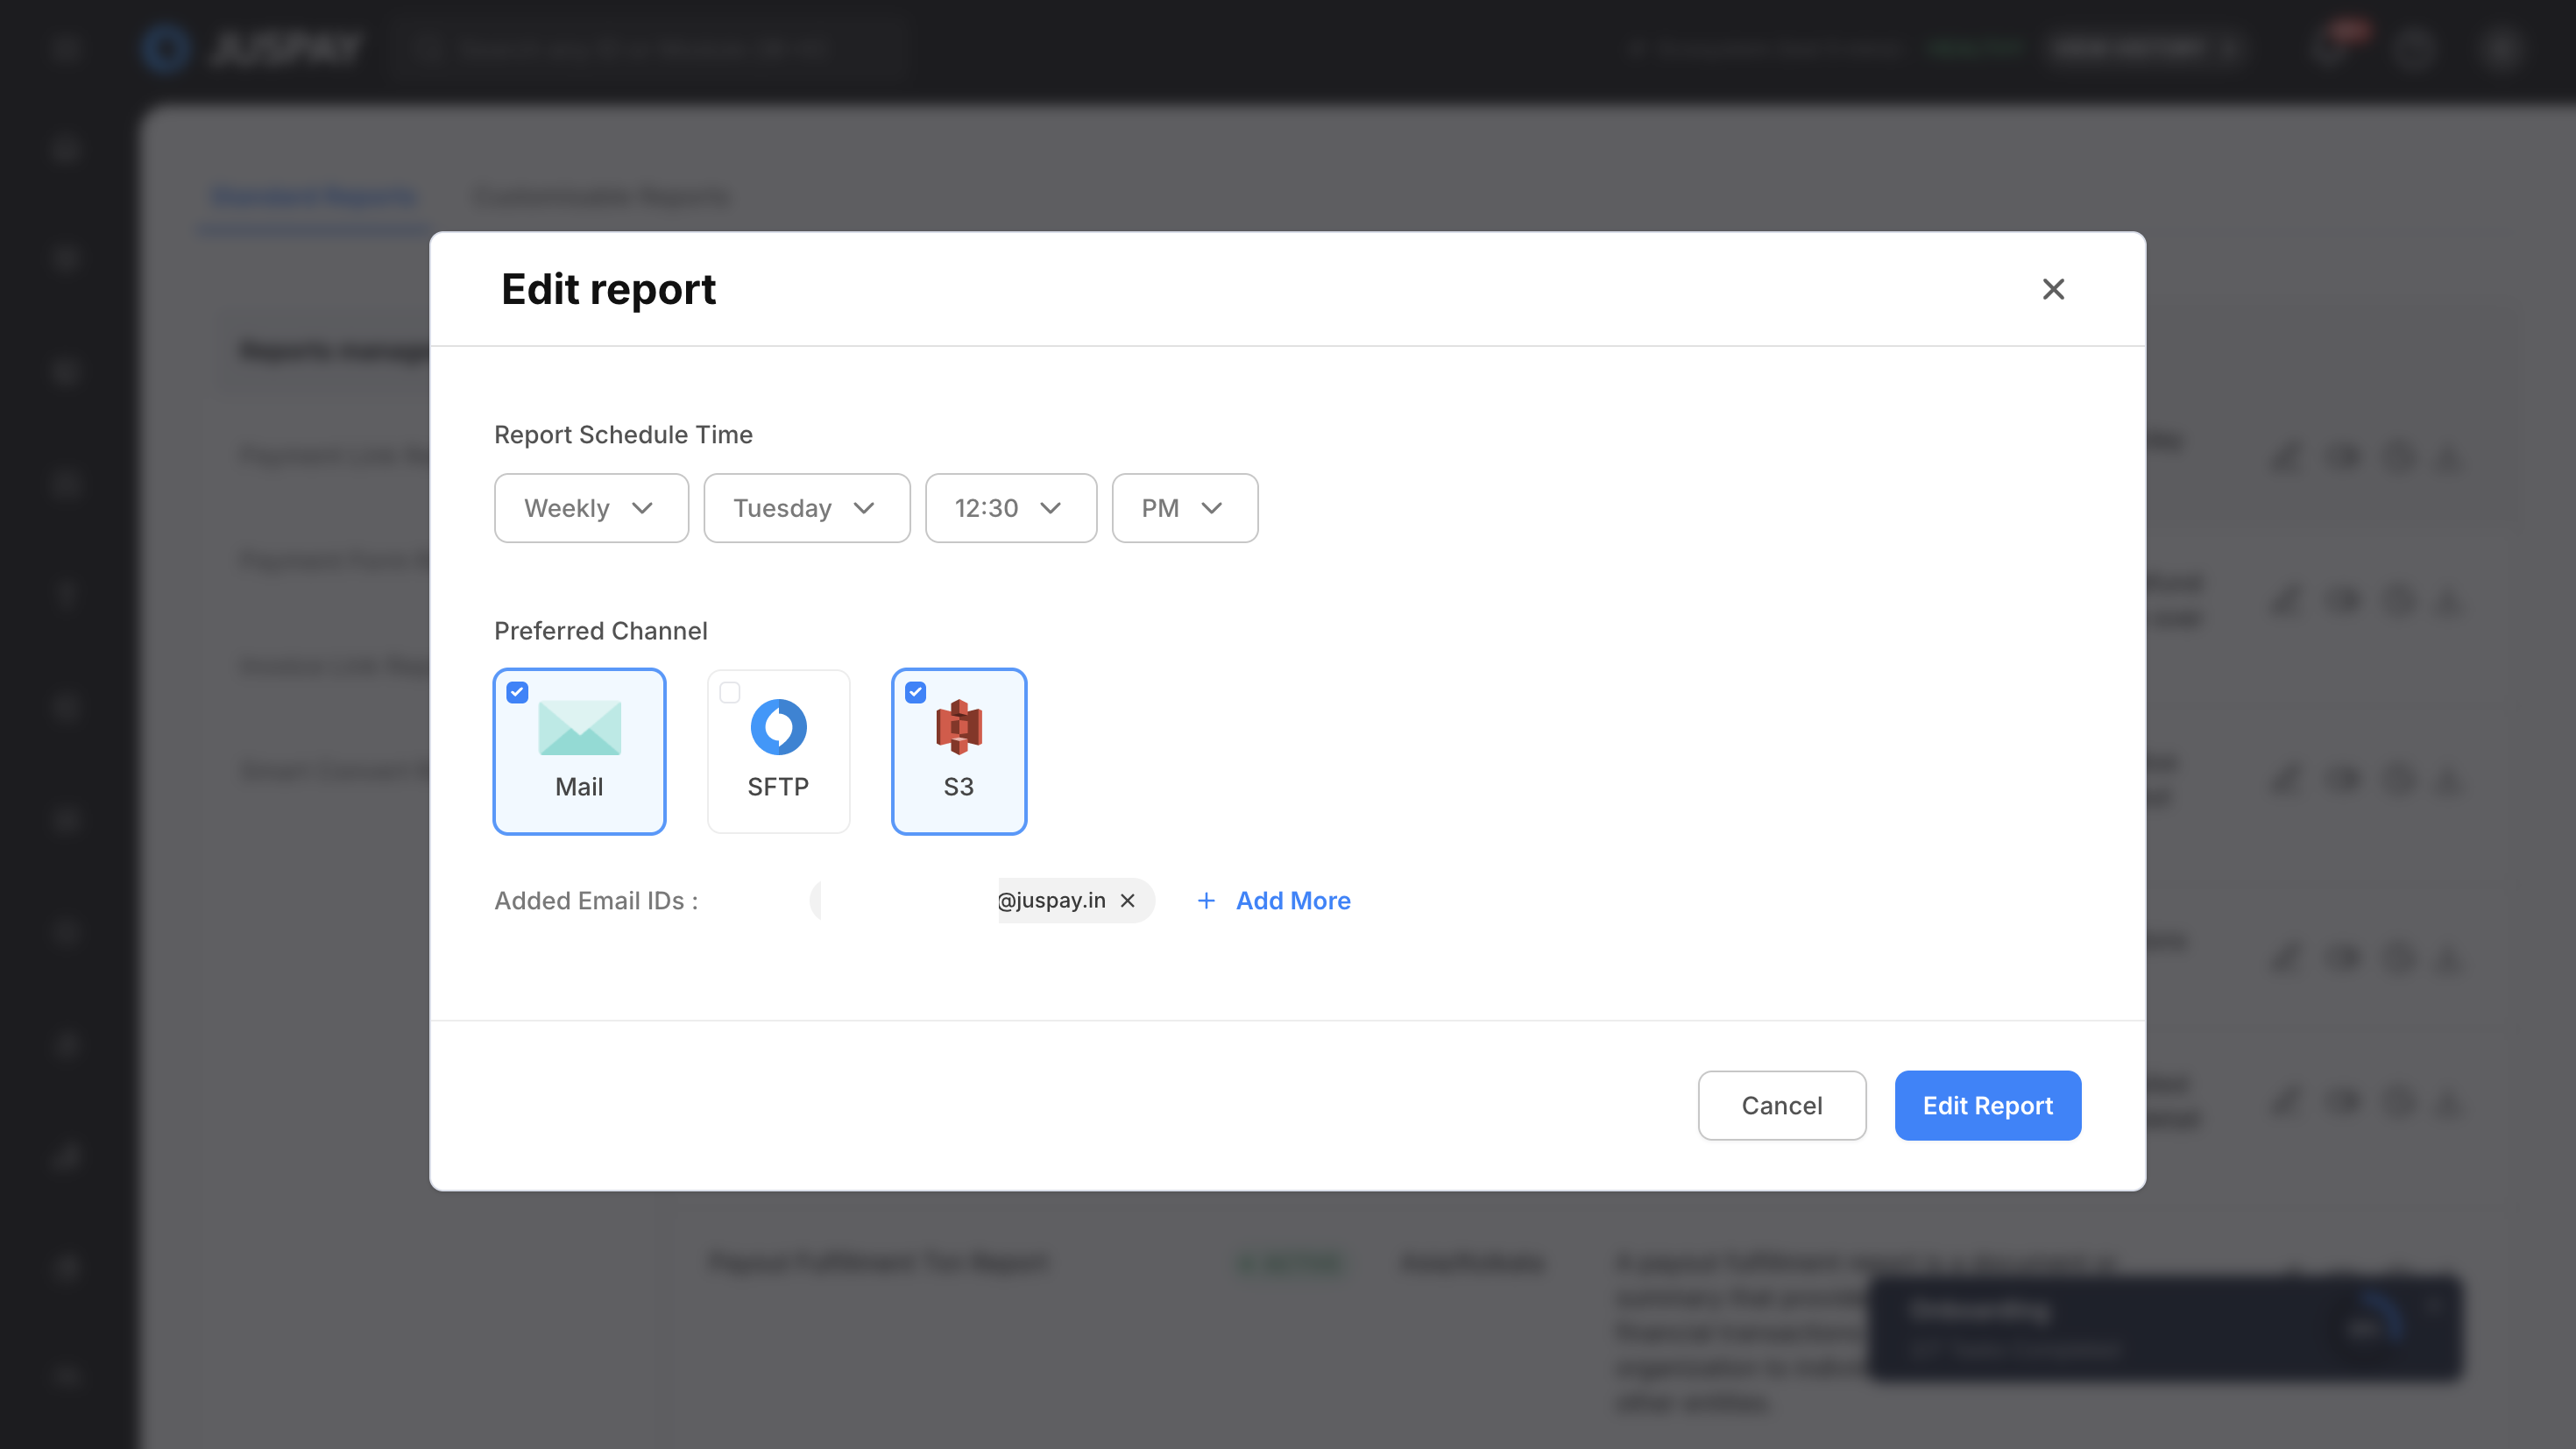
Report Scheduling Configuration
Select Report Frequency:
Daily (86400 seconds): Daily report generation
Weekly (604800 seconds): Weekly report generation
Monthly (2592000 seconds): Monthly report generation
Standard Report Limitations: PAYOUTFULFILLMENT and MANUALREVIEW types only support Daily option
Configure Schedule Time:
Available Times: 12:00 AM to 11:30 PM in 30-minute intervals
Format: 24-hour format (00:00 to 23:30) with AM/PM selector for display
Label: "Report Schedule Time"
Set Schedule Details:
Weekly Reports: Choose day from Monday (1) through Sunday (0)
Monthly Reports: Choose date from 1st through 30th using date picker
Dynamic Fields: Interface shows day selector for weekly, date picker for monthly
Submit Report Configuration to create and activate the report.

Monitoring Reports
Viewing and Managing Reports
Report List Management
Navigate to the reports section to view all configured reports in the table interface.
Use search functionality by typing in the "Search Report Table" input with search icon.
Sort reports by clicking on column headers (Alert Name, Date Created, Status, Monitor Every, Email).
View report status with color-coded indicators:
activated: Displayed as "ACTIVE" with green label
deactivated: Displayed as "INACTIVE" with red label
Monitor report frequency displayed as:
900 seconds: "15 Minutes"
1800 seconds: "30 Minutes"
3600 seconds: "1 Hour"
10800 seconds: "3 Hours"
21600 seconds: "6 Hours"
86400 seconds: "1 Day"
604800 seconds: "1 Week"
2592000 seconds: "1 Month"
Report Details and Downloads
Click on any report from the reports list to open the detailed view.
Review complete report configuration including source, type, metrics, dimensions, and delivery settings.
Access report links when available:
Trigger Date: Report generation timestamp
Eval Start Time: Report data start time
Eval End Time: Report data end time
Report UUID: Unique identifier for download
Download reports using generated links:
Standard Reports:
{url_prefix}/download/report/{reportUuid}Custom Reports:
{url_prefix}/api/monitoring/fetchData/{reportUuid}URL Prefix: Environment-specific (localhost vs production hostname)
Report File Access:
Scheduled Email Reports: Reports received via email are password-protected
Password: The password is typically the merchant ID
Direct Downloads: Reports downloaded directly from the dashboard interface are not password-protected
Monitoring Reports
Editing and Updating Reports
Report Modification Process
Navigate to report details by clicking on a report from the list.
Click "Update Report" button to enter edit mode.
Modify report configuration:
Update report source, type, and metrics
Change report dimensions (maximum 6 for summarised reports)
Adjust delivery channels and email recipients
Modify scheduling frequency and timing
Update report details:
Change report name (subject to same validation rules)
Modify description text
Update notification preferences
Save changes and confirm updates to apply modifications.
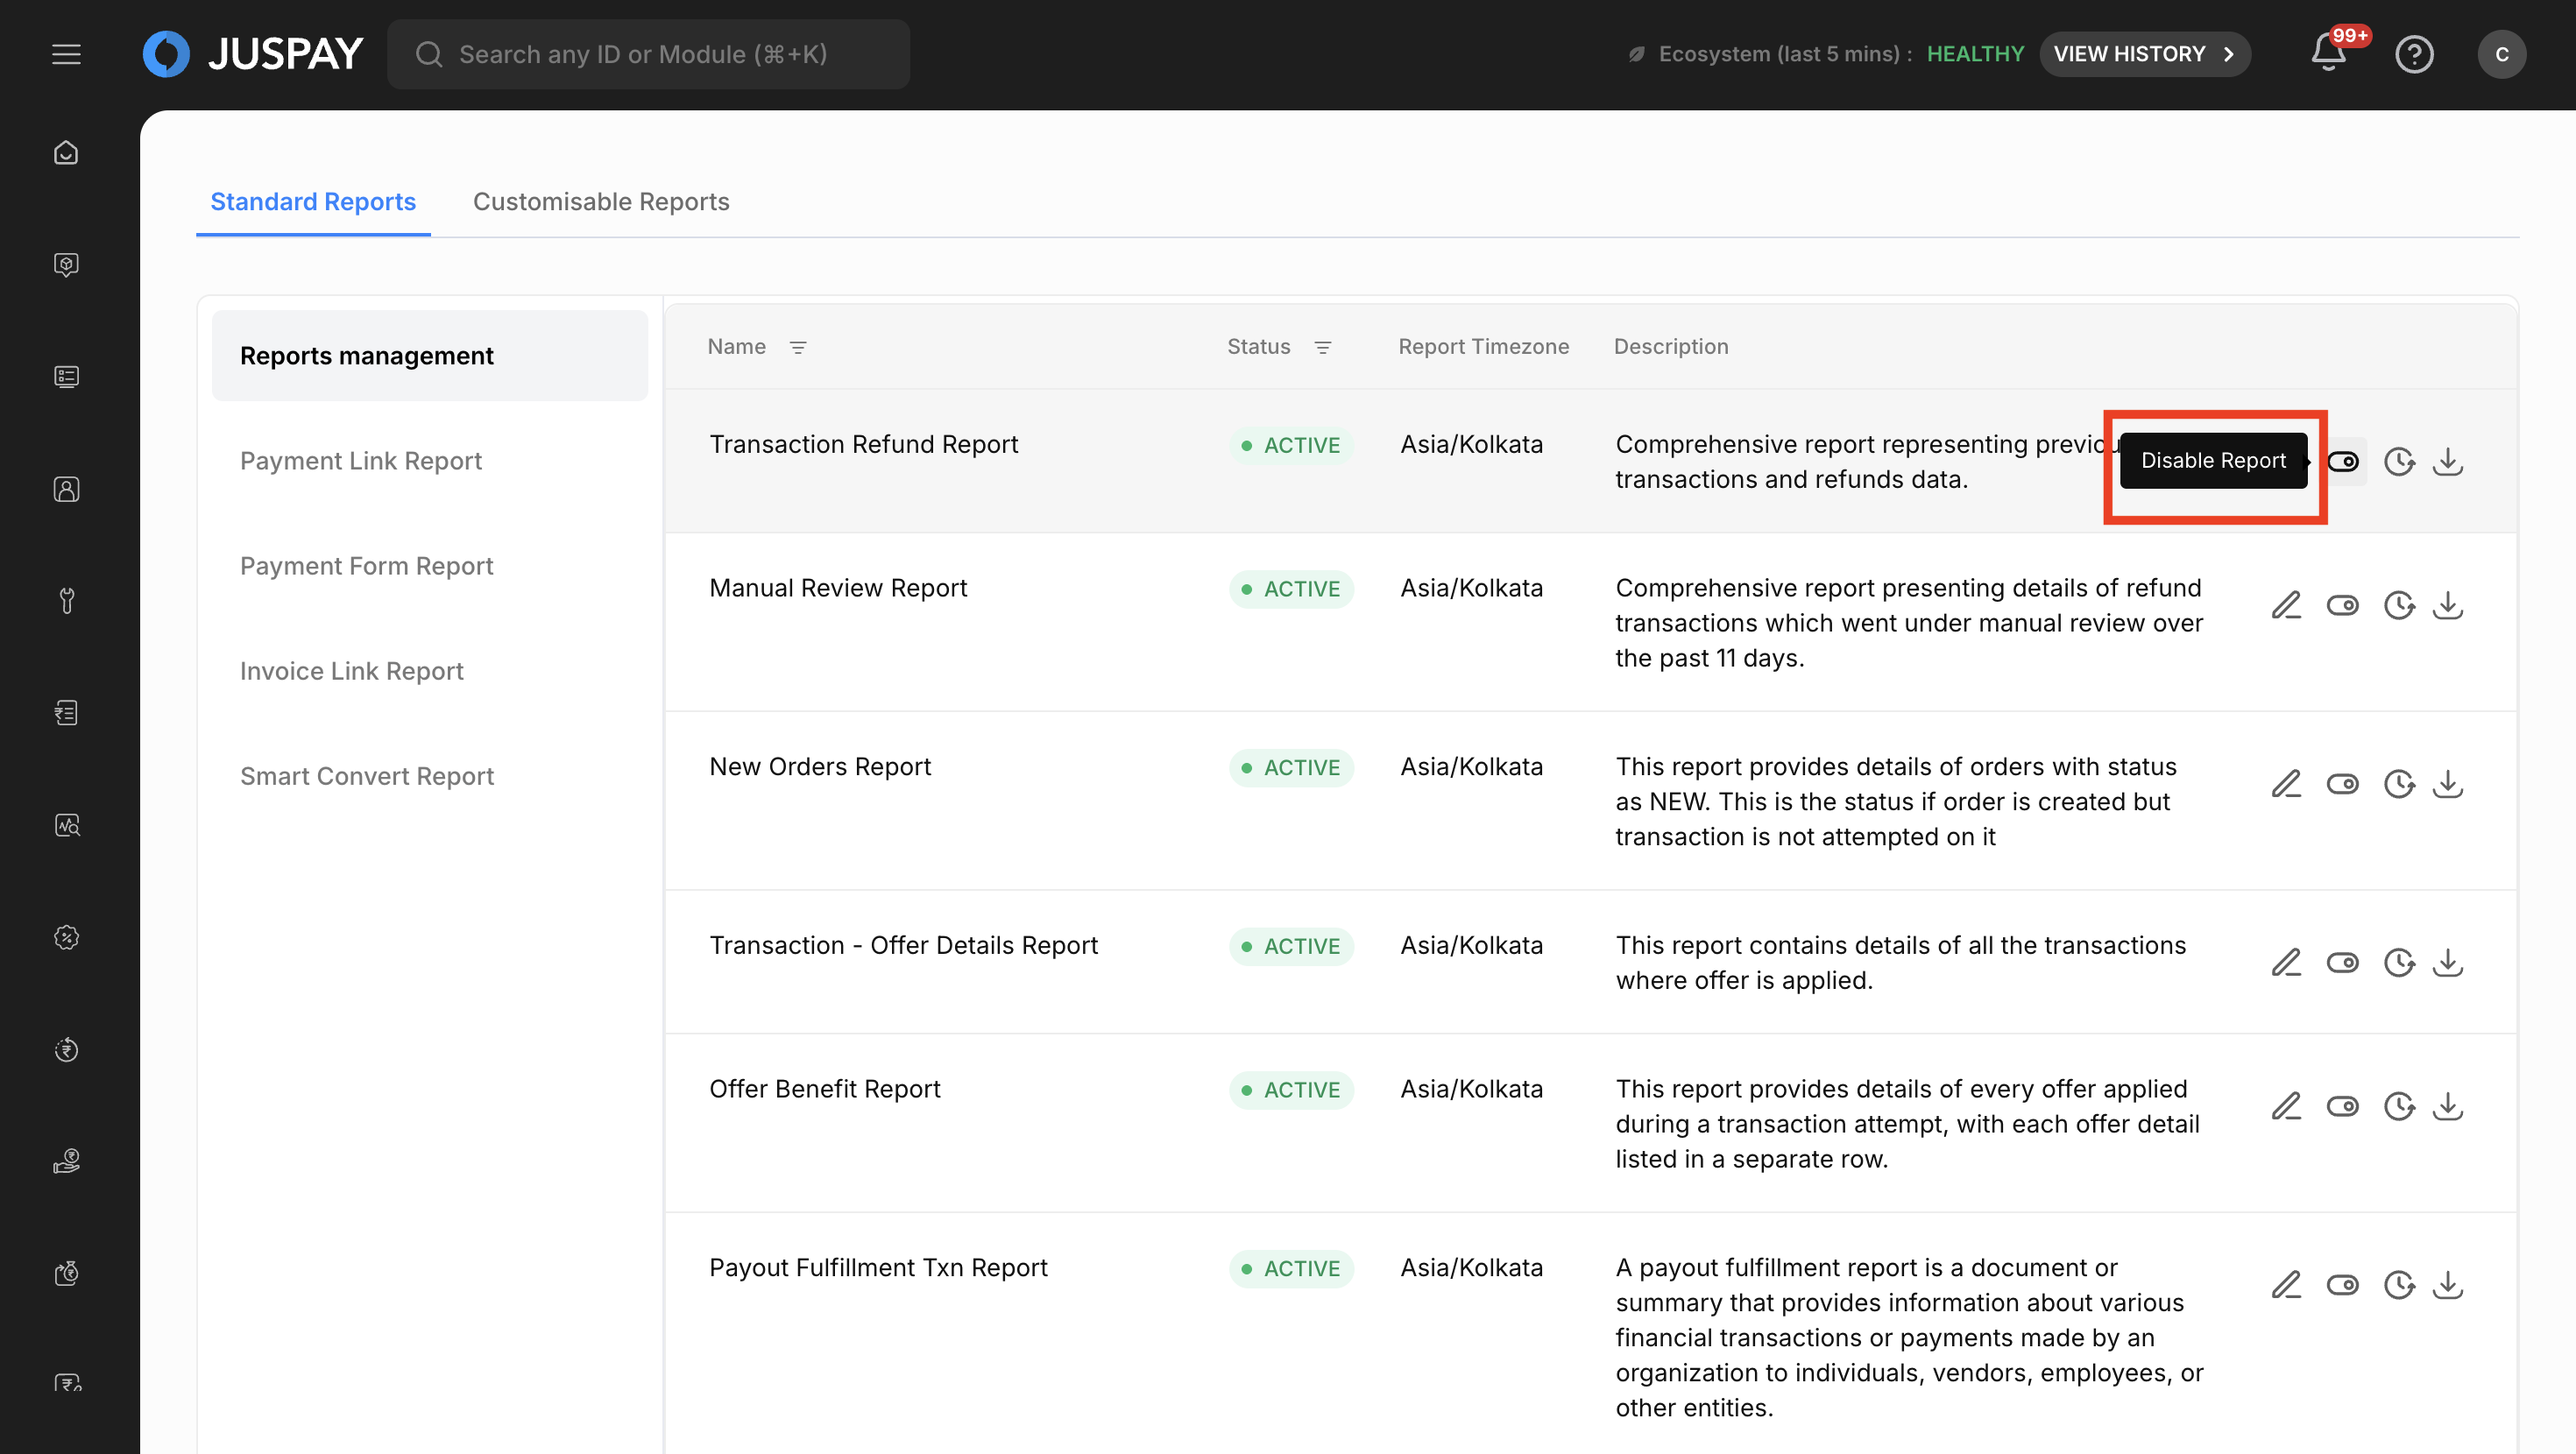
Report Status Management
Report Lifecycle Management:
Toggle report status between ACTIVE and INACTIVE states
Active reports continuously generate according to schedule
Inactive reports stop generation but retain configuration
Delete reports permanently with confirmation
Report Validation:
System validates all report parameters before saving
Checks for required fields and proper configuration
Ensures delivery channels are properly configured
Validates email addresses and recipient settings
Standard Reports Access
Reports Management Interface
Main Standard Reports Section:
Display: Comprehensive list using LoadedTable component
Columns: Name, Status, Timezone, Description, and Action columns
Pagination: 10 reports per page with navigation controls
Serial Numbers: Sequential numbering for easy reference
Sorting: Default sorting by date created with customizable options
Access Control: Available to users with monitoring ACL permissions
Specialized Report Types
Payment Link Reports
Access Requirements:
Permissions: Payment link permissions required
Context: Merchant context access only
Functionality: Payment link transaction data and analytics
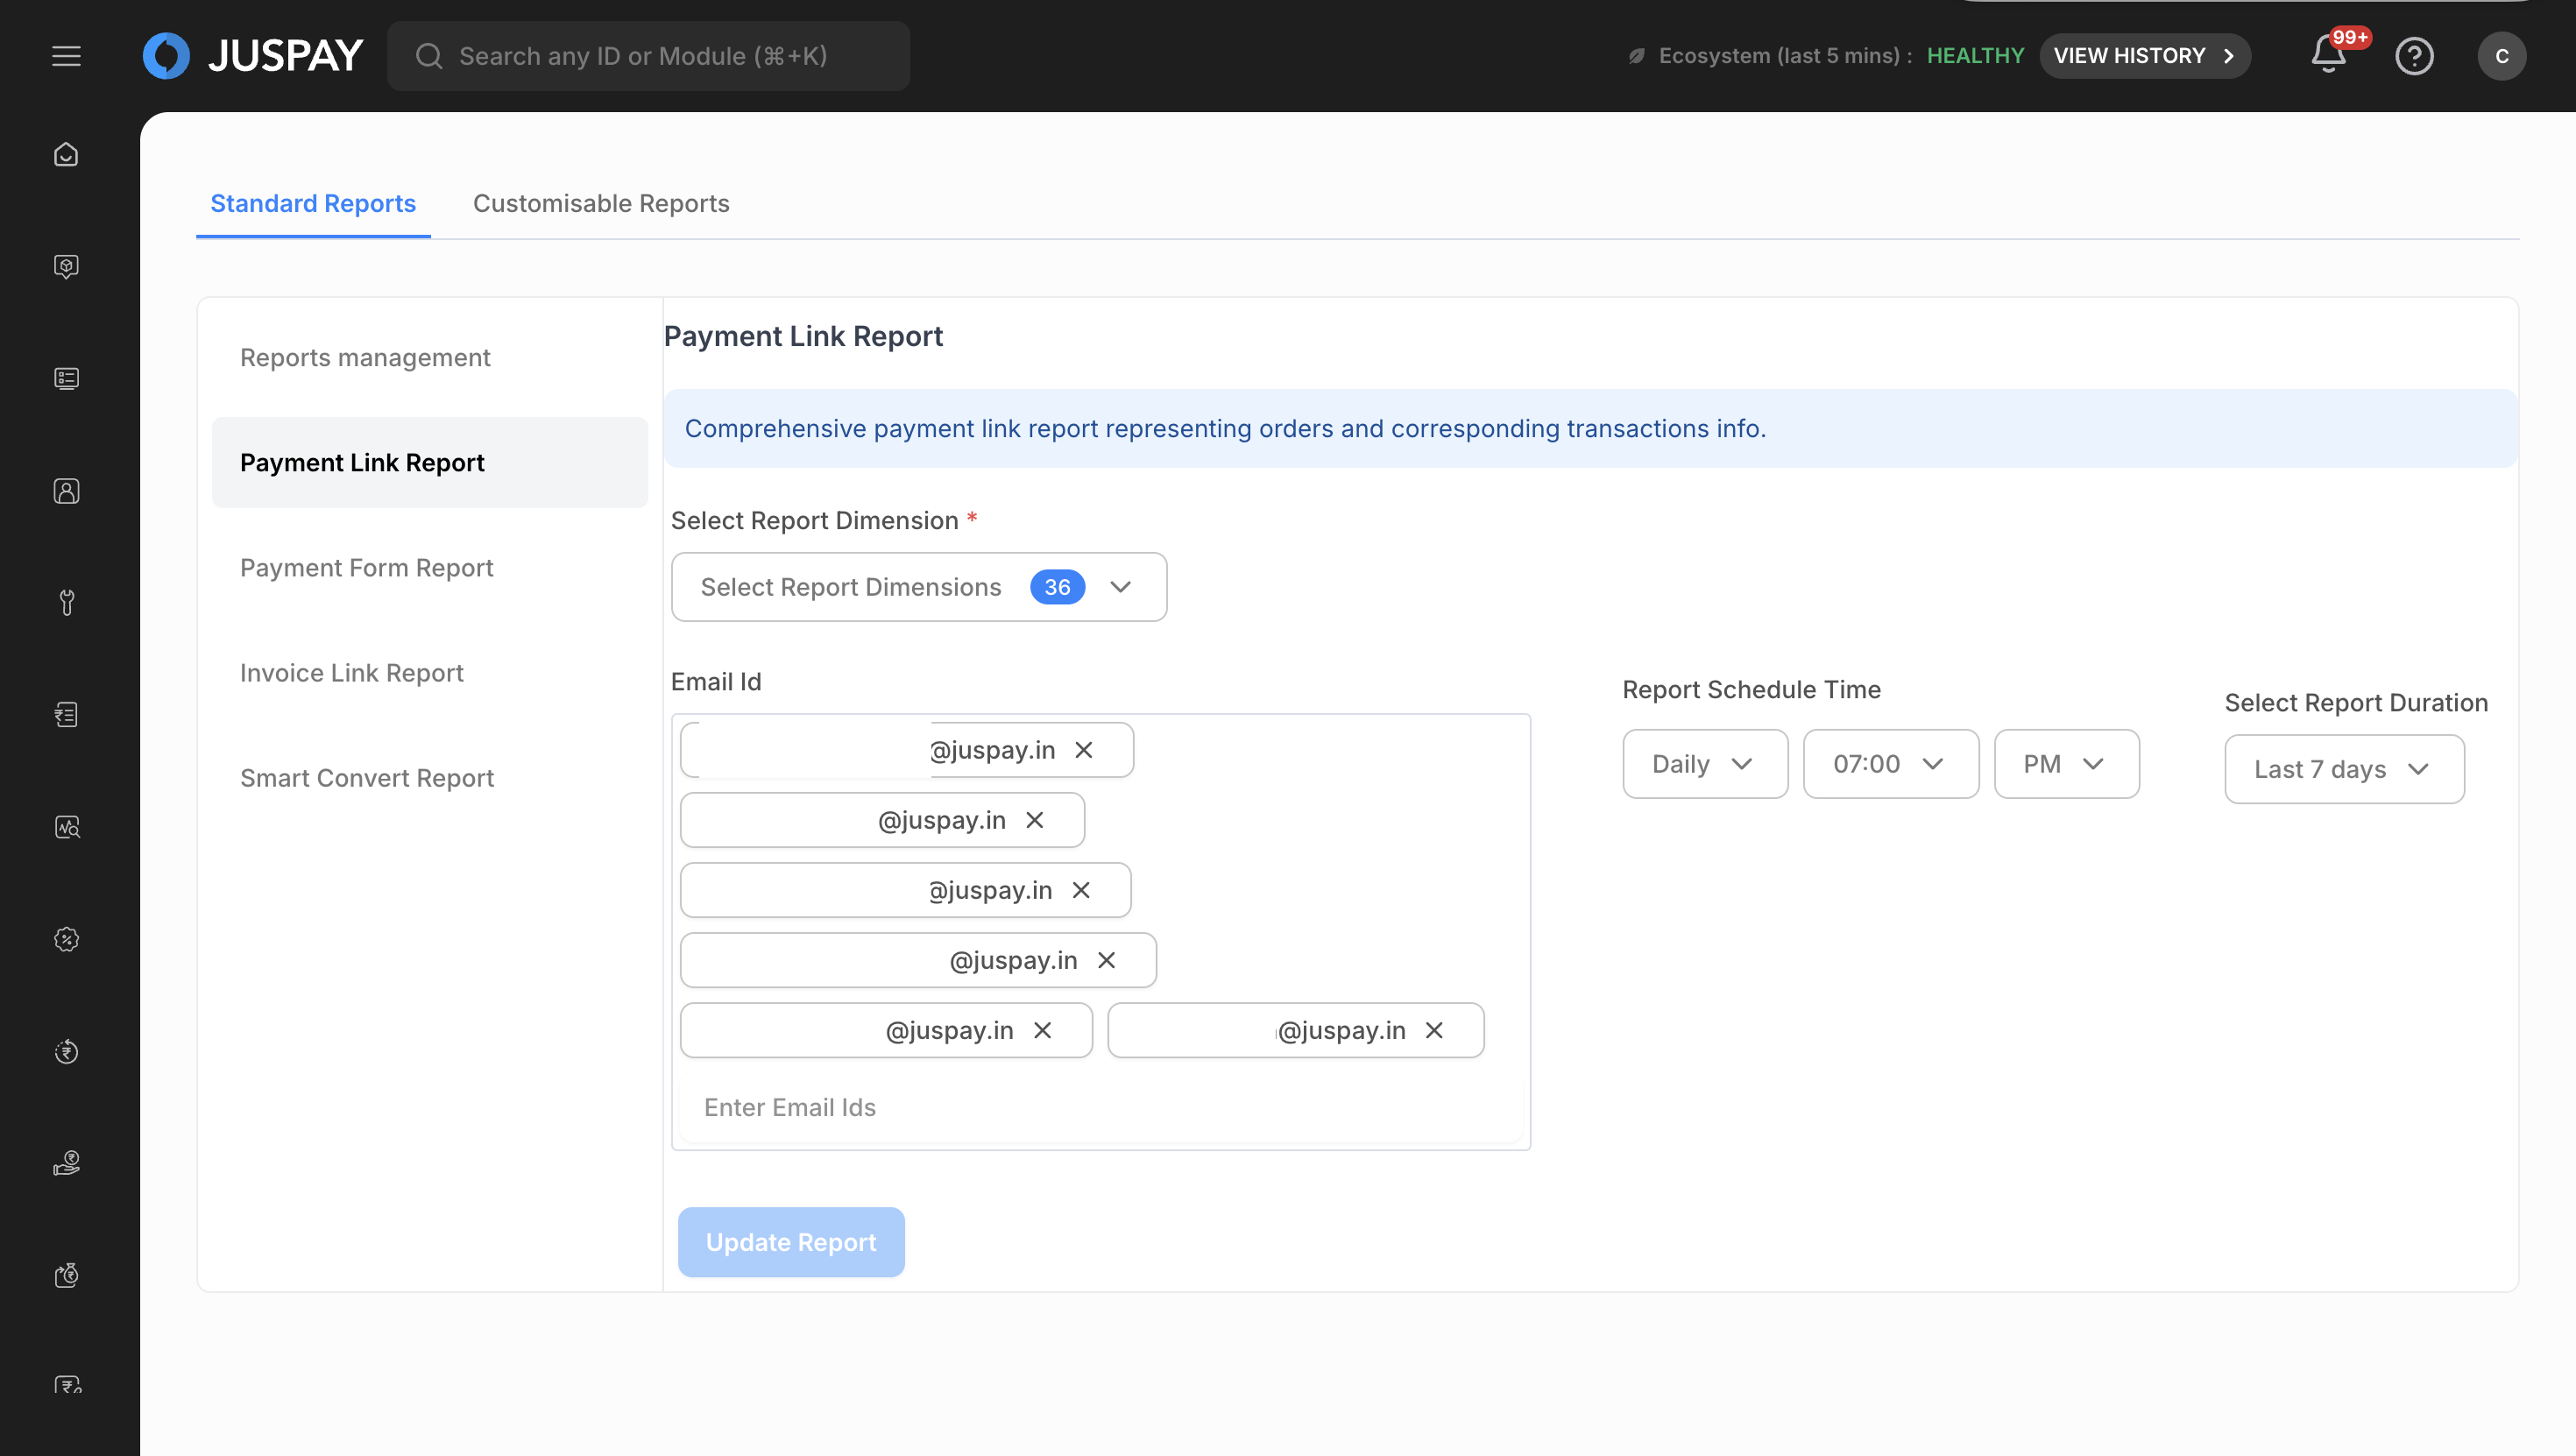
Payment Link Report
Configuration Process:
Navigate to Payment Link Report tab from standard reports section
Configure Report Dimensions (Required):
Choose data dimensions for report inclusion
Validation: "Please Select atleast 1 dimension" error if none selected
Set Up Email Recipients (Required):
Enter delivery email addresses
Validation: "Please Enter Mail ID(s)" if empty, "Maximum 5 emails are allowed" if exceeded
Configure Report Scheduler with frequency and timing settings
Set Query Duration for data collection timeframe
Submit Configuration using "Schedule Report" or "Update Report" button
Payment Form Reports
Access Requirements:
Permissions: Payment form permissions or admin payment form permissions
Context Restrictions: Not available for JUSPAY context users
PII Access: Requires PII decryption order details access
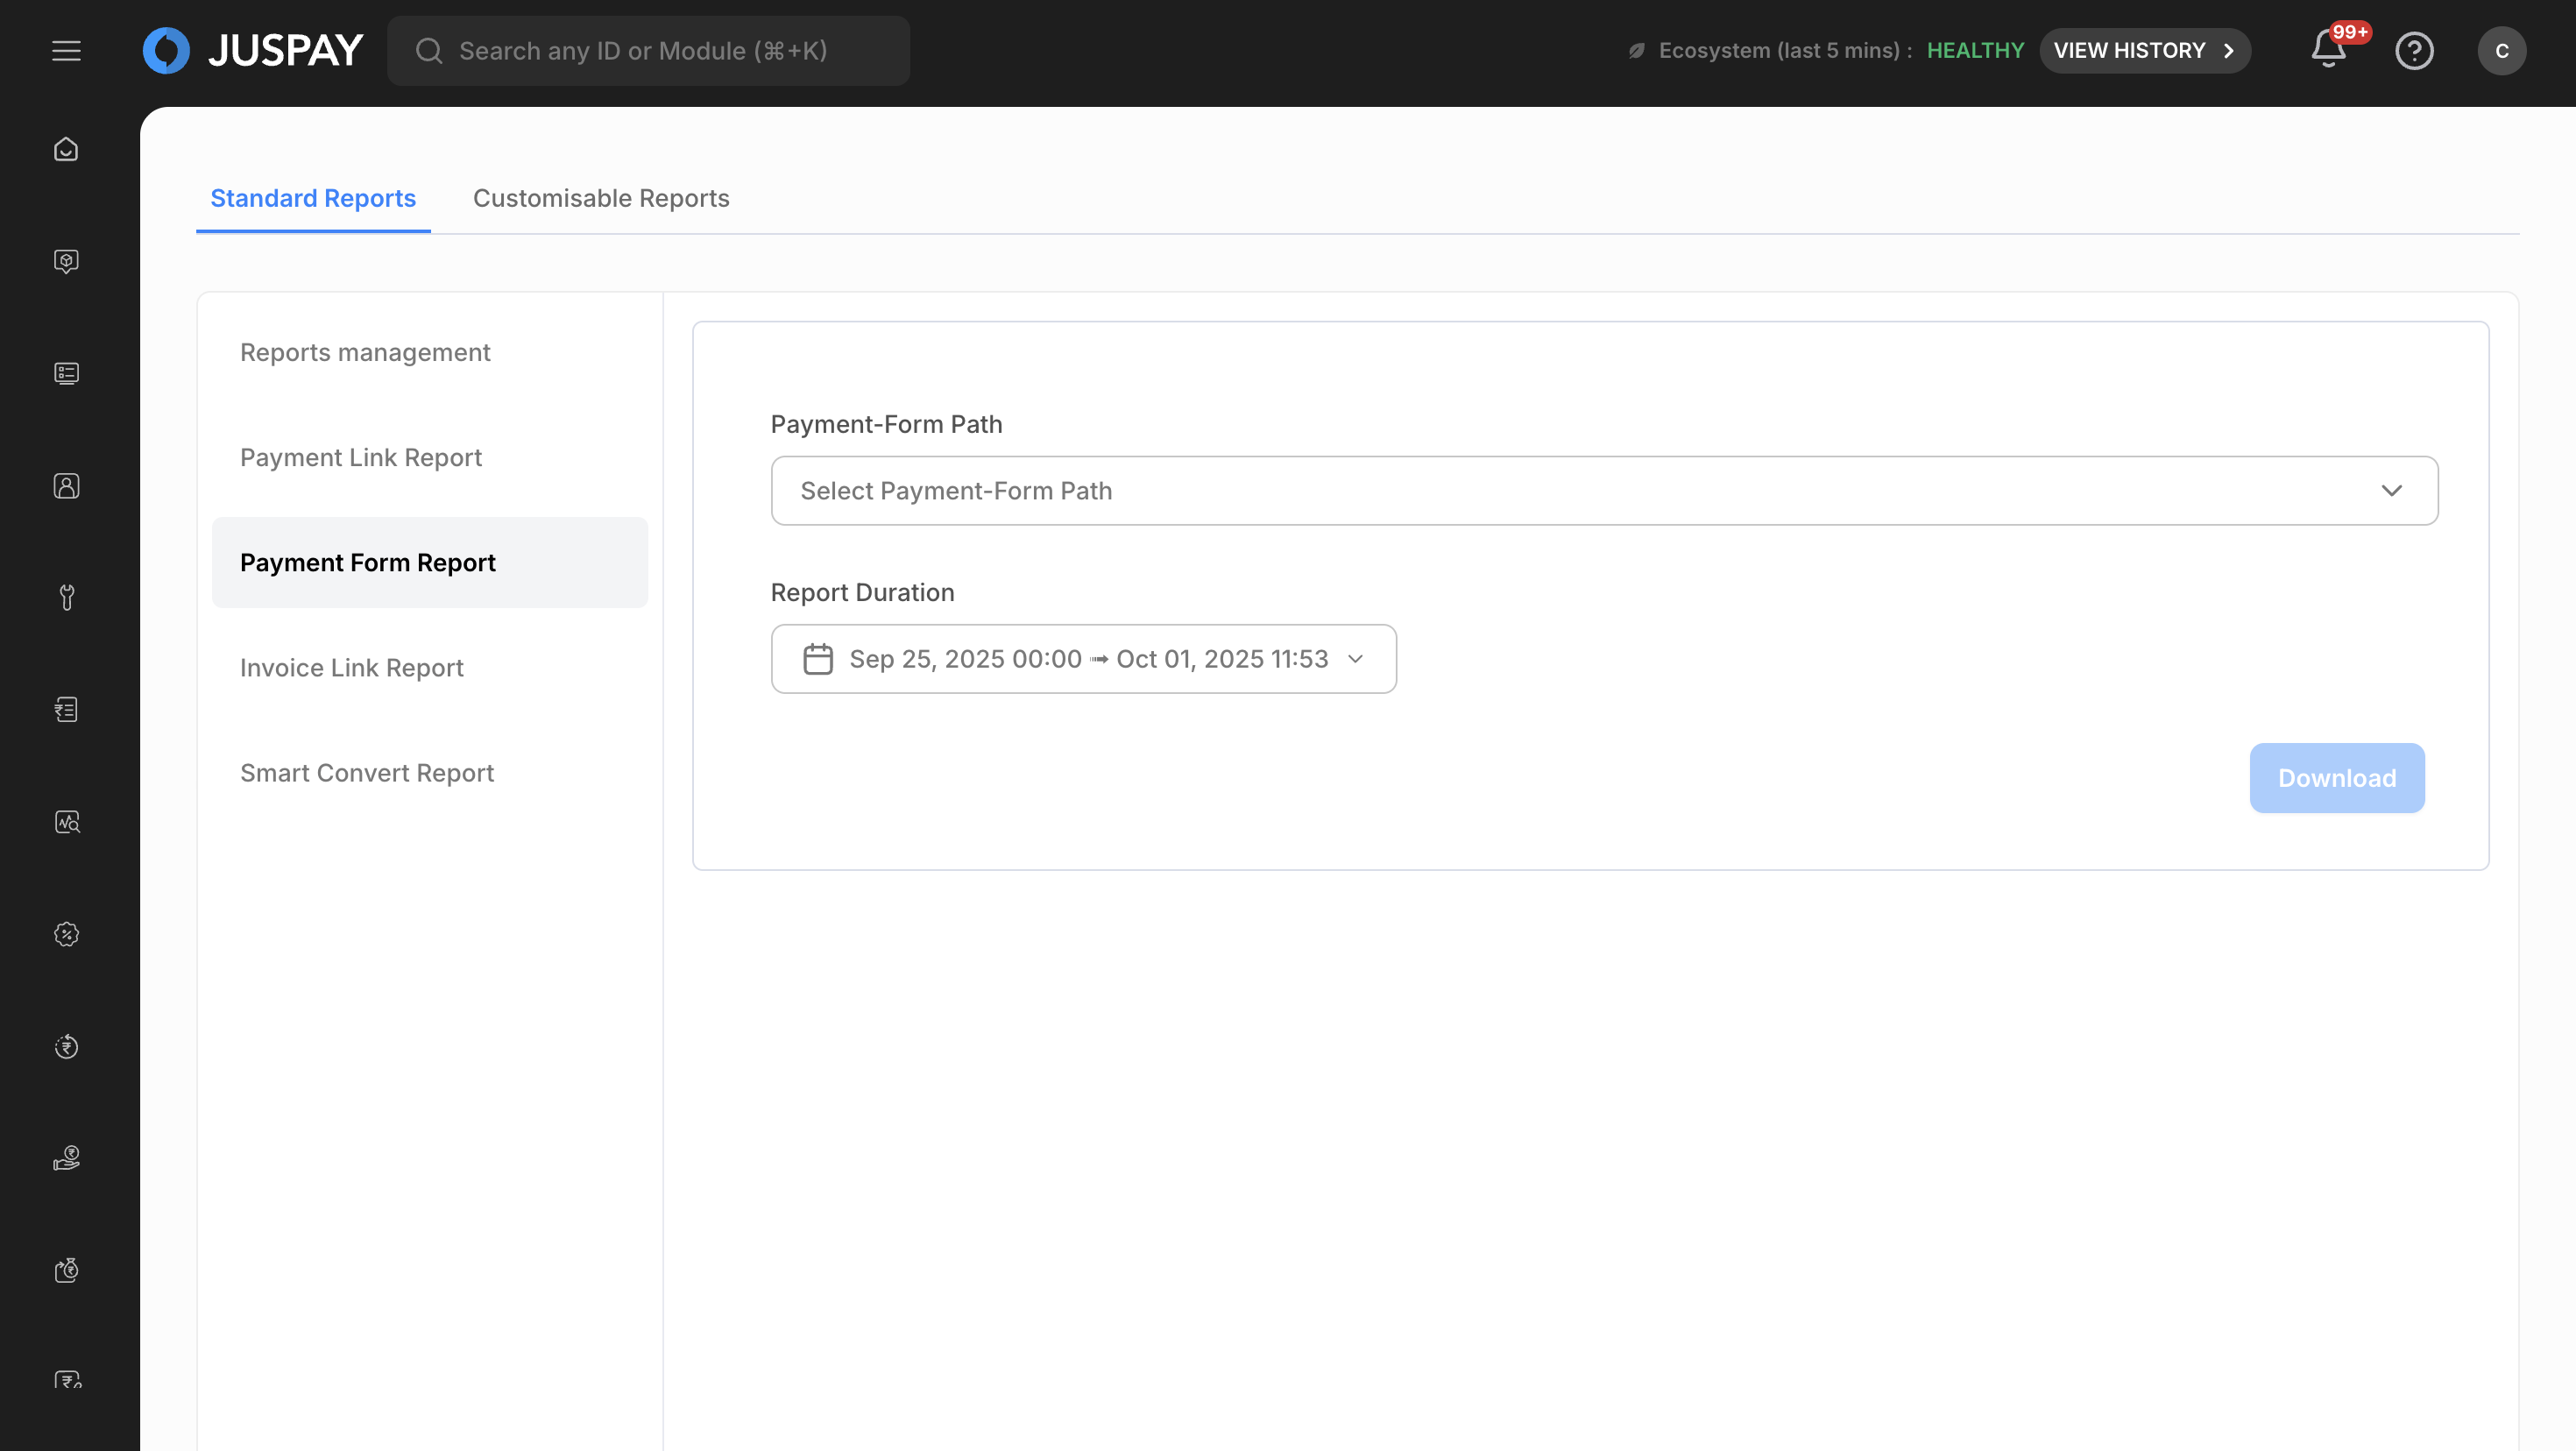
Payment Form Report
For Merchant Context Users:
Access Payment Form Report Interface with grid-based form
Select Payment Form Path (Required):
Choose from approved payment forms (excludes DRAFT, REVIEW, REJECTED)
Validation: "Select Payment-Form Path" error if none selected
Configure Report Duration (Required):
Maximum 7-day range limit, future dates disabled
Format: "YYYY-MM-DDTHH:mm:00[Z]"
Download Report with button states (Download/Downloading...)
For Admin Context Users:
Access Payment Form Approval Report Interface
Review Report Description: "Payment Form Approval Report" with reviewer details
Download Approval Report using primary button that opens AdhocReport modal
Invoice Link Reports
Access Requirements:
Primary Access: Invoice link permissions required
PII Requirements: PII decryption order details access required
Context Access: Merchant context or reseller-level invoice reports enabled
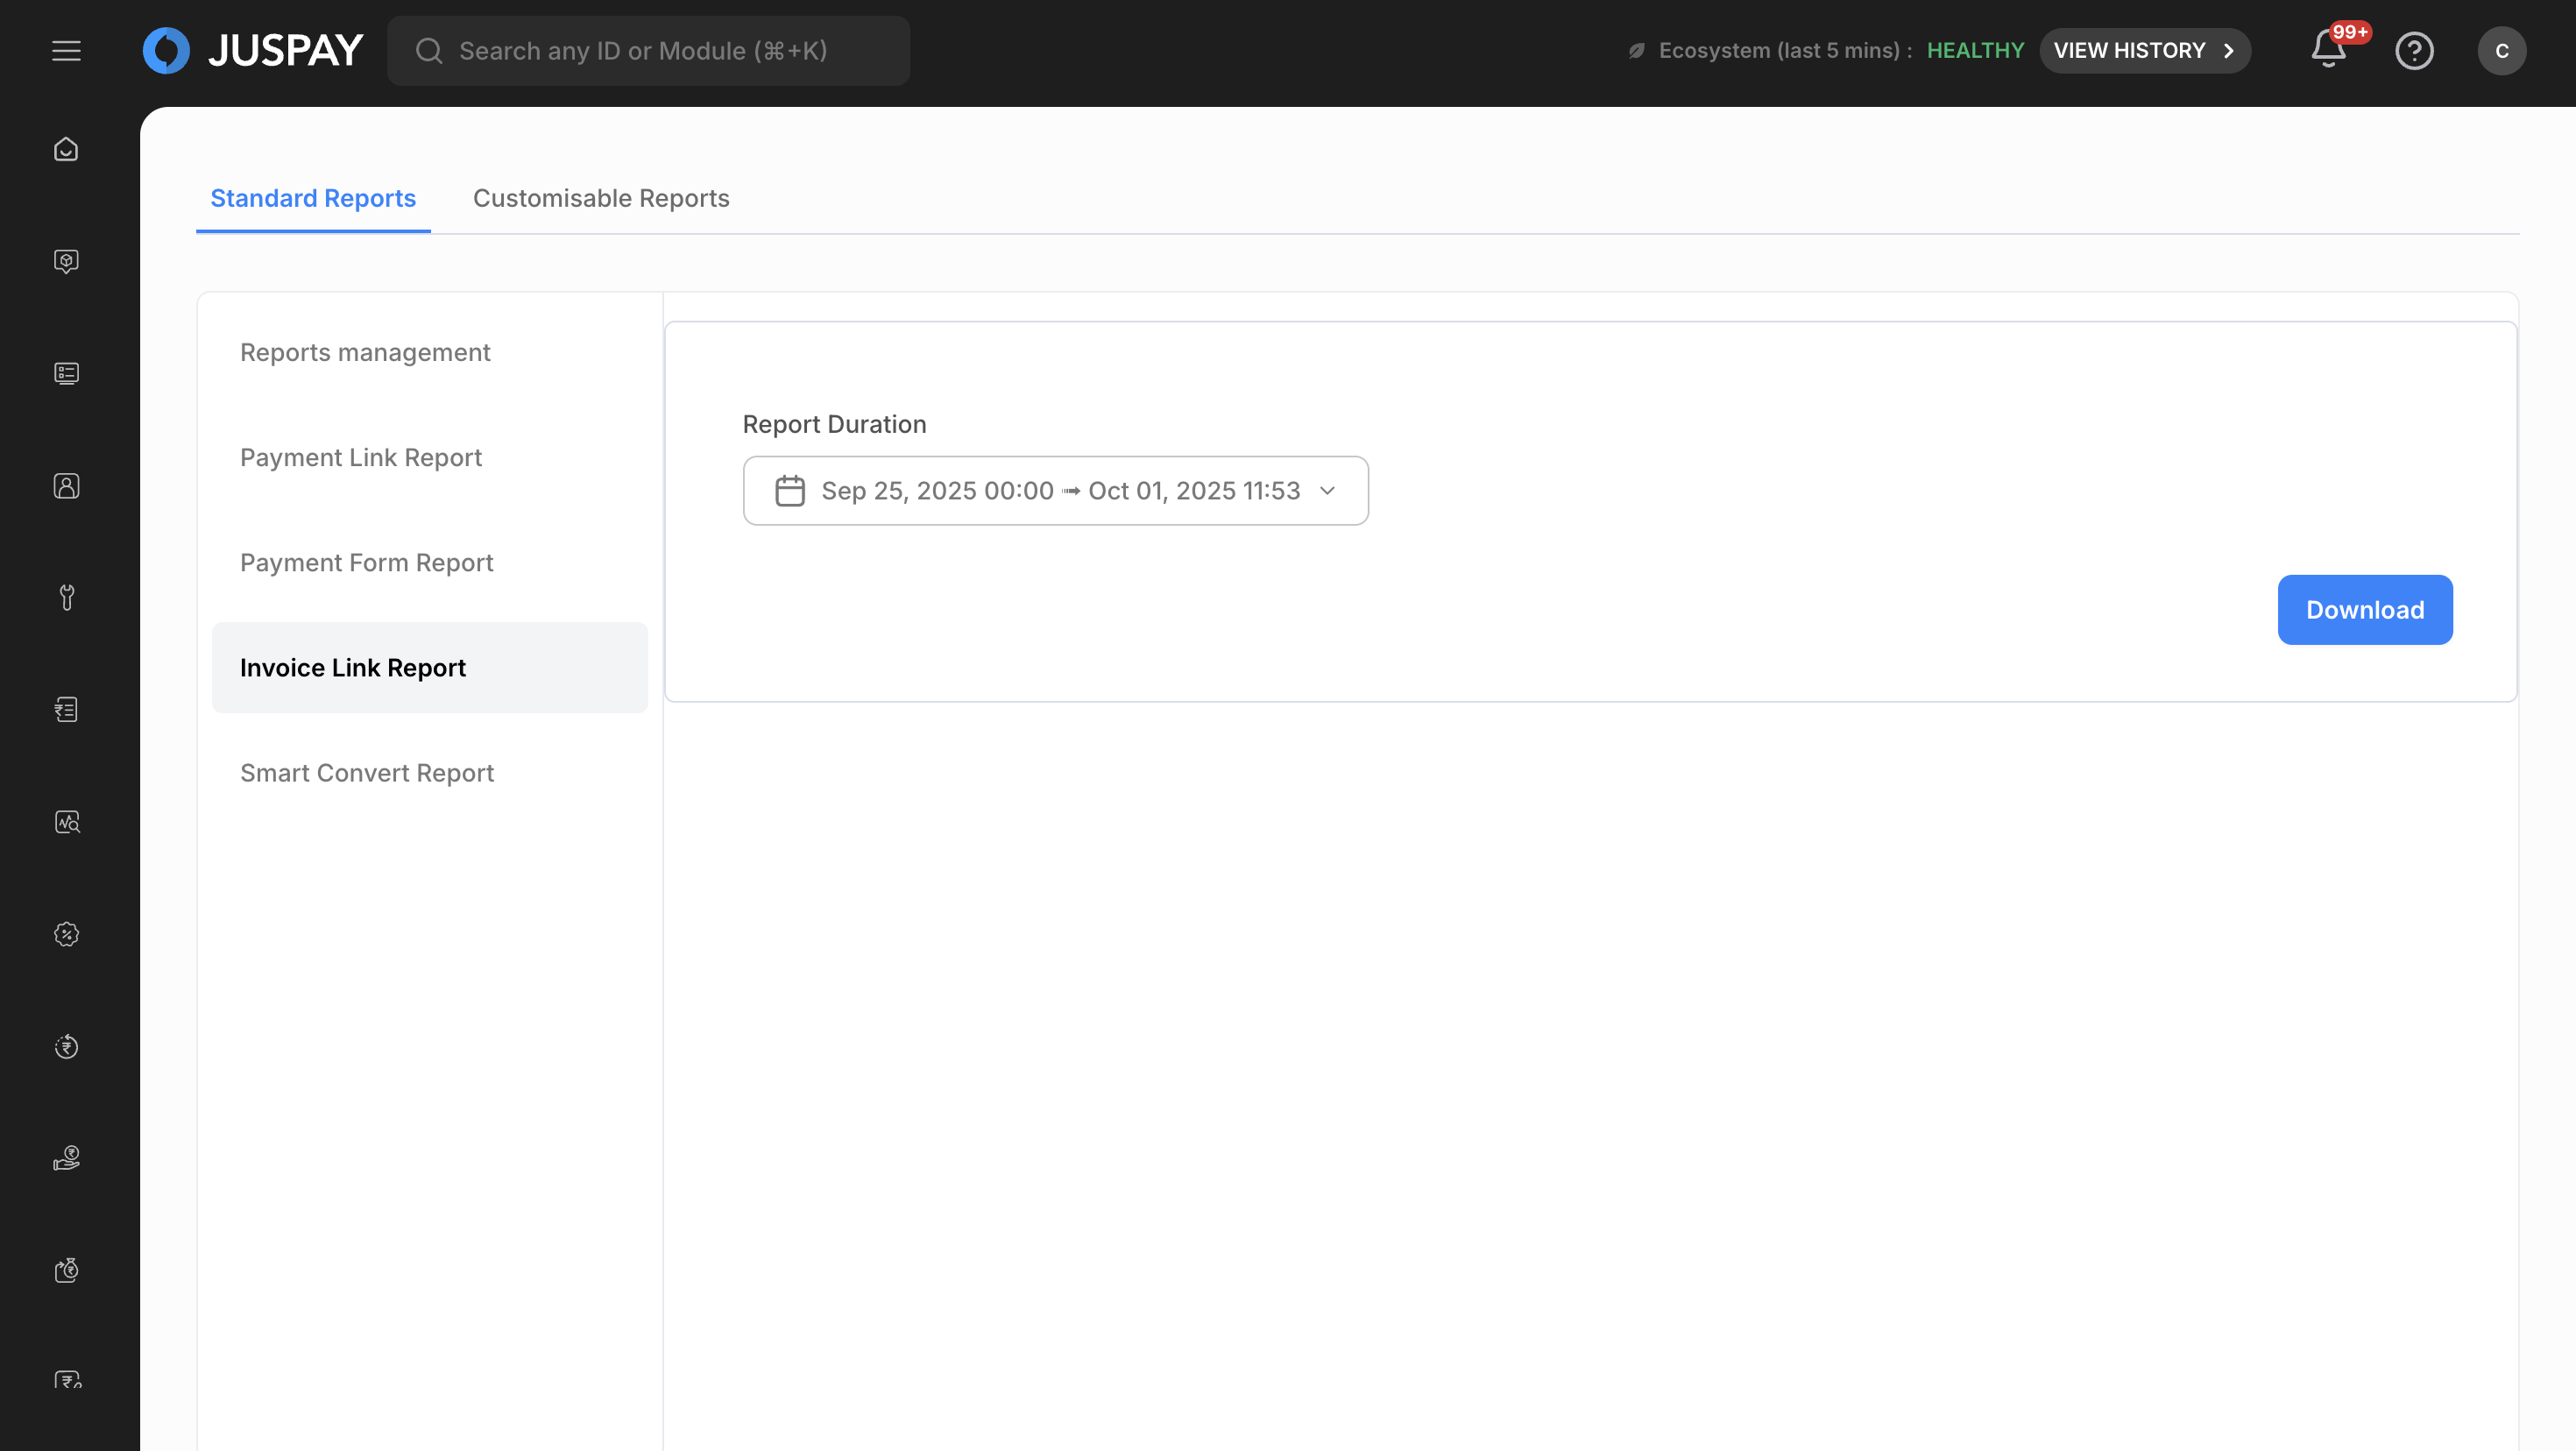
Invoice Links Report
Configuration Process:
Access Invoice Link Report Interface with minimal form design
Configure Report Duration (Required):
Maximum 7-day range limit, future dates disabled
Format: "YYYY-MM-DDTHH:mm:00[Z]"
Default: 7 days ago to current time minus 5:30 hours
Monitor Generation Status with error display in red text
Download Invoice Report with button states and immediate generation
Smart Convert Reports
Access Requirements:
Permissions: Retargeting permissions required
Features: Status monitoring, configurable parameters, real-time updates
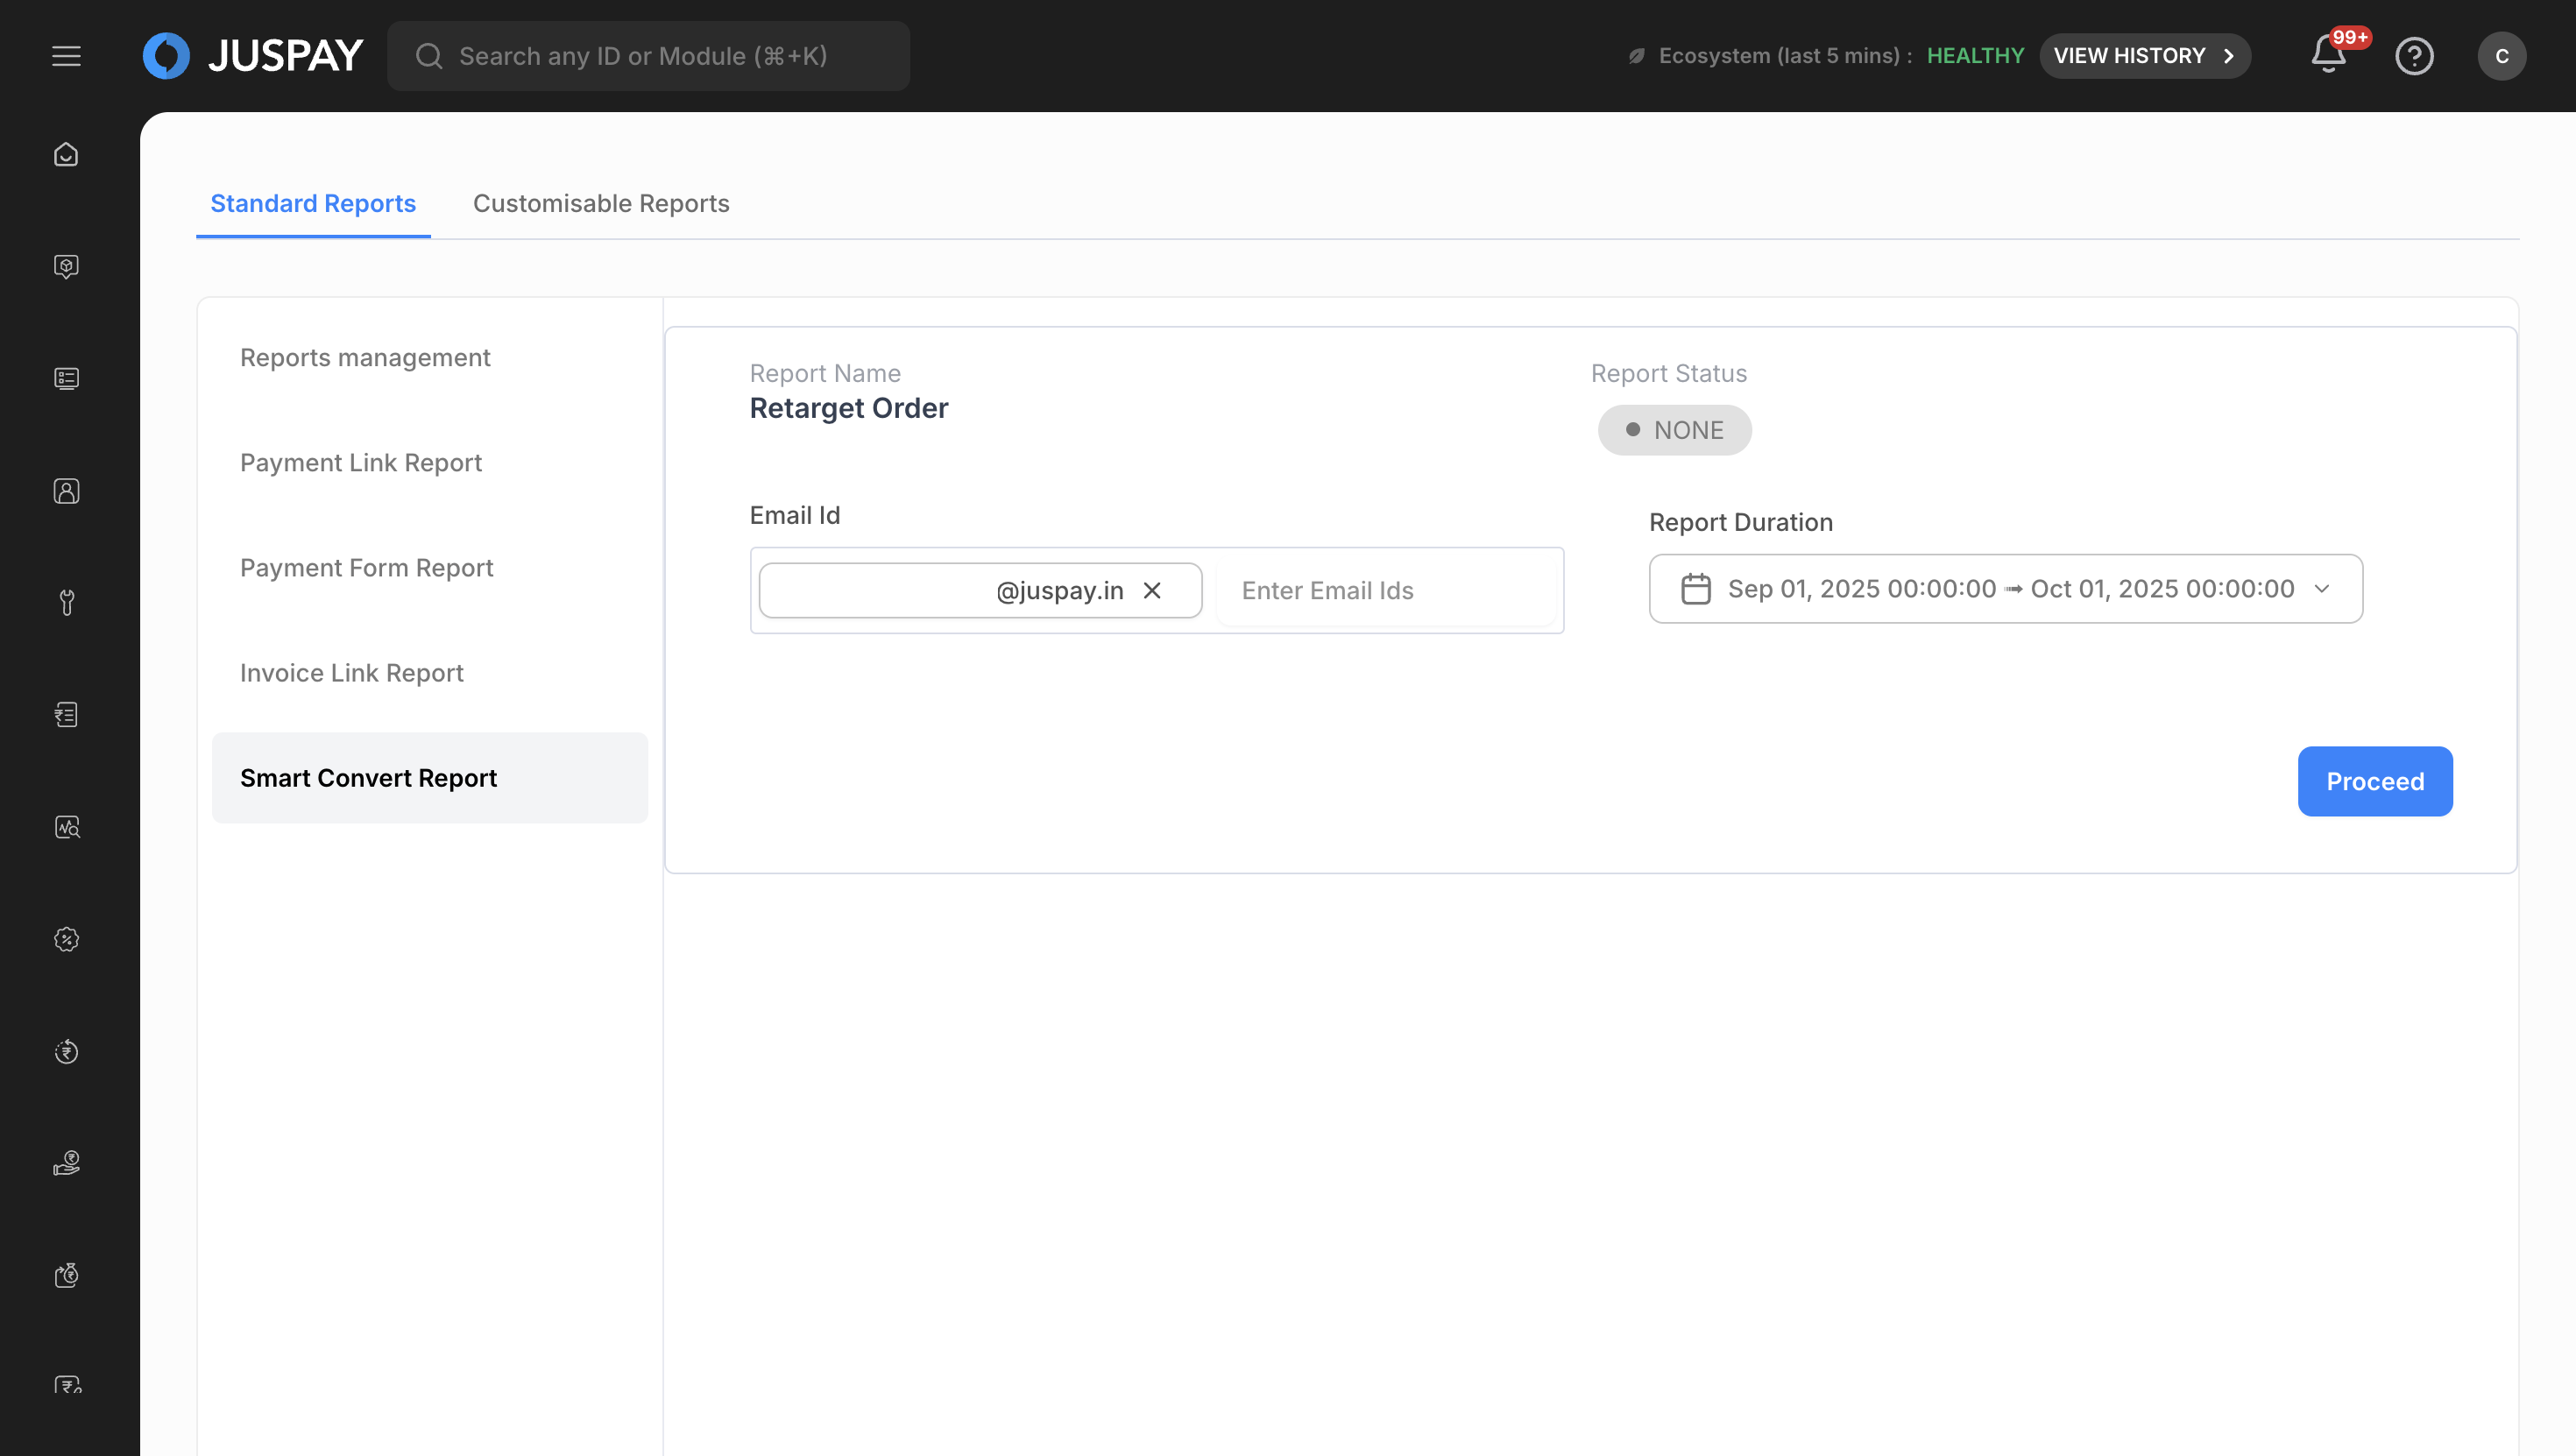
Smart Convert Report
Configuration Process:
Access Smart Convert Report Interface with grid layout
Review Current Report Status:
PENDING: Orange badge with circle border
Other Status: Gray badge with circle border
Configure Email Recipients (Required):
Pre-populated with current user's email
Validation: "Please Enter Mail ID(s)" if empty, "Enter valid email address" for format
Set Report Duration (Required):
Maximum 31-day range limit, future dates disabled
Format: "YYYY-MM-DDTHH:mm:ss.SSS[Z]"
Default: 31 days ago to previous day at 6:30 PM
Handle Pending Reports: Orange warning for "Report in Progress" scenarios
Submit Generation Request with "Proceed" or "Cancel and Proceed" buttons
Report Configuration Options
Data Sources and Types
Available Sources:
Transaction (txn): Transaction-level metrics and performance monitoring
Refund: Refund patterns and success rate tracking
Payout (fulfillment-txn): Payout fulfillment monitoring (context-dependent availability)
Report Types:
Raw View: Detailed transaction-level data (context-dependent availability)
Summarised View: Aggregated data with metrics (universal availability)
Metrics and Dimensions
Standard Metrics:
Success Rate: Percentage of successful operations
Total Volume: Total number of operations
Success Volume: Number of successful operations
Total Amount: Monetary value of operations
Dimension Configuration:
Maximum Selections: Up to 6 dimensions for summarised reports
Search Functionality: Searchable dimension selection
Dynamic Loading: Options based on selected source and type
Scheduling and Delivery
Schedule Options:
Daily: 86400 seconds interval
Weekly: 604800 seconds interval with day selection
Monthly: 2592000 seconds interval with date selection
Delivery Channels:
Email: MonitoringEmailInput with validation
SFTP: Secure file transfer protocol
S3: Amazon S3 bucket storage (Note: For Setup, refer to the Cross-Account S3 Bucket Permissions Setup Guide
)
Use Cases
Transaction Performance Monitoring: Create detailed transaction reports with specific metrics and automated delivery
Financial Reporting: Generate revenue and volume reports across multiple business dimensions
Compliance Documentation: Set up automated regulatory reports with audit trails
Troubleshooting
Form Validation Errors
Report Configuration Errors:
"Please Enter Mail ID(s)": At least one email address is required for report delivery
"Enter valid email address": Check email format and ensure proper syntax (user@domain.com)
"Maximum 5 emails are allowed": Remove excess email addresses when email limiting is enabled
"Please Select atleast 1 dimension": Select at least one dimension for report generation
"Maximum 6 Dimensions are Allowed": Reduce dimension selection for summarised reports
"Select Payment-Form Path": Must select a payment form for payment form reports
Report Creation and Updates:
"Task Name should be less than 50 characters": Shorten the report name
"Please select at least one delivery channel (Email, SFTP, or S3)": Enable at least one delivery method
Permissions and Roles
Access to the Monitoring Reports module is controlled by the following permissions:
Required Access Control Lists (ACLs)
Monitoring Module Access: Required for accessing the monitoring reports interface (ACL:
monitoring)Admin Monitoring Access: Required for administrative report management functions (ACL:
admin_monitoring)Combined ACL Requirement: System requires either
monitoringoradmin_monitoringpermissions (ACL String:"monitoring,admin_monitoring")Parent ACL Verification: Access control based on
parentAclInfo.acl.monitoringfor hierarchical permission management