

Creating API eMandate requests via the Source API endpoint
This guide refers to API endpoints in API Reference (in the Dashboard, go to Developers > API Reference).
The Source endpoint assumes that you already have the full details required to create a mandate or that you are using LotusPay.js![]() . If you don't have all of the details, you'll need to build a form to capture the details from the customer. Alternatively, you can use a white-labelled LotusPay hosted form
. If you don't have all of the details, you'll need to build a form to capture the details from the customer. Alternatively, you can use a white-labelled LotusPay hosted form![]() .
.
If you know the mandate arguments like amount and frequency, but you don't know your customer's bank account details, you can use LotusPay.js to ask the customer for just their bank account details and offer them a seamless ecommerce-style checkout experience with our secure JavaScript element. LotusPay.js tokenises bank account details at the front-end so that they never touch your server.
When source is submitted, it creates a mandate. Source has no further use after the mandate is created - all of the relevant details can be retrieved from the mandate.
See Source statuses![]() for more details.
for more details.
Methods
The eMandate redirect flow can use the Checkout method (a) or the Invitation method (b), depending on your use case.
a) Checkout method
If the customer is in session in your web app or mobile app, you can create an ecommerce-style instant check-out experience for the customer by redirecting them to the url from your web app, or by opening a webview in your mobile app.
In this method, the customer starts in Step 1.
Eligible merchants can build their own custom authorisation page certified by LotusPay, in which case the customer will not see the LotusPay review page (Step 2) - they will go from Step 1 to Step 3. Contact LotusPay Support for more information.
b) Invitation method
If the customer is not currently online, you can send a fully pre-filled eMandate invitation to a customer for them to authorise in their own time.
In this method, the customer starts in Step 2.
When the customer visits this link, they land on the LotusPay review page.
If you want LotusPay to send the url link to your customer via email, you can include an email address in source and an email will be sent to your customer within a few seconds. The display name of the From email address will be your company's trading name, and your company logo will be displayed.
If your merchant account is enabled for SMS notifications, and you want LotusPay to send the url link to your customer via SMS, you can include their mobile number in source and a short link will be sent (in live mode only) to that mobile number within a few seconds. * Requires Pro Plan upgrade and SMS service upgrade *
Otherwise, you can share the url link independently via your own method such as email/SMS/chat etc.
If you want to terminate the link at any time, you must use the Source Withdraw API endpoint.
Redirect flow
Both methods use the redirect flow. In this graphic, each orange arrow represents an API request, and each linked blue box represents a view.
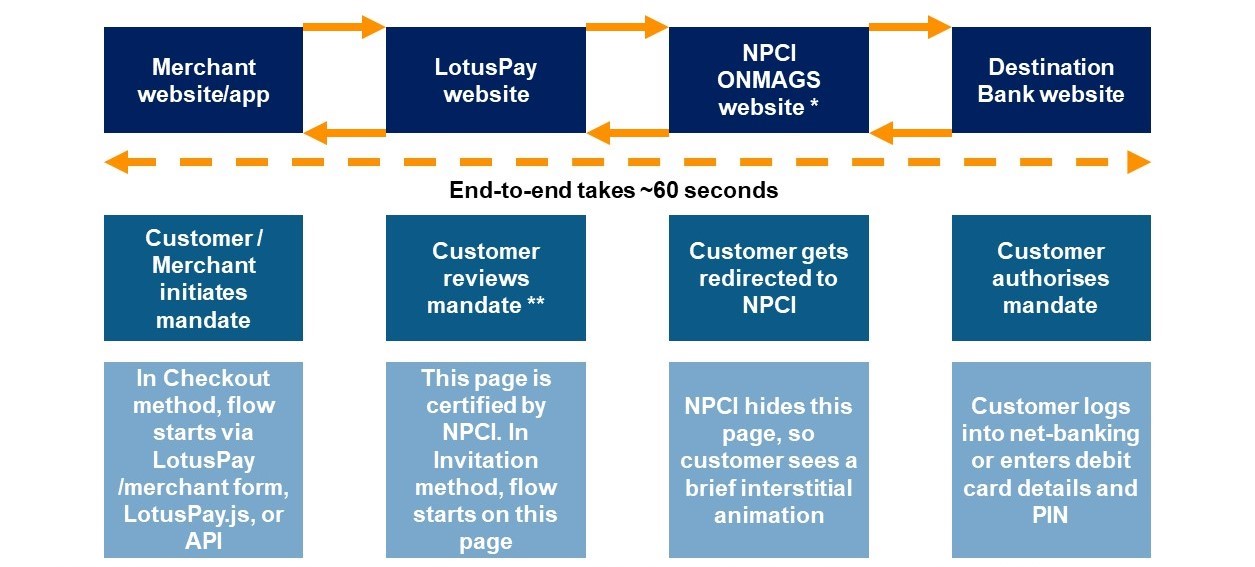
* ONMAGS = NPCI Online Mandate Approval Gateway System.
** Eligible pro merchants can request LotusPay to hide the LotusPay page if they make a compliant page in their web/mobile application.
The flow is as follows:
Step 1. [Checkout method only] The customer starts in your web/mobile application. If you need to capture any details from the customer, you can build a form in your app. If you need to capture just the customer's bank account details, you can use LotusPay.js. You create source via a server-to-server POST request using the POST Source API![]() with the required arguments. You can use the GET NACH Banks API
with the required arguments. You can use the GET NACH Banks API![]() to get the latest list of destination banks live for emandate_api variant (this data changes no more than twice per week, so best to store this data in your app and refresh once a day).
to get the latest list of destination banks live for emandate_api variant (this data changes no more than twice per week, so best to store this data in your app and refresh once a day). source.status is initially pending. source.mandate and source.redirect.response are initially empty. source.redirect.url contains an authorisation link. The authorisation link remains usable until source.status is submitted or withdrawn. You send the customer to this URL in a browser-to-browser redirect using the GET method. In a mobile app, you would open this page in a webview. LotusPay informs you of the source creation by asynchronously sending server-to-server event POST request to your webhook url of type source.pending (containing the full source payload).
Step 2. The customer goes to the authorisation link, which shows the LotusPay review page. This page is hosted by LotusPay and is certified by the NACH Debit system. It is branded with your logo. The customer reviews the details, selects an authorisation method (if you did not already provide one in source), accepts the terms and proceeds. The authorisation methods displayed (either debit card, or net-banking, or both) will be those which are available for the destination bank chosen. If you pre-filled the authorisation method then the customer won't see this option, else they can choose here.
Step 3. The customer gets redirected to the NPCI Online Mandate Approval Gateway System (ONMAGS). They see a brief interstitial animation and get forwarded again.
Step 4. The customer gets redirected to their bank's website. Here they authenticate themselves via netbanking login or debit card and PIN (depending on the option chosen earlier). They review the mandate details. They authorise the mandate with an OTP, which is sent to the mobile number registered in their bank account. See this article![]() for screenshot, video and more information regarding the customer's experience. This displays a status to the customer and sends them back to ONMAGS.
for screenshot, video and more information regarding the customer's experience. This displays a status to the customer and sends them back to ONMAGS.
Step 5. The customer sees a brief success/error message on ONMAGS and gets redirected back to LotusPay.
Step 6. The customer sees a success/error message on LotusPay.
In the Test environment, each scenario can be simulated![]() from the source authorisation link.
from the source authorisation link.
The articles linked below for each scenario contain sample responses.
Success scenario: If the customer has completed authorisation successfully:
source.statusmoves tosubmitted.source.redirect.responseis populated with the ONMAGS response.Response Scenario 1
 : LotusPay request crossed ONMAGS and the destination bank confirmed successful eMandate authorisation. This yields
 <MndtAccptResp>, withtruein<MndtAccptResp><UndrlygAccptncDtls><AccptncRslt><Accptd>and the UMRN (Unique Mandate Reference Number) in<MndtAccptResp><UndrlygAccptncDtls><OrgnlMsgInf><MndtId>.
mandateis immediately created.source.mandateis populated with the ID of the newly created mandate.mandateis created with the exact same set of attributes as were requested insource.nach_debitarguments.mandate.statusisactiveandmandate.umrnis populated with the UMRN.mandate.sourceis populated with the ID of the source that originated it.LotusPay informs you of the success by asynchronously sending server-to-server
eventPOSTrequests to your webhook url oftypesource.submitted(containing the fullsourcepayload) andmandate.active(containing the fullmandatepayload). If you are not integrating the webhook, see the next step.The authorisation link becomes blocked from further attempts.
Error scenario: If ONMAGS returns an error ![]() (click on this link to see all the various scenarios in detail) for any reason (destination bank rejection or ONMAGS rejection) and the customer returns to LotusPay:
(click on this link to see all the various scenarios in detail) for any reason (destination bank rejection or ONMAGS rejection) and the customer returns to LotusPay:
source.statusremainspending.source.redirect.responseis populated with the ONMAGS response if received.Error Scenario A
: LotusPay request was rejected by ONMAGS. This yields <MndtRejResp>, with error details in<MndtRejResp><MndtErrorDtls>.Response Scenario 2
: LotusPay request crossed ONMAGS but is rejected by the destination bank. This is an actual mandate rejection. This yields <MndtAccptResp>, withfalsein<MndtAccptResp><UndrlygAccptncDtls><AccptncRslt><Accptd>and error details in<MndtAccptResp><UndrlygAccptncDtls><AccptncRslt><RjctRsn>.Error Scenario B
: The destination bank's response is not recognised by ONMAGS. It is a technical error.Error Scenario C
: There is some other technical failure in the destination bank and no response is received.
mandateis not created.source.mandateremains empty.LotusPay informs you of the error by asynchronously sending a server-to-server
eventPOSTrequest to your webhook url oftypesource.pending(containing the full source payload). You can differentiate this from a creationeventbecause the erroreventcontains a value insource.redirect.response. If you are not integrating the webhook, see the next step.The authorisation link remains active so that the customer can retry. Click here
to see a full list of errors. Checkout method: If you want the customer to retry, you can resend them to the same link. Invitation method: If the customer wants to retry, they can revisit the same link. If you want to block the customer from retrying with the same url, you must use the POST Source Withdraw API endpoint to transition source.statustowithdrawn. LotusPay informs you of the withdrawal by asynchronously sending a server-to-servereventPOSTrequest to your webhook url oftypesource.withdrawn(containing the full source payload).
Step 7. If you supplied source.redirect.return_url, the customer gets redirected to your Return URL. If you opened a webview in a mobile app, at this stage you can close the webview and take control back into your app. Returning to your web/mobile app happens regardless of whether authorisation was successful or not. If you are not integrating the webhook, you can call the GET Source API![]() to check its status. If
to check its status. If source.status is submitted then source.mandate will contain a mandate ID, and you can call the GET Mandate API![]() to see
to see mandate's details. If source.status is still pending it means that the authorisation was not successful, and you can see details in source.redirect.response. If you want to block the customer from retrying with the same url, you must use the POST Source Withdraw API![]() endpoint to transition
endpoint to transition source.status to withdrawn.
Return URL
If you provided source.return_url, LotusPay concatenates the following GET parameters to your return URL when returning your customer to it:
* source_id: A string representing the ID of the source object.
* livemode: Indicates if this is in the live environment, either true or false.
* client_secret: used to confirm that the returning customer is the same one who triggered the creation of the source (source IDs and mandate IDs are not considered secret)
e.g. ?source_id=SC0011AABBCC22&livemode=false&client_secret=src_client_secret_DUeNTTEBn6QG5mU27pQxyQj3
You may include any other GET parameters you may need when specifying return_url. Do not use the above as parameter names yourself as these would be overridden with the values we populate.
Next steps
If mandate was successfully created, you may want to create an ach_debit or a subscription.
Source statuses, mandate statuses and webhooks
See the articles linked below on source statuses and mandate statuses for detailed information.
Your integration needs to use our webhooks![]() to be notified of status changes on source.
to be notified of status changes on source.
Some customers using NACH Debit assume that the authorisation process is complete once they have completed Step 4. This results in customers who close their browser instead of following the redirect and returning to LotusPay, and thereafter to your app or website. For these reasons it is essential that your integration rely on webhooks to determine when source is submitted. Please refer to our webhooks guide for more details.
Sponsor bank reports
API eMandate, once submitted by the customer via NPCI ONMAGS gateway, appears instantly in LotusPay as an active mandate, but takes one working day to flow inward to your sponsor bank. Your sponsor bank would update their mandate management system and may send you their report as per your arrangement with them. You can discuss this setup with your relationship manager in your sponsor bank. LotusPay mandate management system (dashboard/API) and your sponsor bank mandate management system will show the same emandate_api mandate details, except for some rare dropped cases![]() which may not appear in LotusPay. Mandate status remains active unless it is expired
which may not appear in LotusPay. Mandate status remains active unless it is expired![]() or cancelled
or cancelled![]() .
.