---
page_source: https://juspay.io/sea/docs/dashboard-sea/docs/payments/surcharge
page_title: Surcharge
---
# A Configuration Guide
## Overview
A _surcharge_ is an extra charge, tax, or fee added to the base cost of a product or service, such as **service** , **handling** , or **processing fees** based on specific business requirements.
**For example** : A **service fee** could be imposed by a merchant for using a **specific credit card** **brand** , or a minor surcharge might be applied to**cash-on-delivery** orders as a way to **discourage** that payment method.
### **How Juspay Handles Surcharge**
With **Juspay Surcharge** , merchants can define flexible business rules to automatically apply additional charges to an order based on the **payment method** , **transaction type** , or **other.**
The surcharge amount is clearly displayed on the payment page and seamlessly added to the total payable amount, ensuring full transparency for customers and reducing checkout drop-offs.
### **Target Users**
1. **Operations Teams** : Configure and manage surcharge rules to optimize processing costs.
2. **Finance Teams** : Define fee structures, tax compliance, and cost recovery policies.
3. **Business Teams** : Implement surcharge strategies aligned with commercial goals and pricing models.
### **Key Features**
* **Intelligent Rule Engine:** Configure surcharge logic with multiple criteria and conditions.
* **Fee Management:** Define fixed or percentage-based surcharges per payment method.
* **Tax Compliance:** Set tax rates for local regulatory alignment.
* **Cost Recovery:** Apply surcharges to recover payment processing expenses.
* **Conditional Pricing:** Configure surcharges based on transaction characteristics.
* **Real-time Configuration:** Dynamically apply surcharges based on live transaction context.
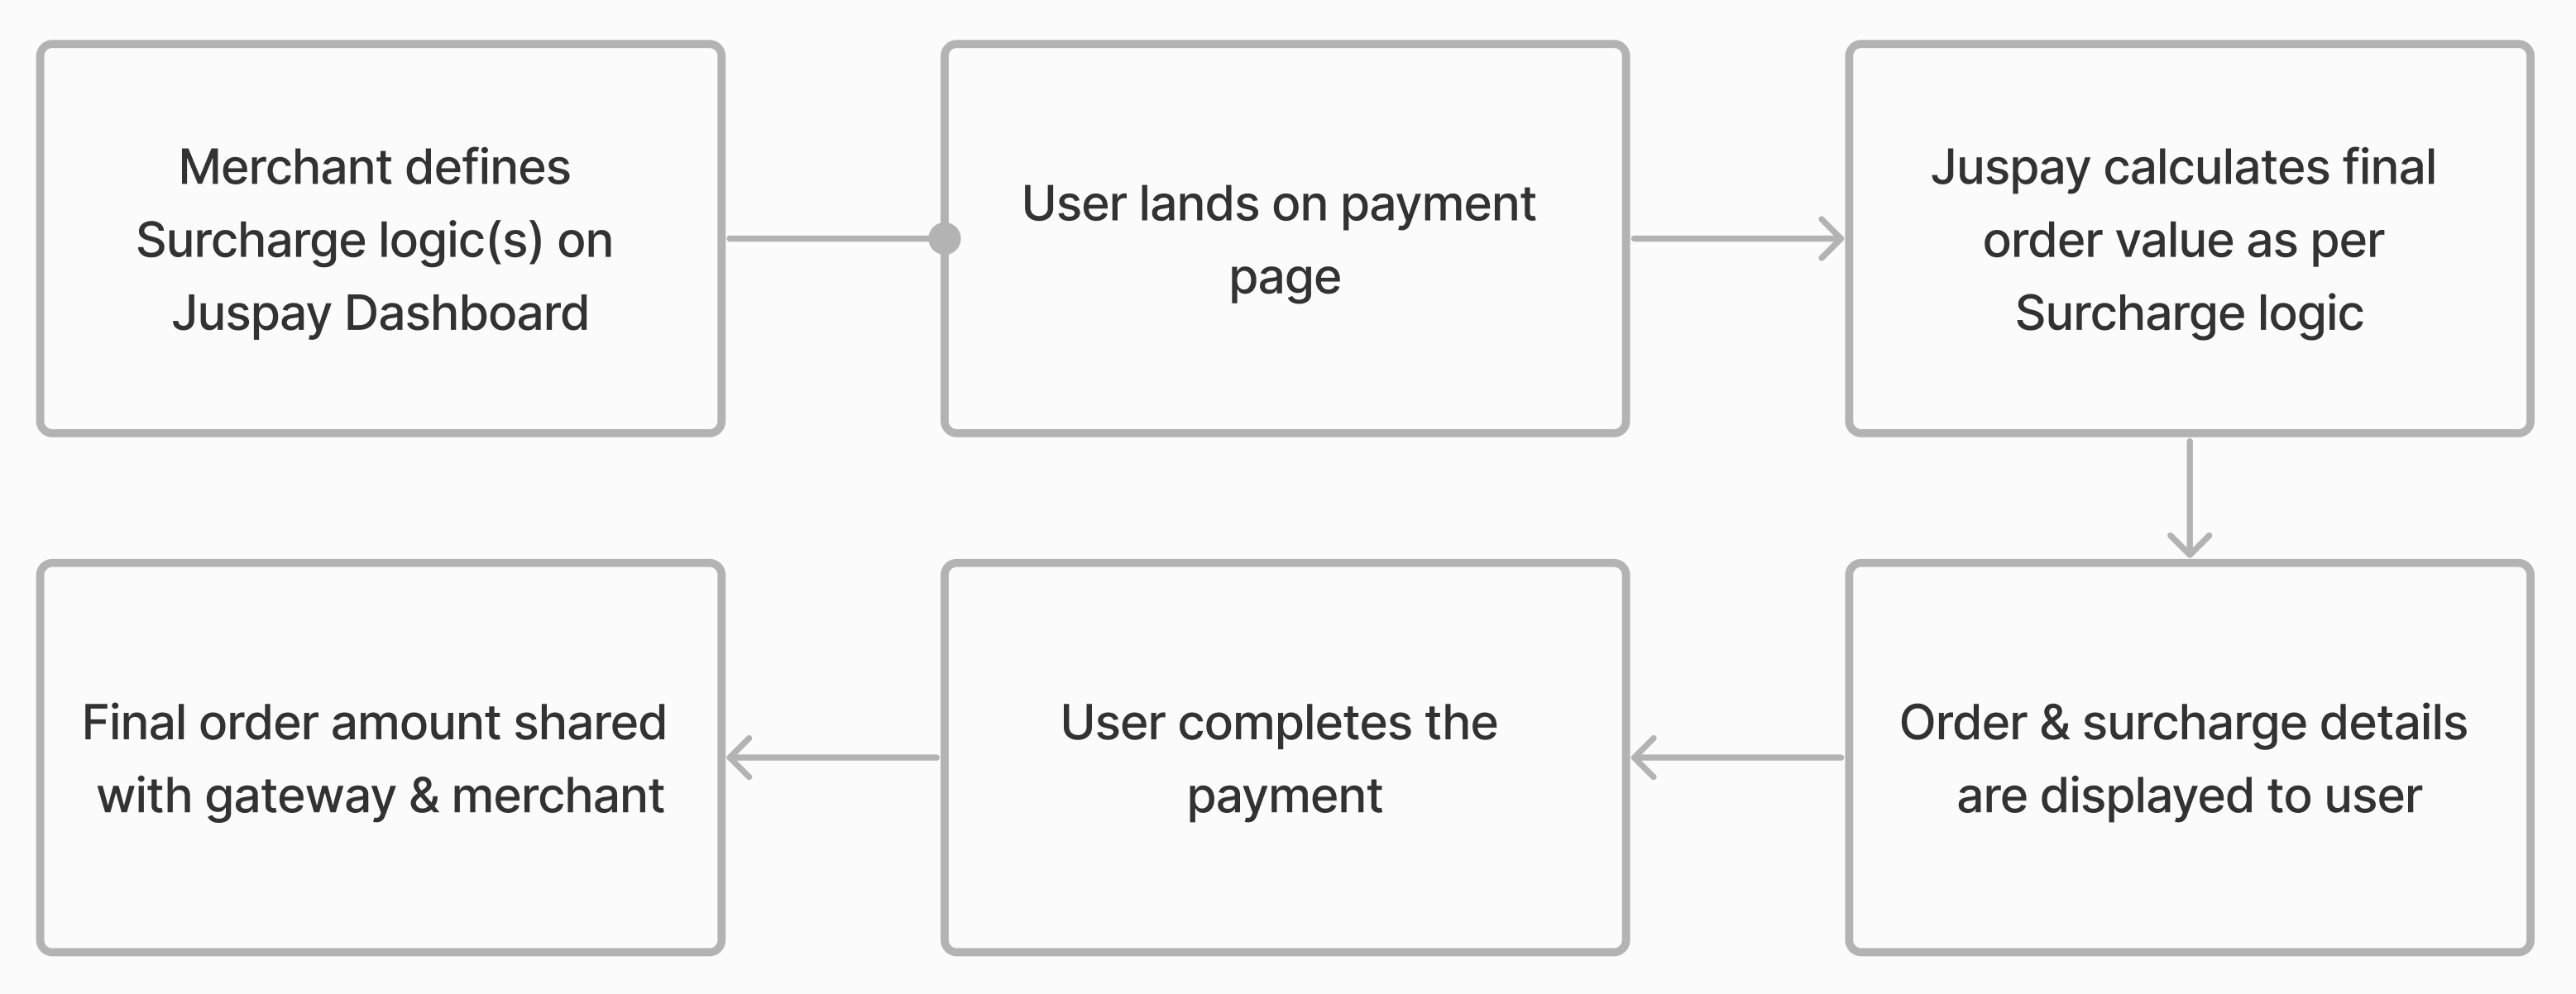
*Surcharge Transaction Flow*
---
## **Accessing the Surcharge Dashboard**
1. To open the Surcharge Logic Dashboard:**Juspay Dashboard → Payments → PG Control Center → Surcharge**
2. Or navigate directly to:**[https://portal.juspay.in/gateways/surcharge](https://portal.juspay.in/gateways/surcharge)**
## **1. Dashboard Overview**
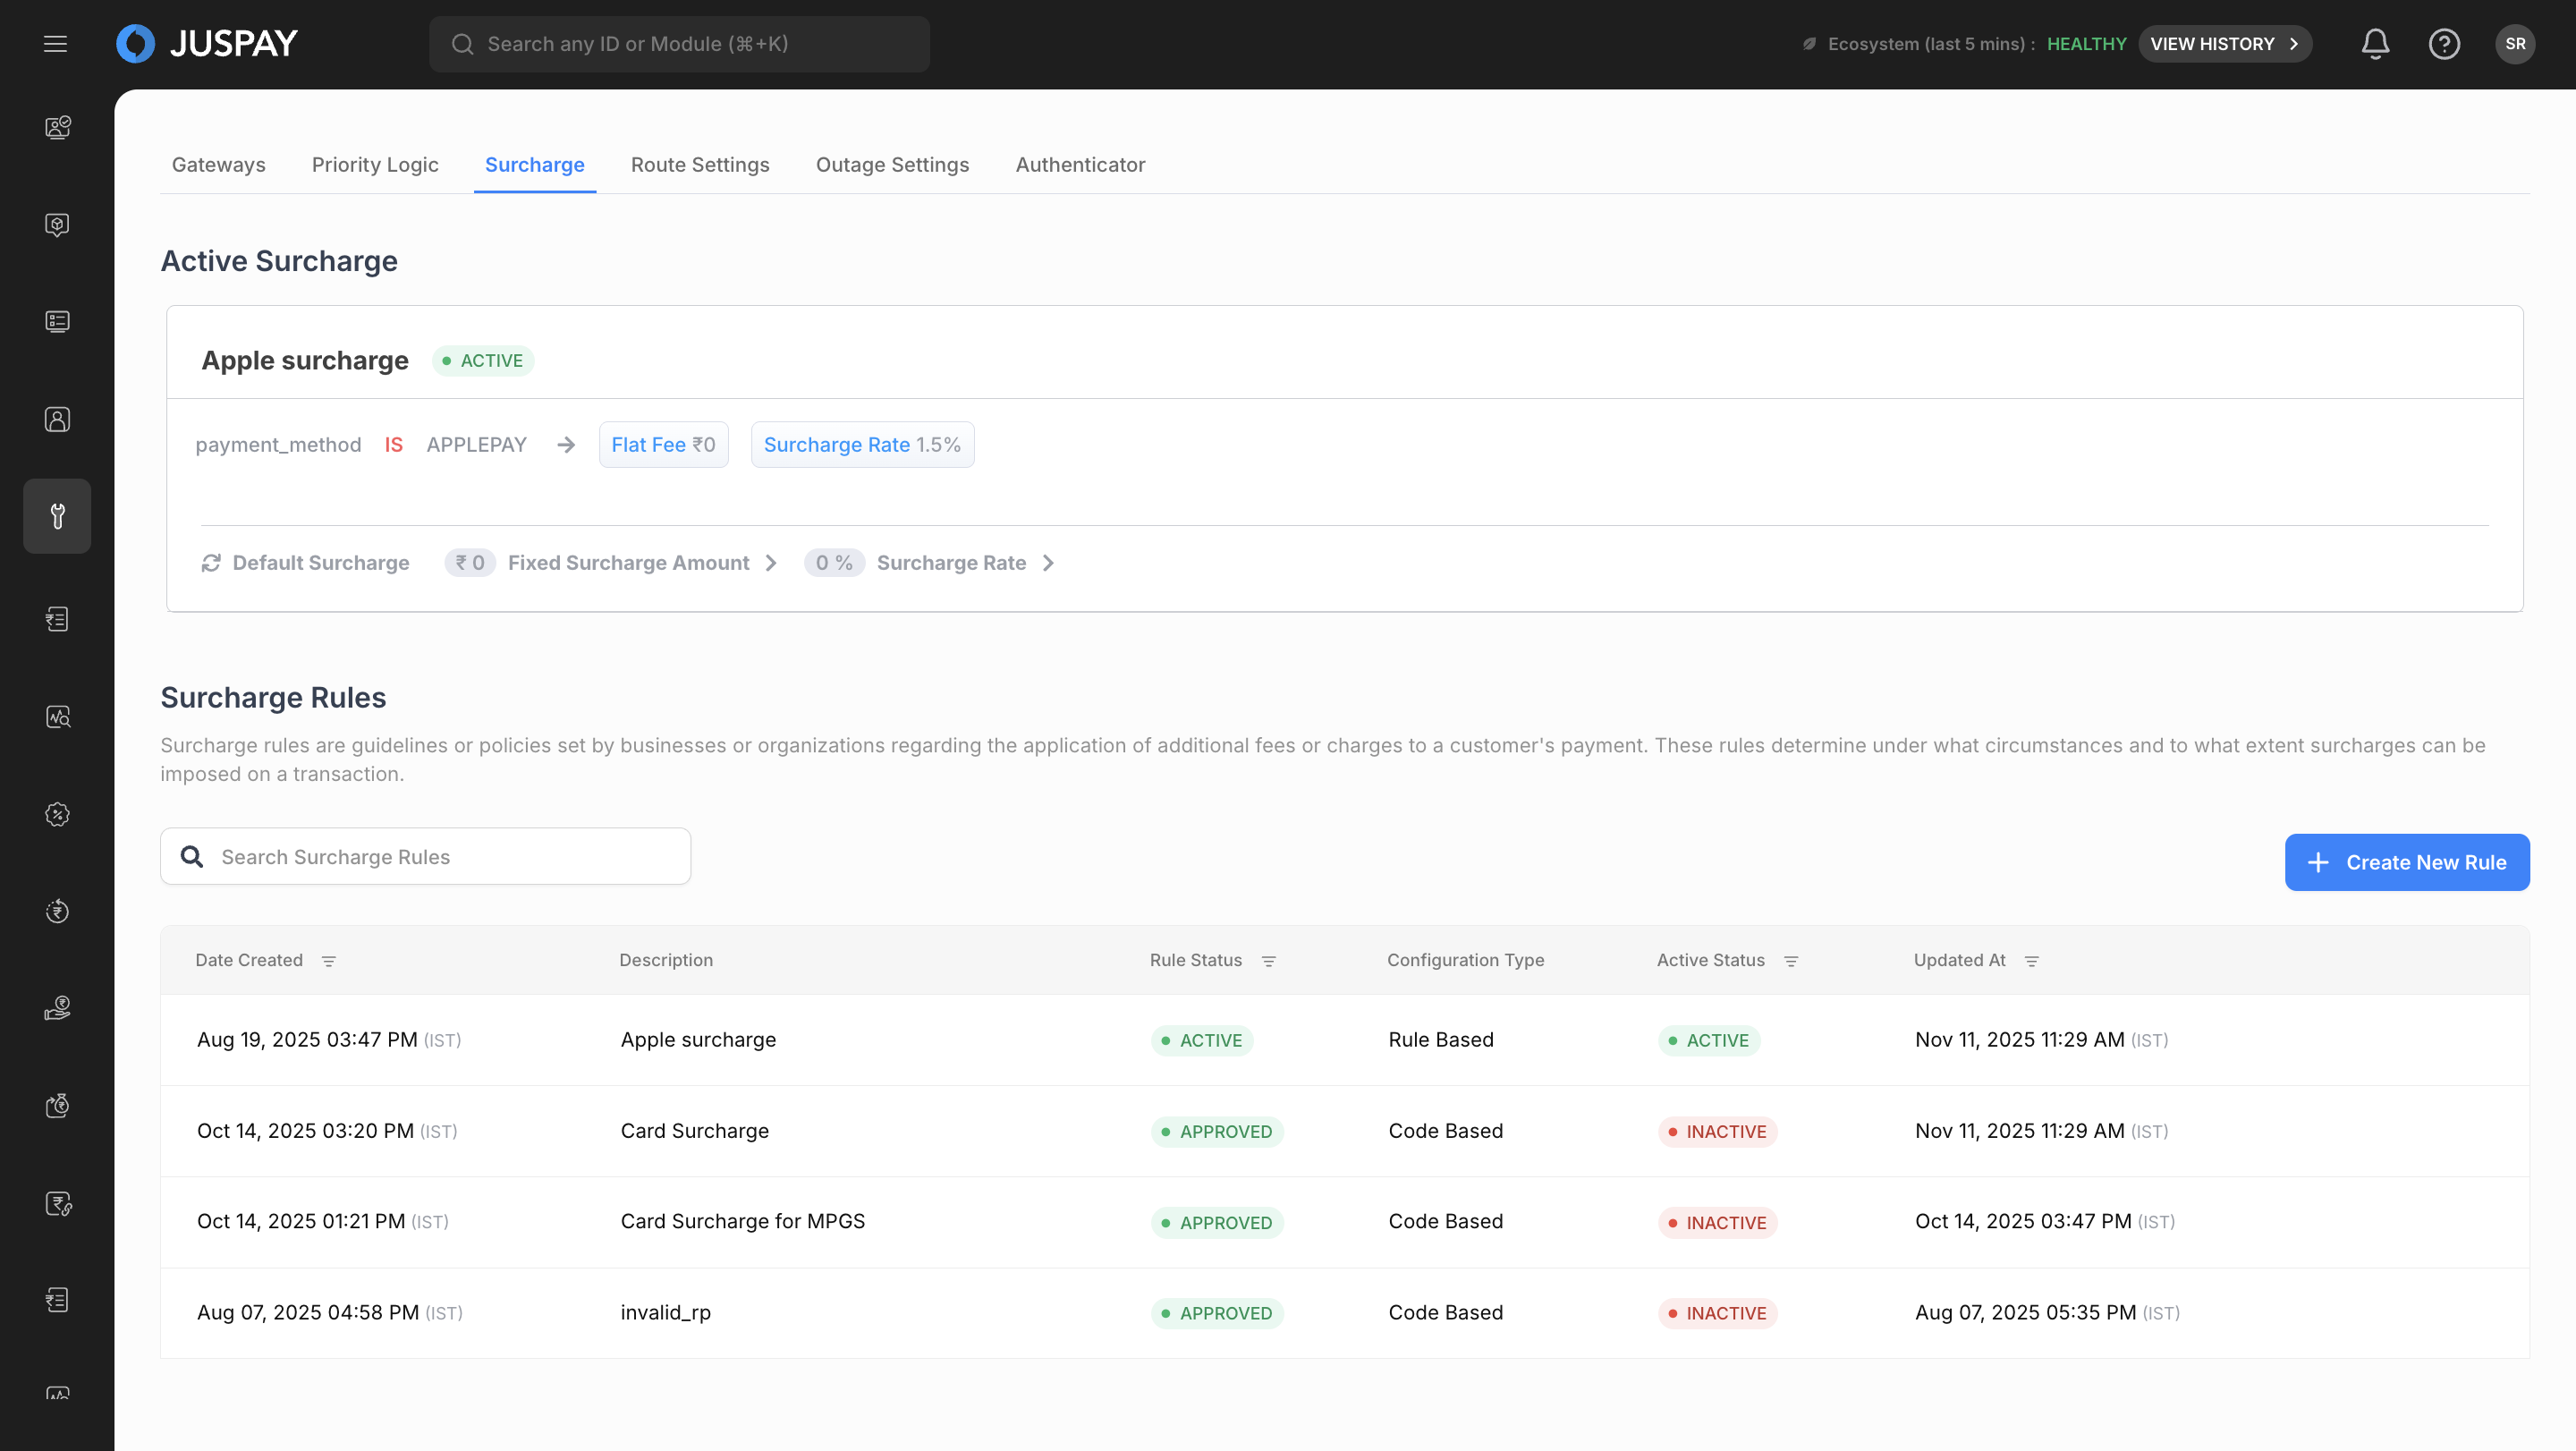
*Surcharge Dashboard*
### **1.1 Active Surcharge Section**
Displays real-time information about the currently active surcharge rule:
* **Active Rule Preview** : Shows configuration details of the active rule.
* **Rule Status** : Indicates if a surcharge rule is active or inactive.
* **Configuration Summary** : Highlights rates, conditions, and rule parameters.
### **1.2 Surcharge Rules Management**
Manage and organize all surcharge configurations through:
* **Rules List** : Displays all surcharge rules with name, status, and creation details.
* **Add New Rule** : Button to initiate new surcharge configurations.
* **Rule Actions** : Edit, copy, delete, or activate/deactivate rules.
* **Search & Filter** : Quickly locate rules by name, type, or condition.
## 2. Creating New Surcharge Rule
You can create **two types of Surcharge Rule** configurations based on your business requirements:
* **Rule-Based:** For visual, condition-driven surcharge setup.
* **Code-Based:** For logic-driven, JavaScript code based surcharge setup.
### 2.1. Rule-Based Surcharge Configuration
The **Rule-Based View** provides a simple, no-code visual interface to define surcharge logic. You can create one or more rules that determine when and how a surcharge should be applied based on transaction fields such as **Card Type** , **Payment Method** , or **Transaction Amount** and more. Follow the steps below to configure a new Rule-Based Surcharge
[Video](https://dth95m2xtyv8v.cloudfront.net/tesseract/assets/dashboard-sea/We%20will%20be%20configuring%20a%20rule%20where%20a%20surcharge%20is%20charged%20for%20credit%20card%20transaction.mp4)
### Step 1 Add a Configuration Name
Enter a descriptive name under **Configuration Name** (max 200 character) to identify your surcharge setup. **For Instance** : CreditCard_Surcharge_2.5%
### Step 2 Define Surcharge Logic
Under **Surcharge Logic** , define one or more rules using the dropdown menus.
**2.1 Select Field**
Choose the parameter on which the surcharge will be applied. For Example:
* **CardType:** e.g., Visa, MasterCard, Amex
* **PaymentMethod:** e.g., Credit Card, UPI, Wallet
* **Amount:** for amount-based conditions
**2.2 Select Operator**
Choose how the condition will be evaluated. The available operators include:
* IS / NOT IS
* IN / NOT IN
* CONTAINS / NOT CONTAINS
* IS NULL / IS NOT NULL
**2.3 Select Value**
Choose or enter the applicable value for your selected field. **For example:**
* **CardType** IS Visa
* **PaymentMethod** IN [CreditCard, DebitCard]
* **TransactionAmount** > 1000
> **Note**
> You can click the **"+" icon** to add multiple rules or conditions.
### Step 3 Configure Surcharge Parameters
For each rule, specify the **surcharge amounts** and **applicable tax rates** :
* **Flat Fee (₹):** Enter a fixed amount to be added to the transaction._Example:_ Enter `25` to apply a ₹25 surcharge on each transaction.
* **Surcharge Rate (%):** Define a percentage of the transaction amount to be applied as a surcharge._Example:_ Enter `2.5` for a 2.5% fee on the total amount.
* **Tax Rate (%):** Add the applicable tax percentage for regulatory compliance._Example:_ Enter `18` to apply an 18% tax on the surcharge amount.
> **Note**
> _You can combine a flat fee and a percentage rate to support mixed surcharge models._
### Step 4 (Optional) Configuring Default Surcharges
If no defined conditions are met, you can set a **Default Surcharge** at the bottom of the screen. This ensures that a fallback surcharge is always applied.
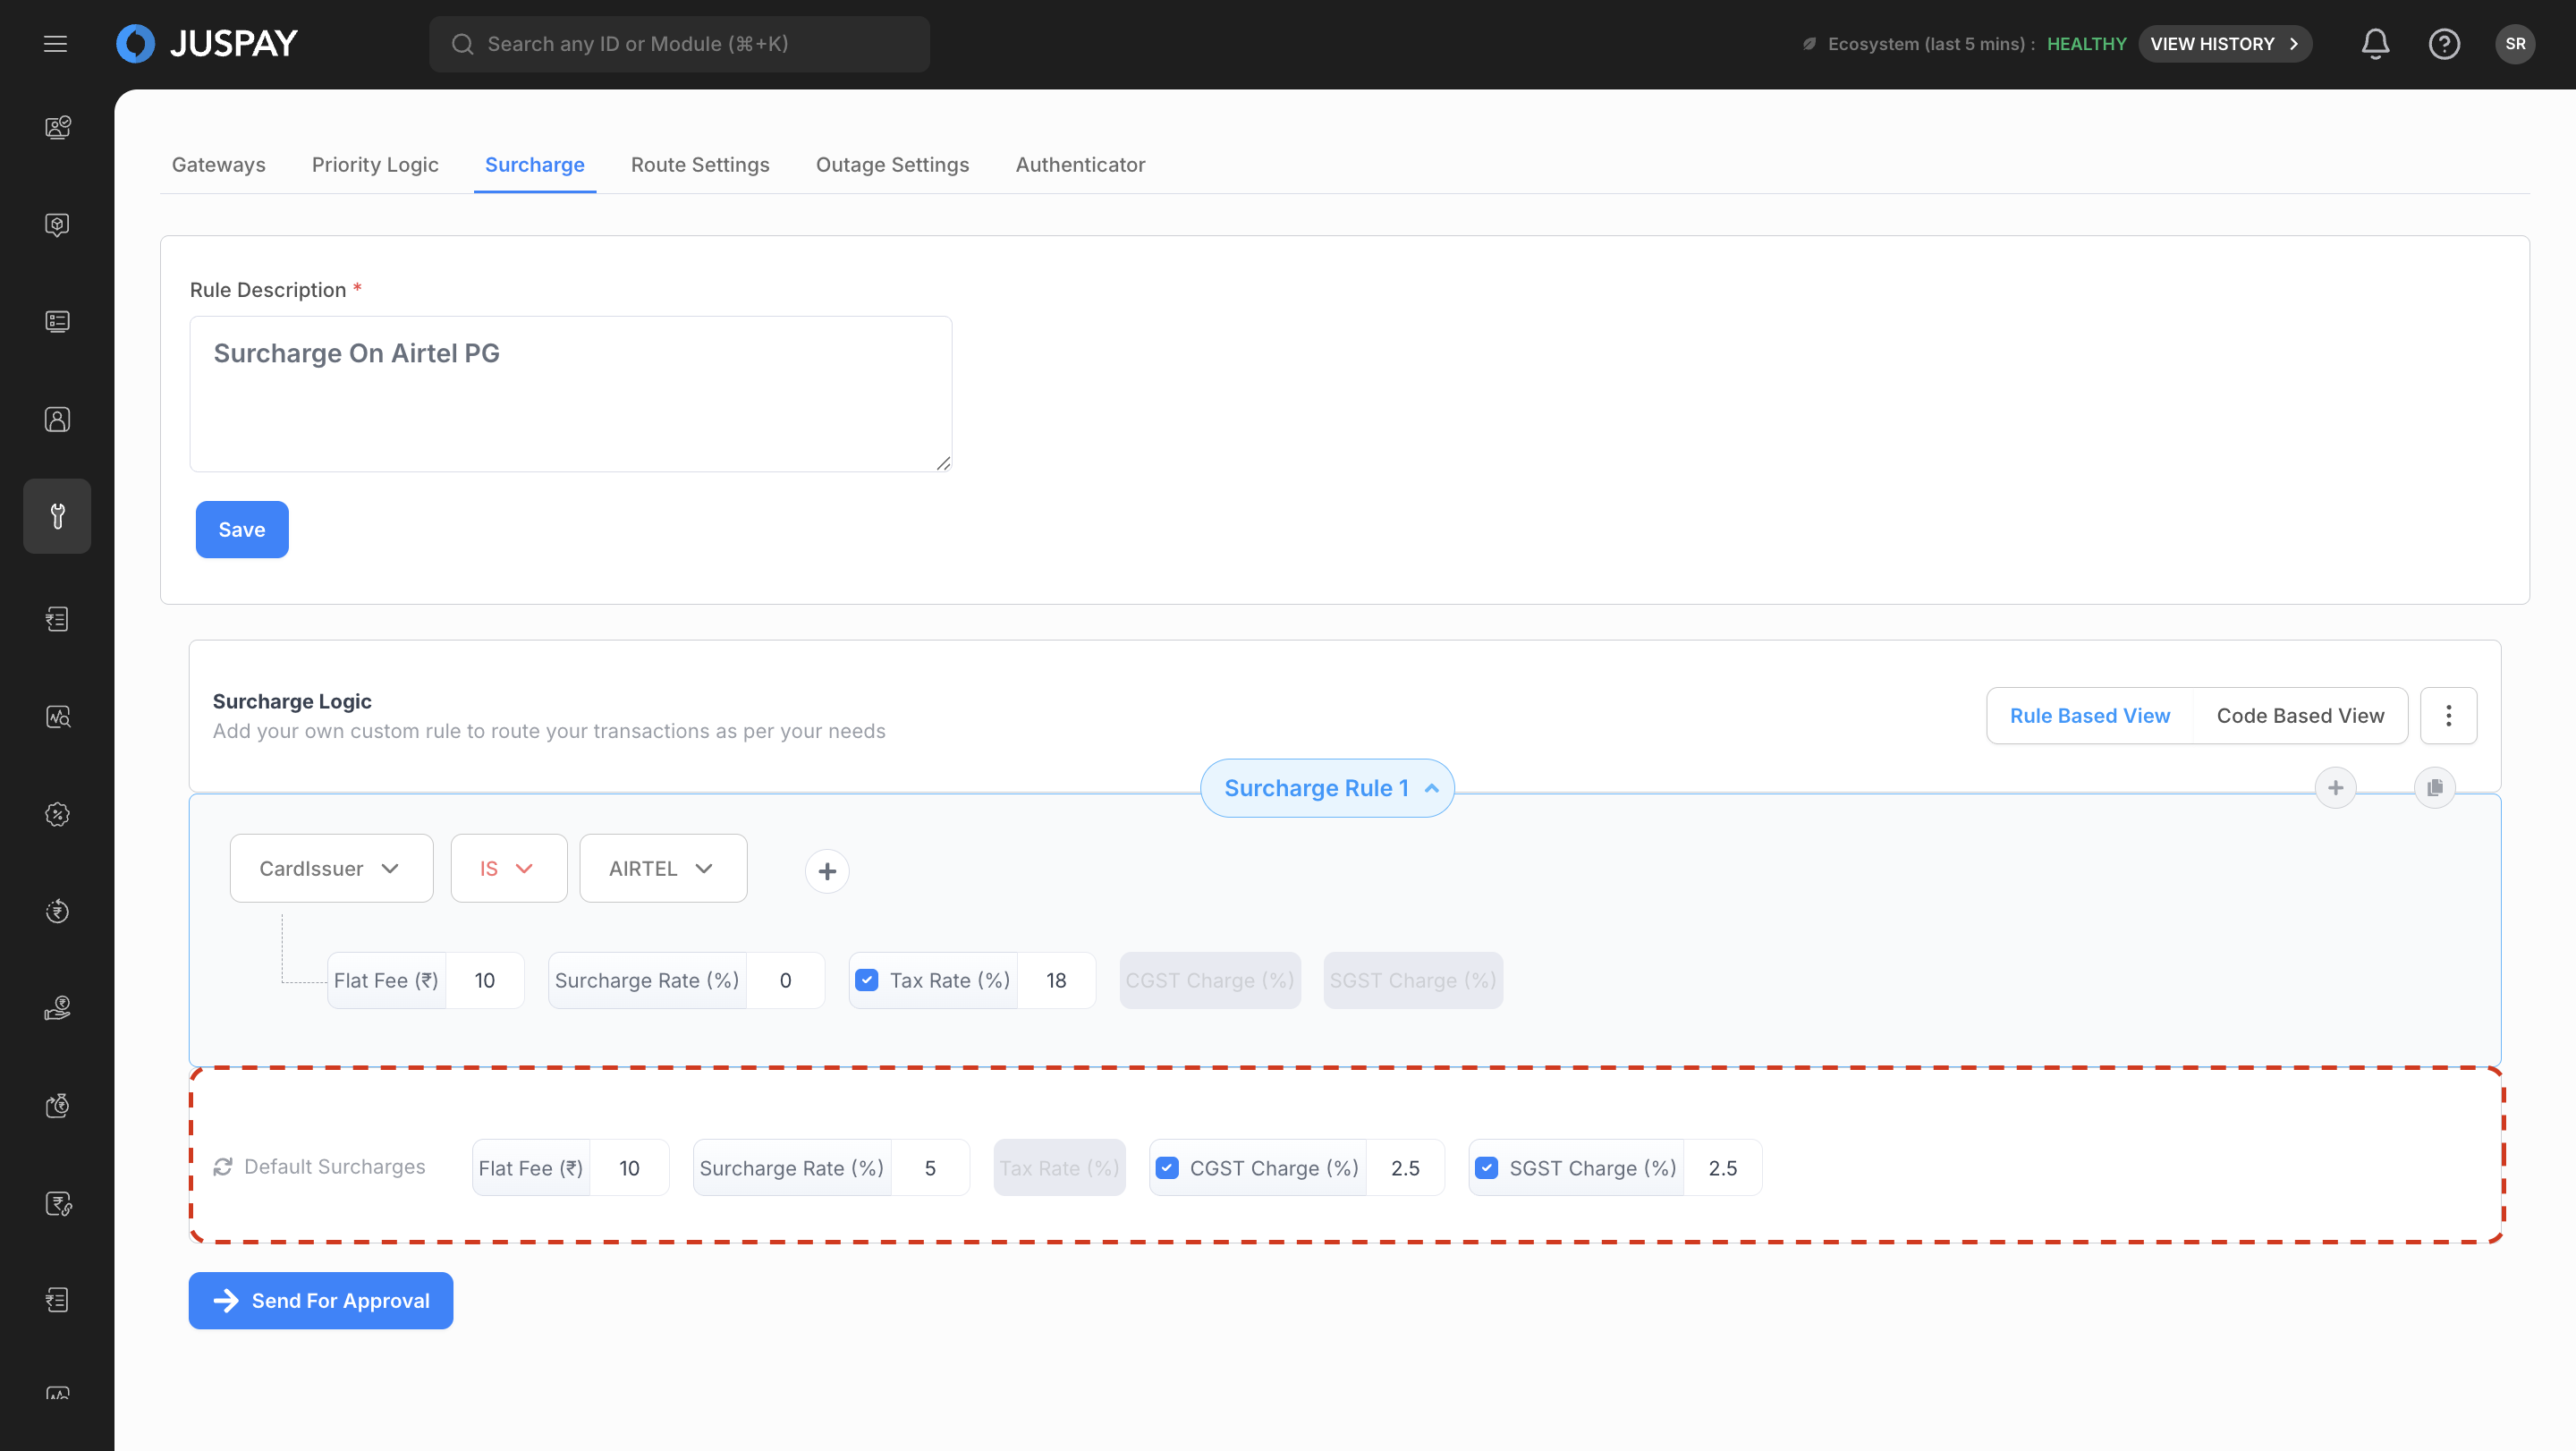
*Default Surcharge Configuration*
### 2.2 Code-Based Surcharge Configuration
The **Code-Based Configuration** provides a **developer-centric interface** where surcharge logic is defined using **JavaScript** . This method allows merchants to create **complex, dynamic, or** data-driven surcharge models that **go beyond standard rule-based conditions.**
[Video](https://dth95m2xtyv8v.cloudfront.net/tesseract/assets/dashboard-sea/To%20share%20a%20rule%20we%20must%20have%20rule%20configured.%20(1).mp4)
You define a **JavaScript function** that determines the surcharge dynamically based on transaction attributes.
#### Cash Surcharge Logic Code Snippet:
```cash surcharge logic
var amount = order_reference.amount;
var is_cash = payment.method_type == "CASH";
var resp = {};
var surcharge_max_amount = 399;
if (is_cash) {
if (amount <= surcharge_max_amount) {
resp.surcharge_rate = 5.2632;
resp.tax_rate = 0;
resp.fixed_surcharge_amount = 40.00;
}
}
resp;
```
## **3. Configuration Validation & Activation**
### **3.1 Validation & Review**
Juspay automatically validates your rule logic as soon as it’s created. The system checks for calculation errors, conflicting conditions, and missing values. Before submitting for approval, review the summary and make sure:
* There are no validation warnings or rule conflicts.
* All surcharge and tax values are accurate.
* The default fallback logic is correctly defined.
### **3.2 Testing**
Before going live, test your rule with different transaction scenarios to confirm that surcharges apply as expected. You can:
* Simulate payments with different amounts or methods.
* Check how taxes are applied for each case.
* Verify that no incorrect surcharge appears during checkout.
### **3.3 Approval & Activation**
If Maker-Checker is enabled, submit your rule for approval once testing is complete. Add any business notes or justification if required.
After approval, choose your activation mode:
* **Immediate Activation:** The rule goes live right away, ideal for urgent updates.
* **Manual Activation:** Keep the rule approved but inactive until you’re ready.
> **Note**
> _Only approved and active rules will be applied to live transactions._